Once you learn how to create a shipping preset in Ordoro, all sorts of combinations are at your fingertips! With just a few simple steps, you can save time and effort by creating preset combinations tailored to your unique shipping needs.
Whether you’re shipping domestically or internationally, dealing with various package sizes or shipping carriers, learning how to set up and utilize shipping presets will revolutionize your fulfillment workflow.
Let’s dive in and unlock the full potential of Ordoro’s shipping presets together!
Other helpful articles:
- How to manage shipping label presets
- Examples of Automation Rules
- How do I print product SKUs on my shipping labels?
Topics
- Standard box sizes for shipping
- Assign specific shipping methods
- Designate Profile / Packing Slip
- Adding packaging material weight
- Setting a Mailing Post Office Zip Code
Standard box sizes for shipping
When shipping items, you have the flexibility to use specific box sizes that suit your needs. To simplify the process, you can predefine the box dimensions, eliminating the need for manual entry each time. For instance, you can set up standard box sizes, and when shipping a package, you can simply select the appropriate preset.
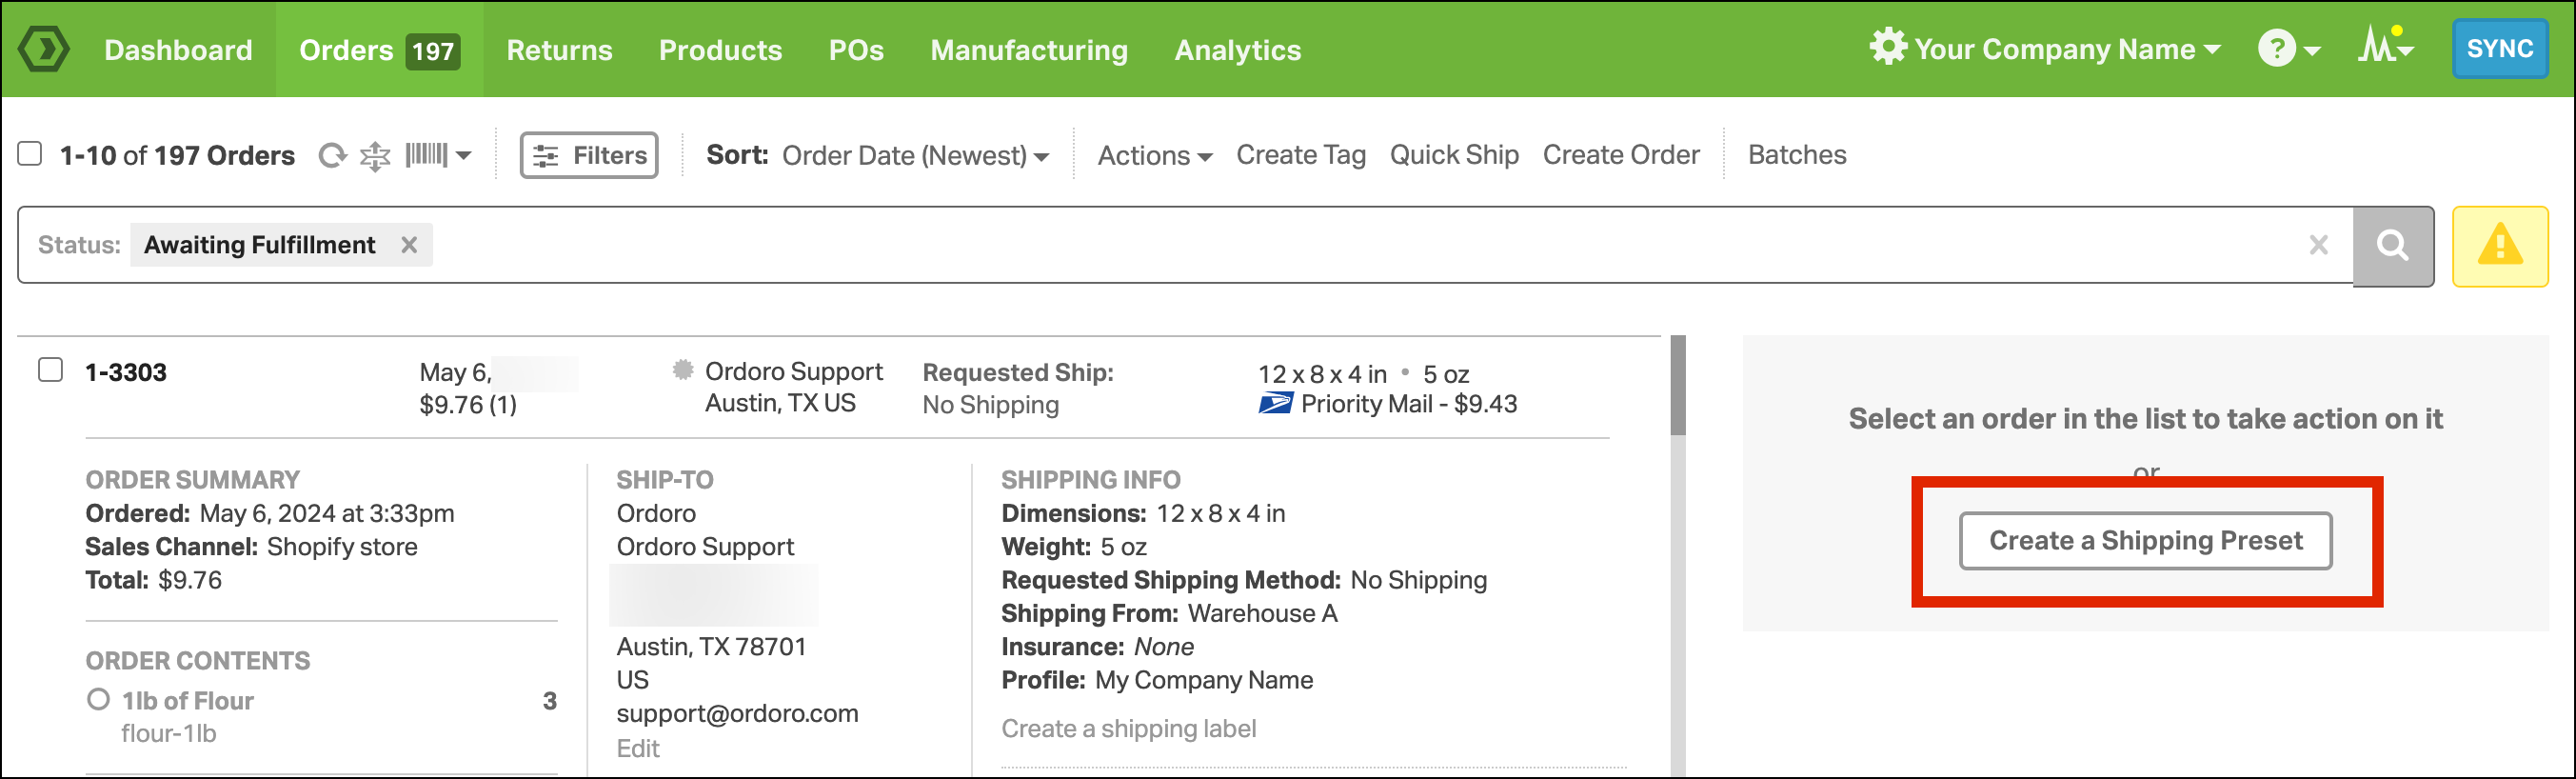
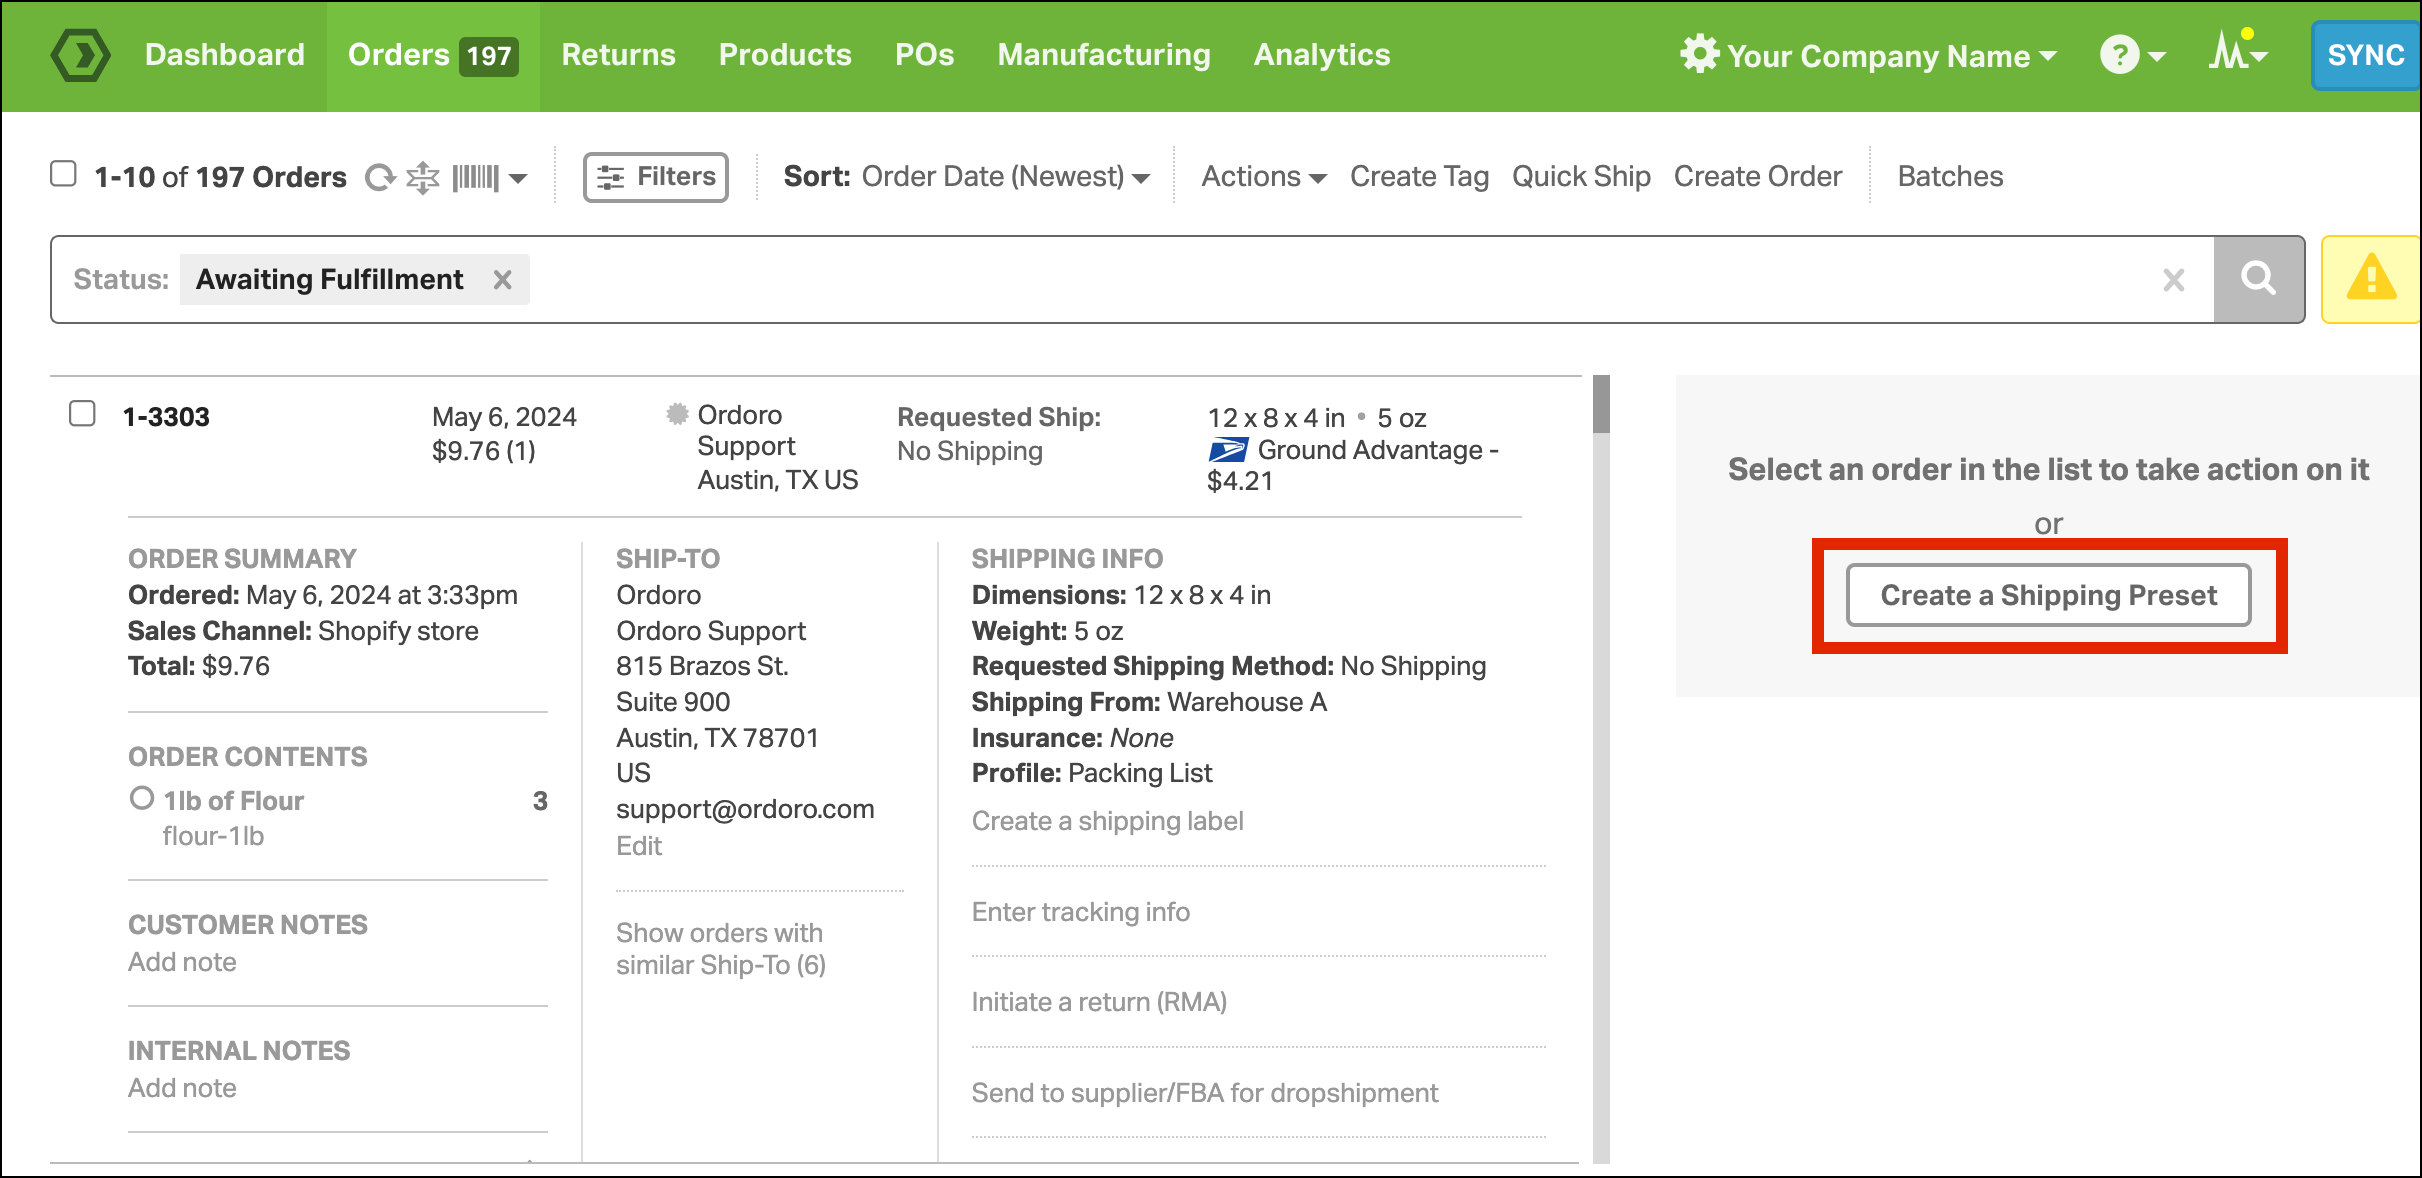
1. On the Orders tab, ensure no orders are selected. Click Create a Shipping Preset.
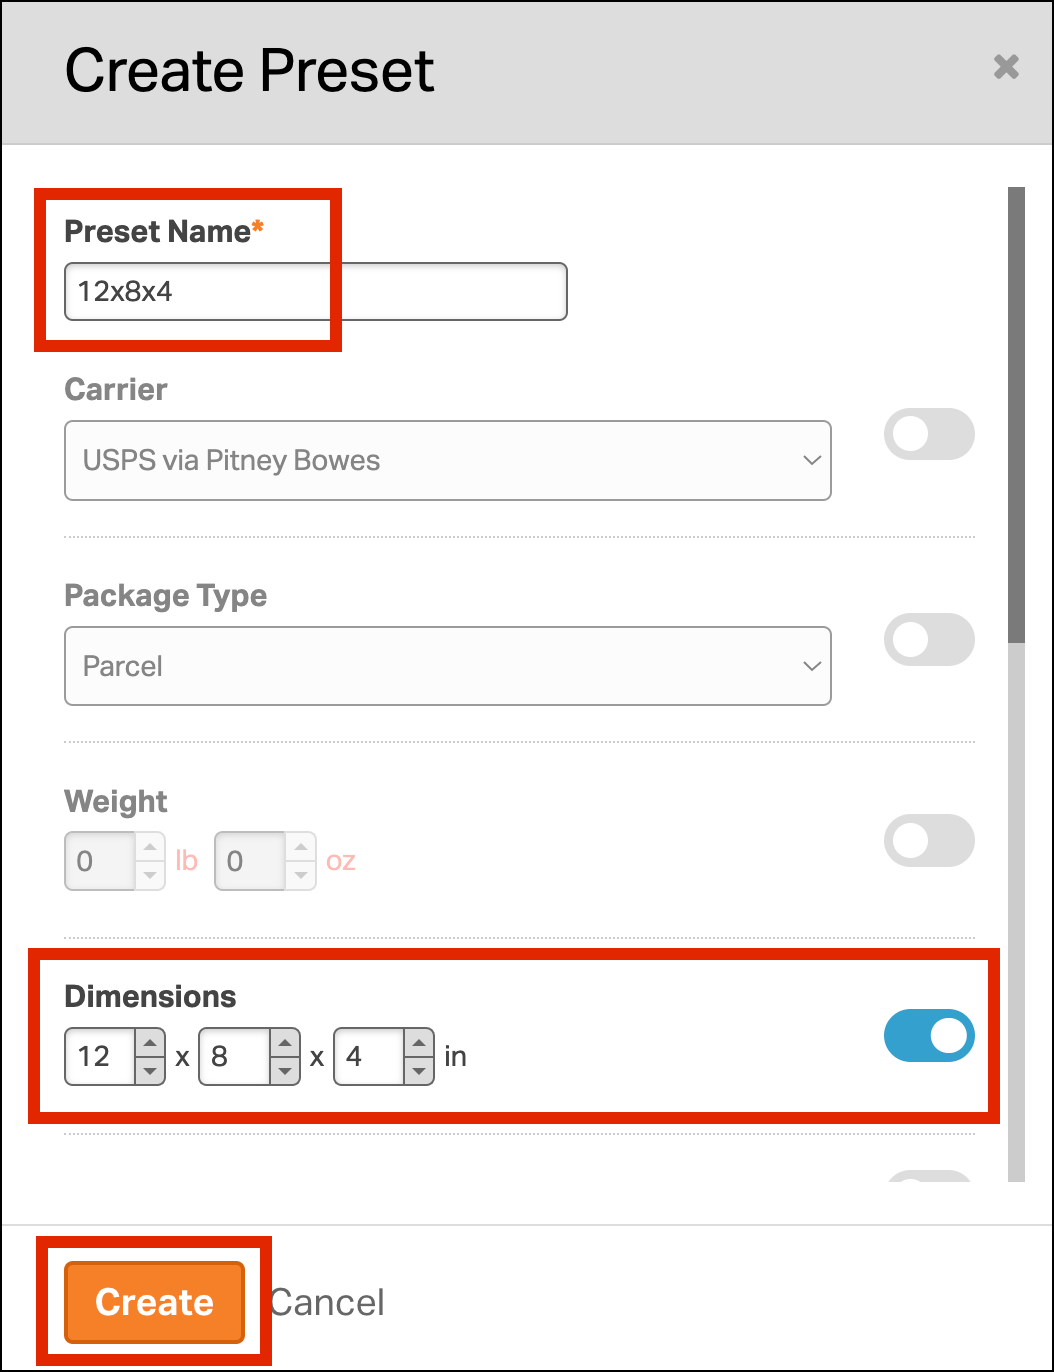
2. In the Create Preset panel, do the following:
- Preset Name: Enter a reference name for this preset (it will show in the Presets dropdown).
- Dimensions: Enable this section and enter the box dimensions. Below we used 12 x 8 x 4.
- Click Create.
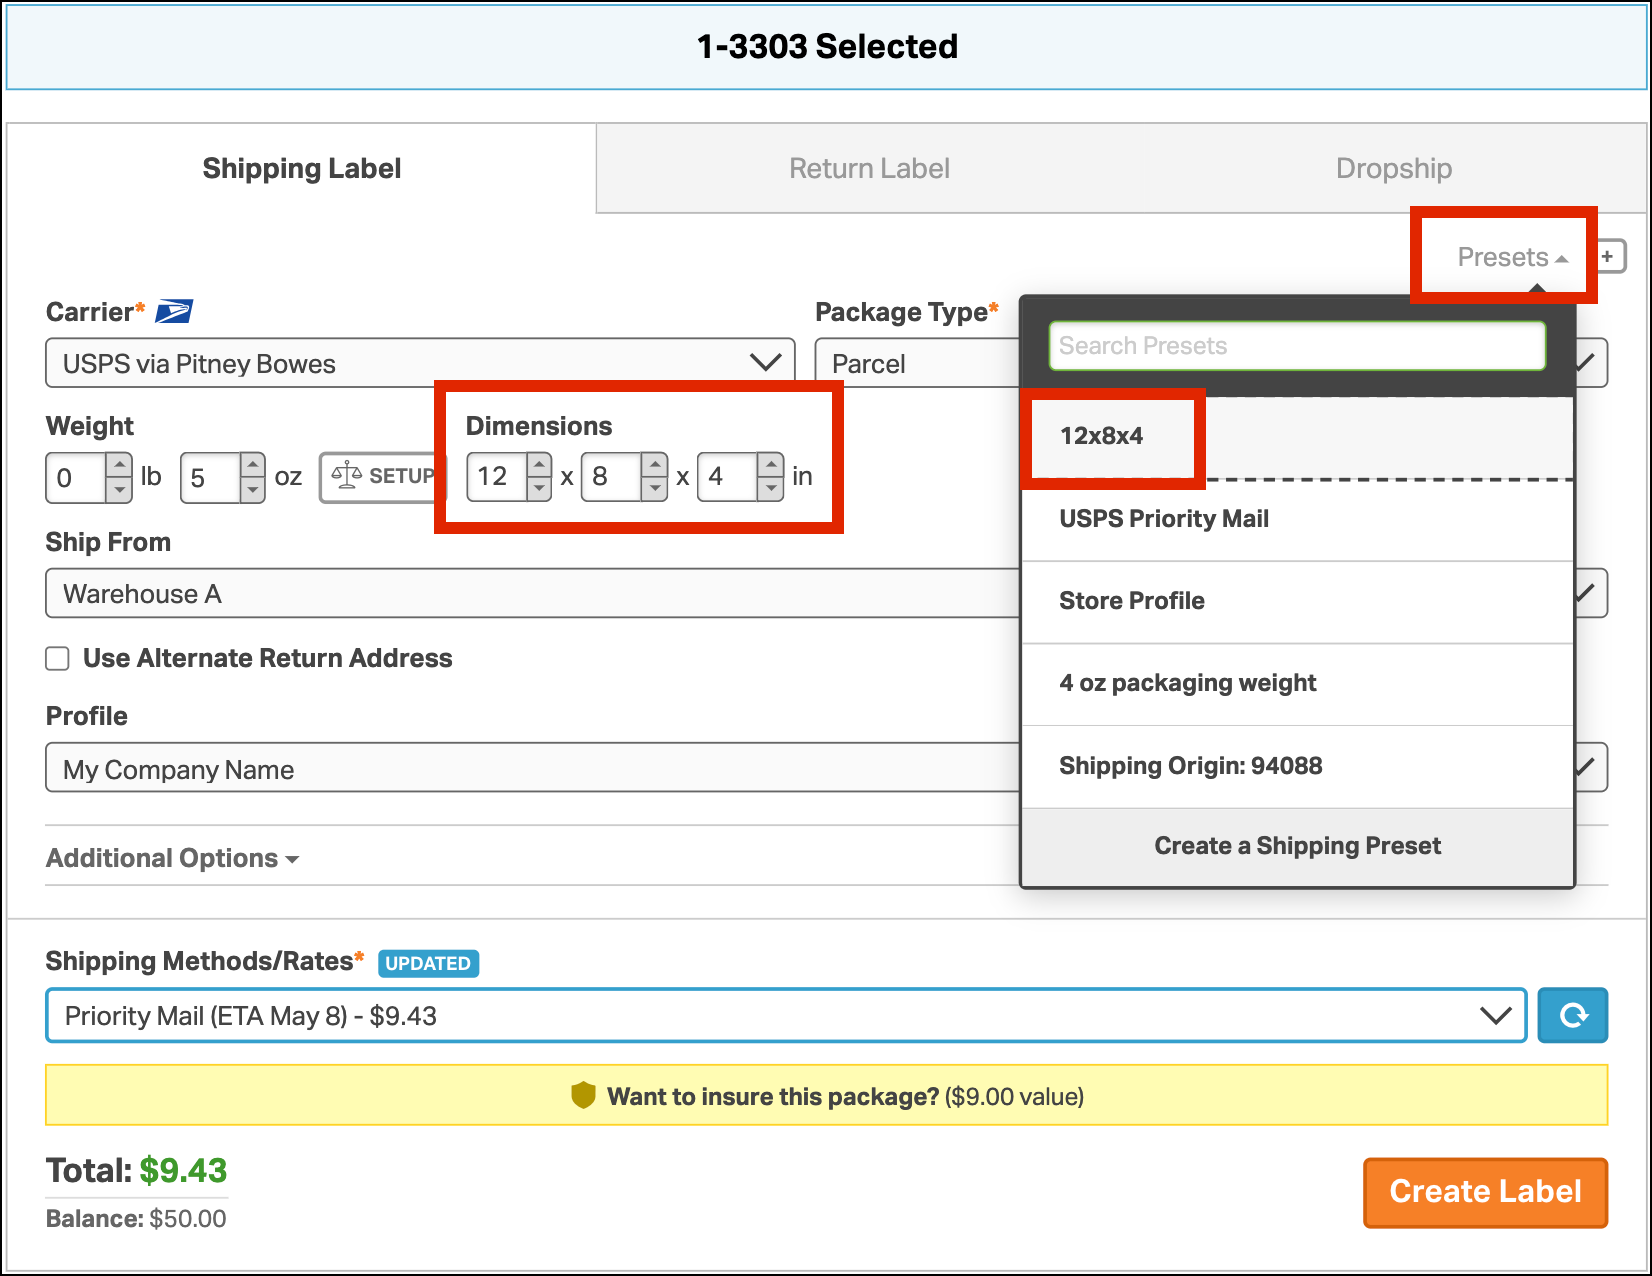
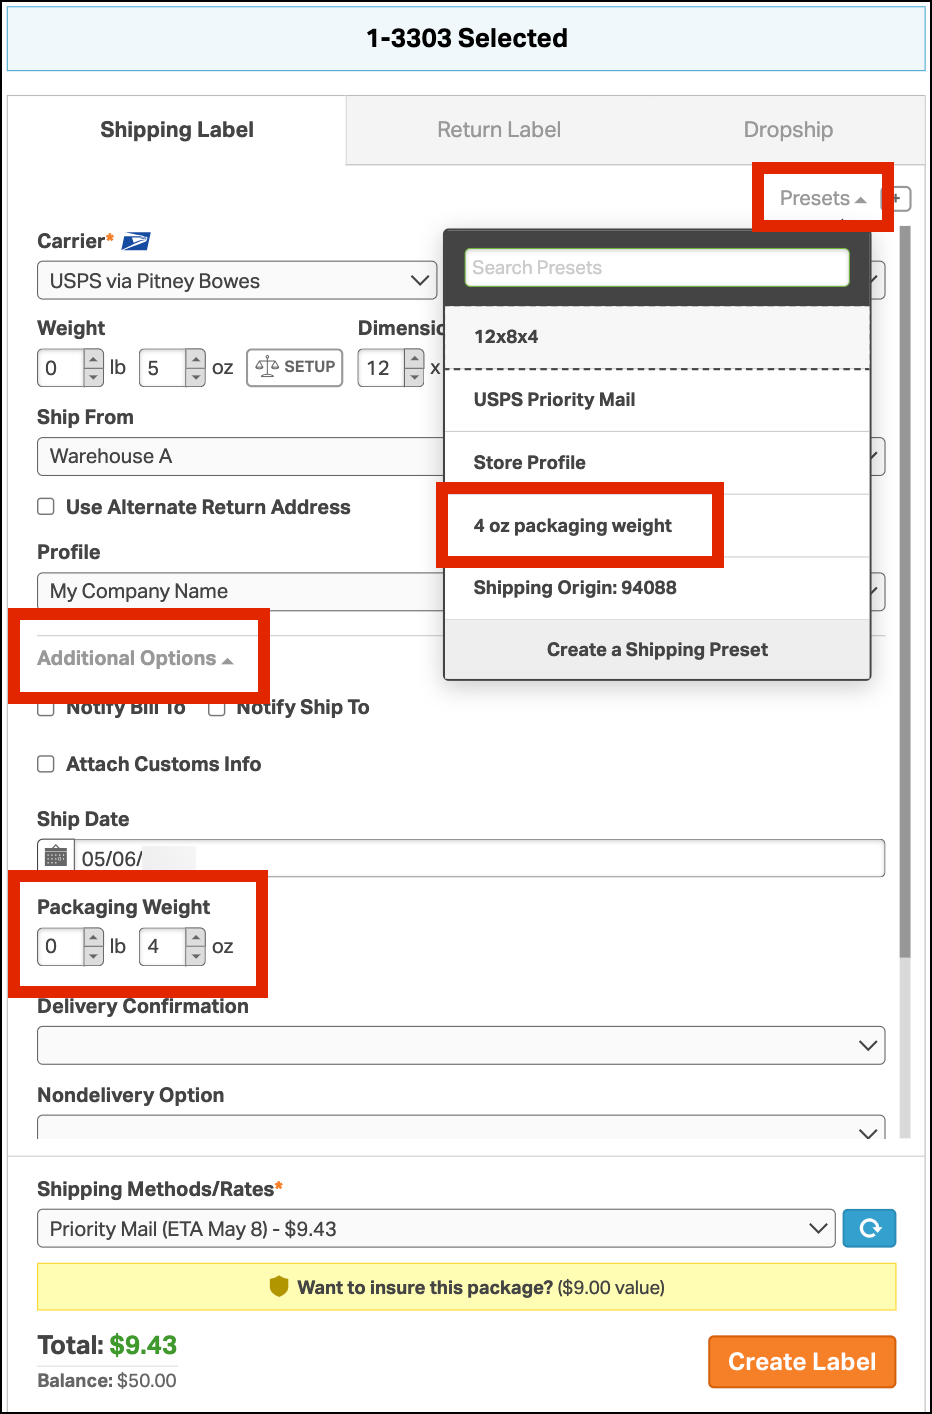
3. Once created, the preset name will appear in the Preset dropdown of the Shipping panel. When it’s applied, the package dimensions will automatically be set.
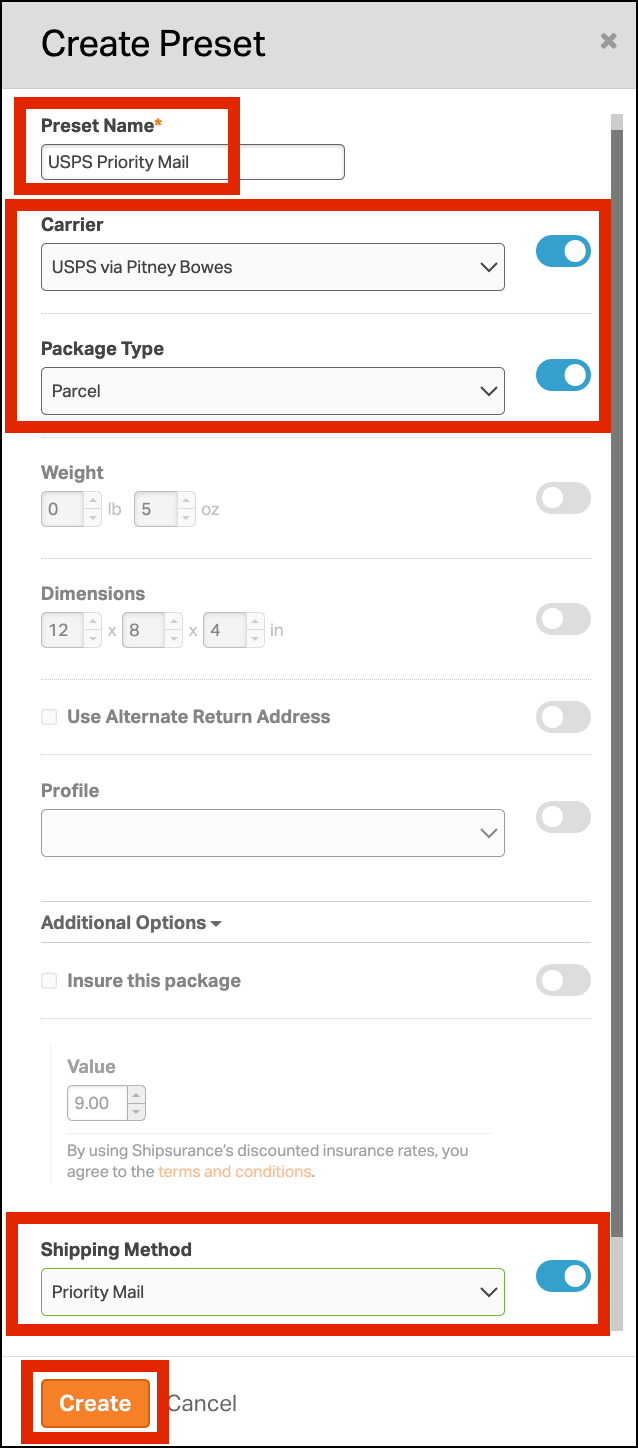
Assign specific shipping methods
You may offer various shipping methods to your customer, such as USPS Priority Mail or FedEx Ground. To simplify the process, you can create and save a preset for these shipping options in Ordoro, making it easy to apply them when needed.
1. On the Orders tab, ensure no orders are selected. Click Create a Shipping Preset.
2. In the Create Preset panel, do the following:
- Preset Name: Enter a reference name for this preset (it will show in the Presets dropdown).
- Carrier, Package Type, and Shipping Method: Enable these sections and enter the information of your preferred shipping method. Below we used USPS Priority Mail.
- Click Create.
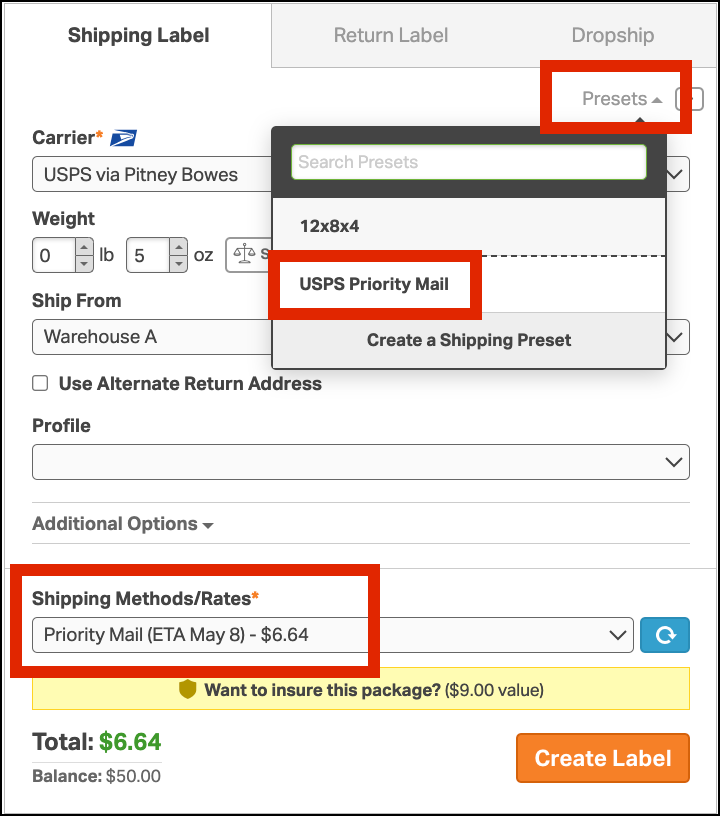
4. Once created, the preset name will appear in the Preset dropdown of the Shipping panel. When it’s applied, the shipping method will automatically be set.
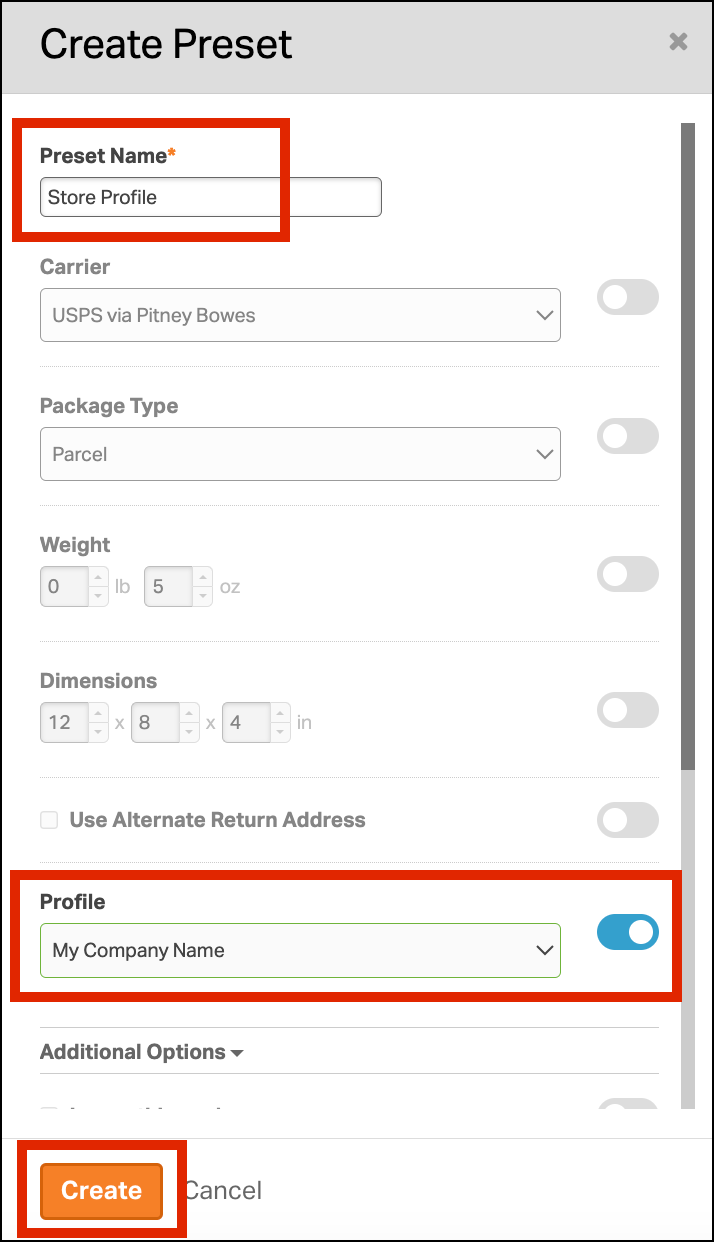
Designate Profile / Packing Slip
When managing your orders in Ordoro, you have the option to assign a Profile to them, either using a preset or based on a specific rule. These Profiles serve as a convenient way to allocate a Packing List Template to the order or assign a Shipper Alias to the label.
1. On the Orders tab, ensure no orders are selected. Click Create a Shipping Preset.
2. In the Create Preset panel, do the following:
- Preset Name: Enter a reference name for this preset (it will show in the Presets dropdown).
- Profile: Enable this section and select the preferred Profile.
- Click Create.
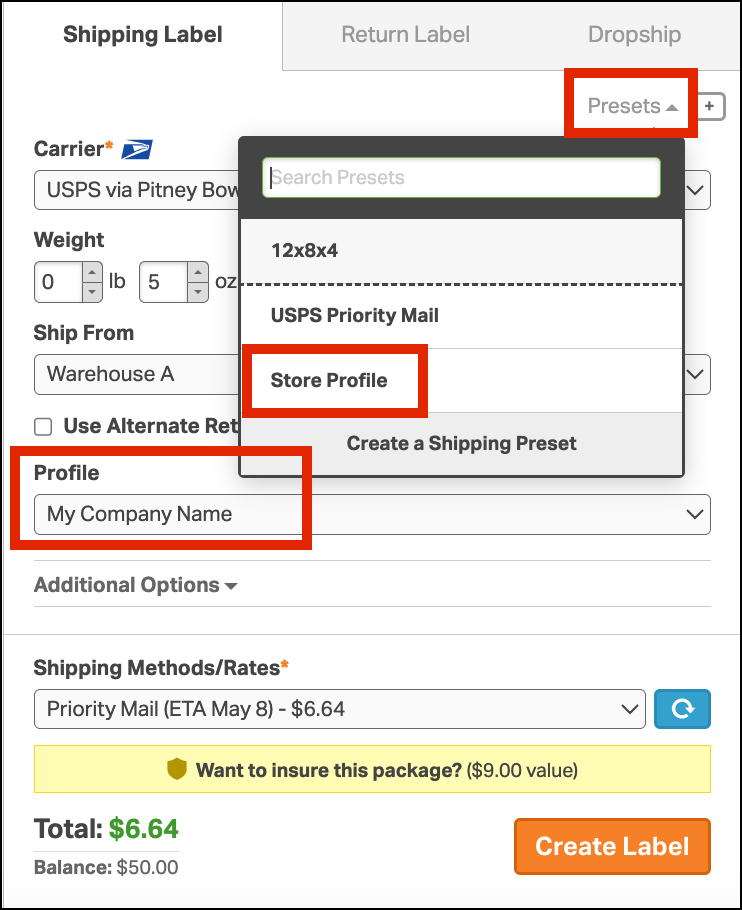
4. Once created, the preset name will appear in the Preset dropdown of the Shipping panel. When it’s applied, the Profile will automatically be set.
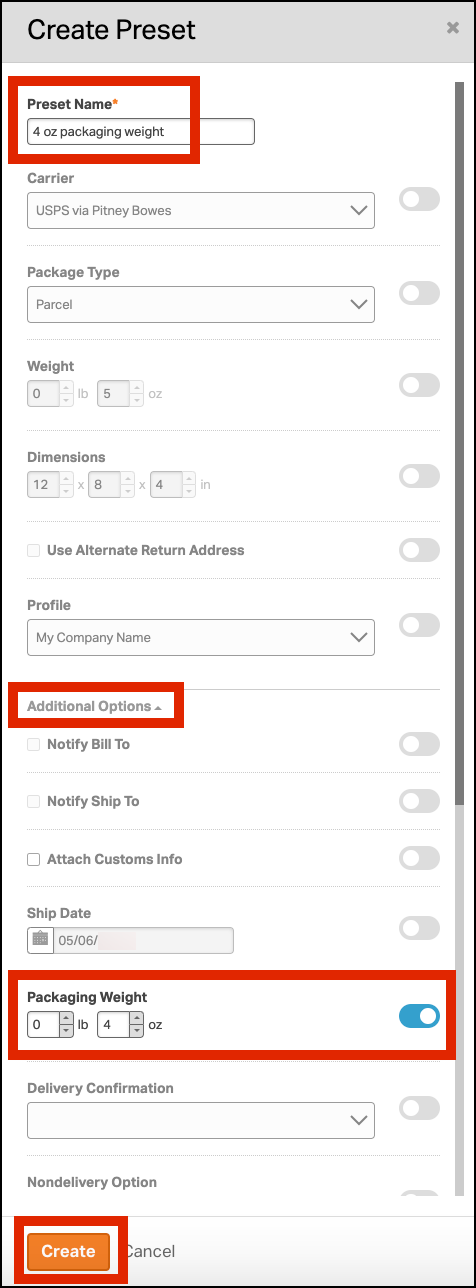
Adding packaging material weight
When shipping items, including the weight of packing materials is important for multiple reasons. It ensures accurate cost estimates, prevents overcharges, and helps stay within weight restrictions set by carriers.
If you know the box and shipping materials always weigh an additional 4 ounces, you can create a preset, which helps ensure the label cost is correct.
1. On the Orders tab, ensure no orders are selected. Click Create a Shipping Preset.
2. In the Create Preset panel, do the following:
- Preset Name: Enter a reference name for this preset (it will show in the Presets dropdown).
- Additional Options: Expand the dropdown menu.
- Packaging Weight: Enable this section and enter the Packaging weight. Below we used 4 ounces.
- Click Create.
4. Once created, the preset name will appear in the Preset dropdown. When it’s applied, the additional packaging weight will automatically be added to the total package weight.
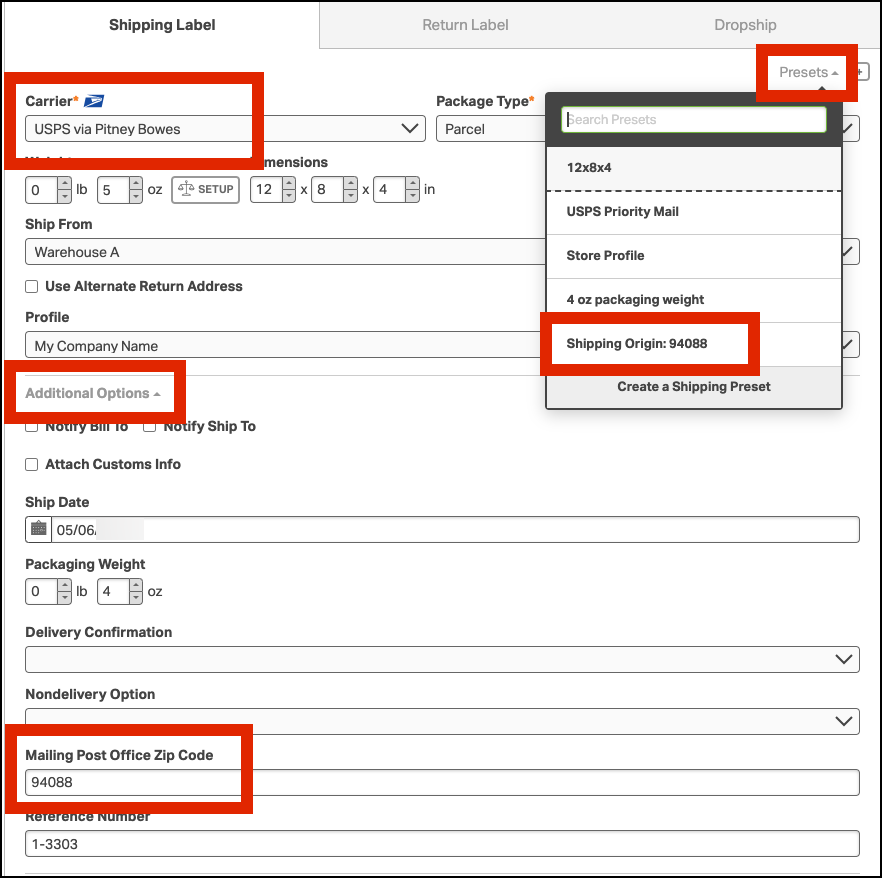
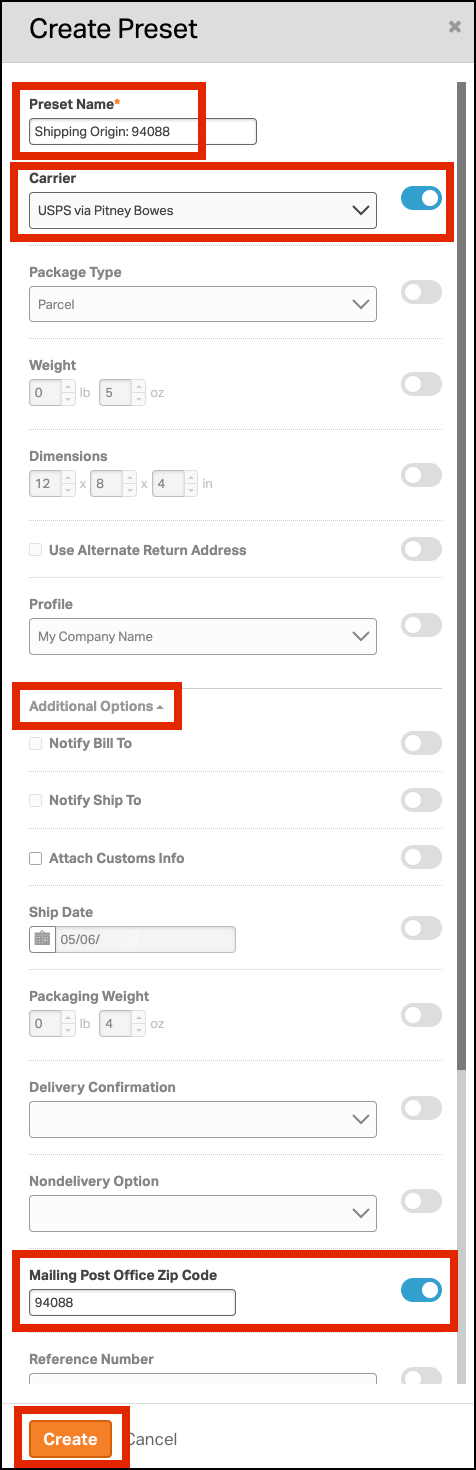
Setting a Mailing Post Office Zip Code
Setting an accurate origin or Mailing Post Office Zip Code for shipping labels is vital. It prevents misdirected packages, ensures correct cost calculations, and avoids disruptions in the shipping process. More details in this help article.
1. On the Orders tab, ensure that no orders are selected. Click Create a Shipping Preset.
2. In the Create Preset panel, do the following:
- Preset Name: Enter a reference name for this preset (it will show in the Presets dropdown).
- Carrier: Enable this section and select the shipper.
- Additional Options: Expand the dropdown menu.
- Mailing Zip Code: Enable this section and enter the Mailing Post Office zip code.
- Click Create.
4. Once created, the preset name will appear in the Presets dropdown of the Shipping panel. When it’s applied, the shipping origin will automatically be set.