Discover the magic of Ordoro! Learn how to set up Automation Rules to simplify your shipping processes and boost efficiency.
We’re excited to share a few popular examples that have transformed our customers’ shipping experience. Get ready to elevate your operations and take your business to new heights with automation rules!
Other helpful articles:
- How do I set up Automation Rules?
- How to manage shipping label presets
- How do I automatically add insurance to my high-value packages?
- Is it possible to reapply rules to existing Ordoro orders?
Topics
- Set a default shipping carrier
- Tag orders by item count
- Assign orders to a warehouse based on the destination address
- Mark POS orders and/or digital orders as shipped
- Apply Preset based on Order Weight
- Tag orders by Requested Ship Method
- Apply Preset by Requested Ship Method
- Tag orders with PO Box address
- Tag orders to check Customer Notes
- Tag orders by Internal Notes
- Apply Preset based on slower shipping to nearby states
- Tag VIP customers
- Tag Orders with Preordered or Presale products
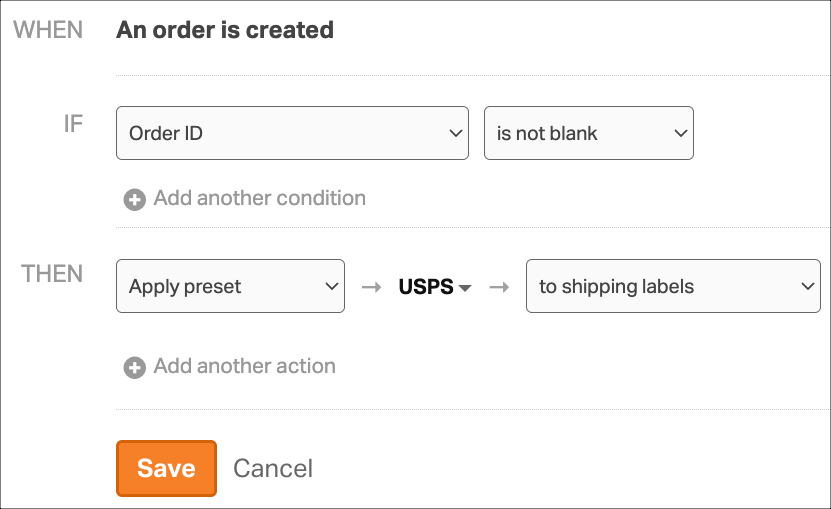
Set a default shipping carrier
When you create your initial shipping carrier in Ordoro, it will automatically be applied to all new orders. If you’d like to set a different default carrier, create the rule below.
- For the IF statement, set Order ID and is not blank.
- For the THEN statement, choose the preset for the carrier you’d like to use.
- Click Save.
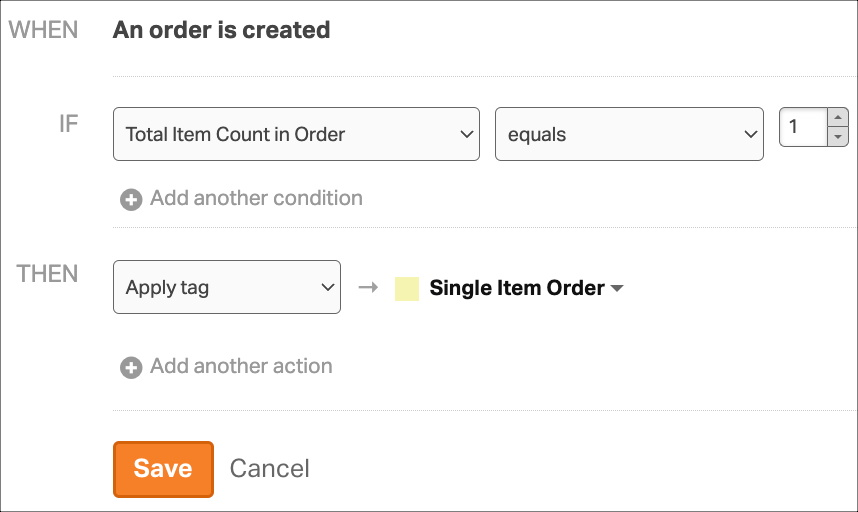
Tag orders by item count
Use this example rule to tag orders with a single item count as “Single Item Order.” Easily filter these orders using the Tag filter on the Orders tab.
- For the IF statement, select the Total Item Count in Order equals 1.
- For the THEN statement, select Apply tag and then select or create an order tag from the dropdown.
- Click Save.
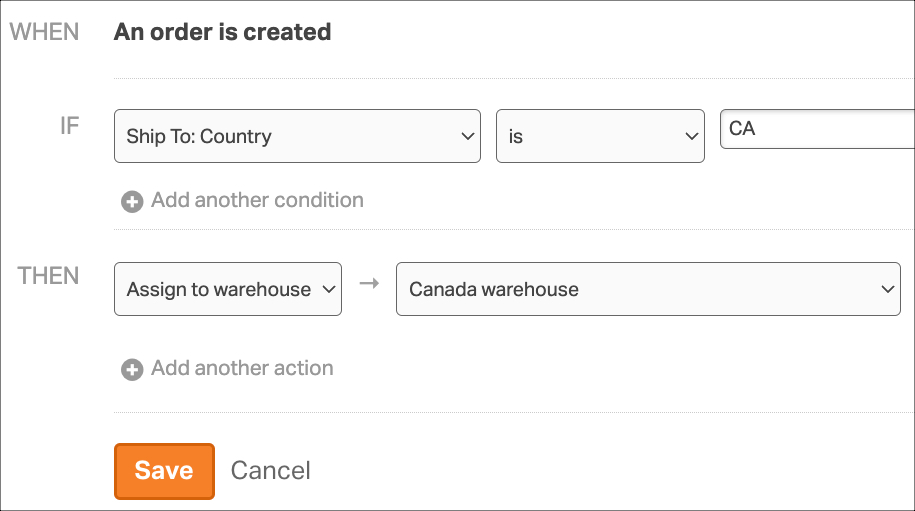
Assign orders to a warehouse based on the destination address
Orders are usually assigned to the Default Warehouse, but automation rules can assign a different Warehouse based on the Ship-To address State or Country Code.
- For the IF statement, select the Ship-To: Country and enter the two-character country code.
- For the THEN statement, select Assign to warehouse and then select a Warehouse from the dropdown.
- Click Save.
The example rule below assigns all orders shipping to Canada (CA) to the Canada Warehouse.
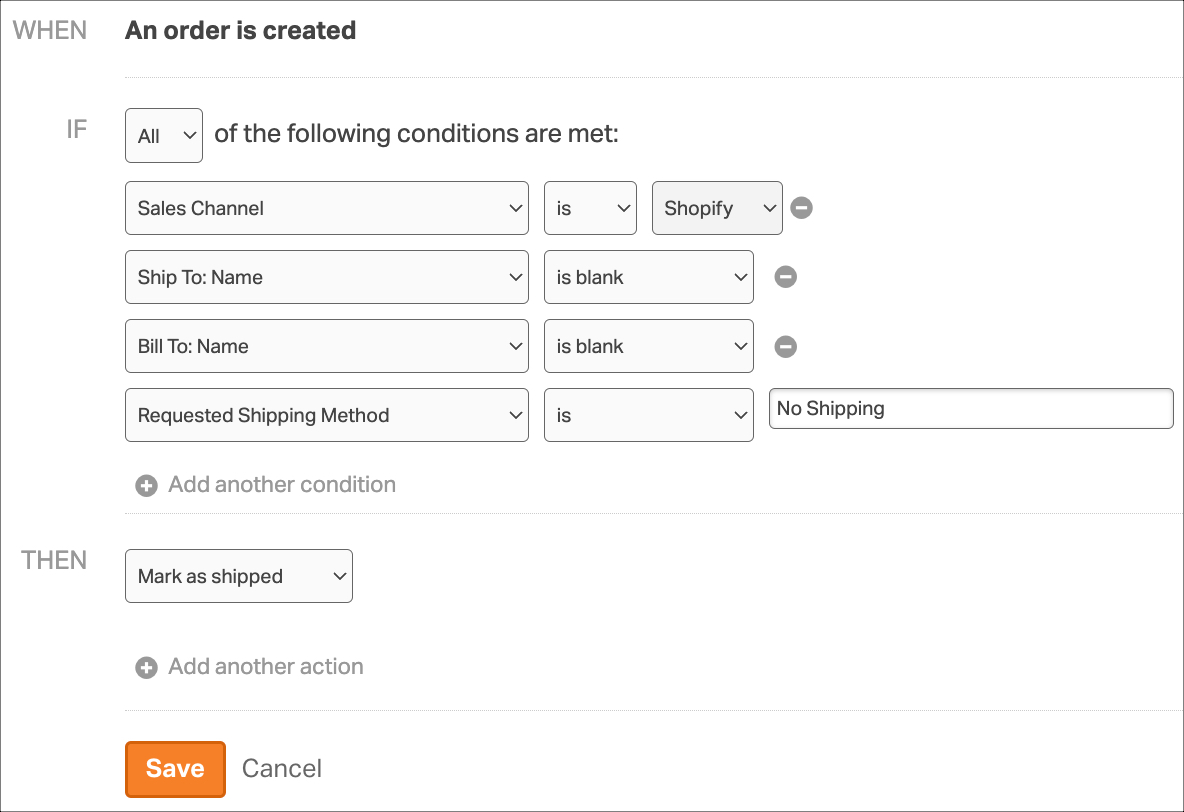
Mark POS orders and/or digital orders as shipped
Orders not requiring shipping can be immediately by Marked as Shipped upon import into Ordoro. This applies to digital orders or Point of Sale (POS) orders that necessitate inventory deduction.
- For the IF statement:
- Select the Sales Channel where the POS orders originate.
- Add other distinguishing features of your POS orders. In the example below, these Shopify orders import without a Ship To or Bill To Name and the Requested Shipping Method is always “No Shipping.”
- For the THEN statement, select Mark As Shipped.
- Click Save.
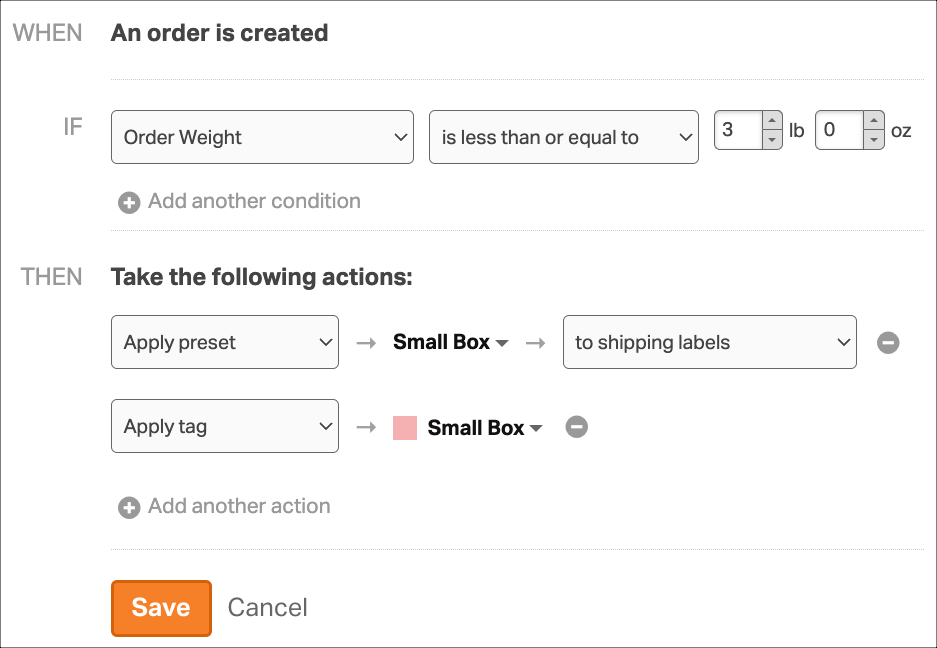
Apply Preset based on Order Weight
Using this example rule, any orders imported with an Order Weight less than or equal to 3 lbs will automatically have the Small Box preset applied and tagged as “Small Box.”
See here how to create a preset for box sizes.
- For the IF statement, select Order Weight, choose the best inequality relation then enter the specified weight.
- For the THEN statement, select Preset and then choose the desired preset from the dropdown.
- Click Save.
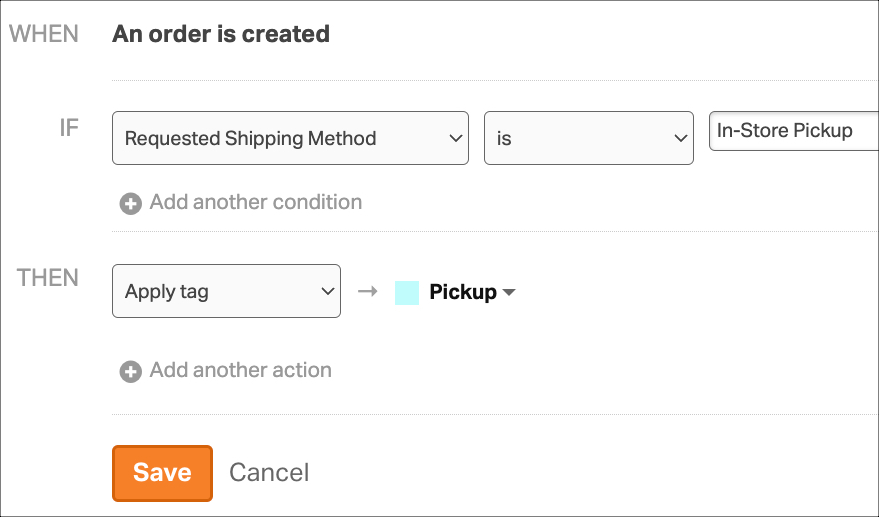
Tag orders by Requested Ship Method
This example rule applies the “Store Pickup” tag to all orders that import with a Requested Shipping Method of Store Pickup.
- For the IF statement, select Requested Shipping Method, choose the best condition from the dropdown, then enter the specific Shipping Method.
- Note: This field is case-sensitive.
- Enter the Shipping Method exactly as it would import from your sales channel.
- For the THEN statement, select Apply tag and then select or create an order tag from the dropdown.
- Click Save.
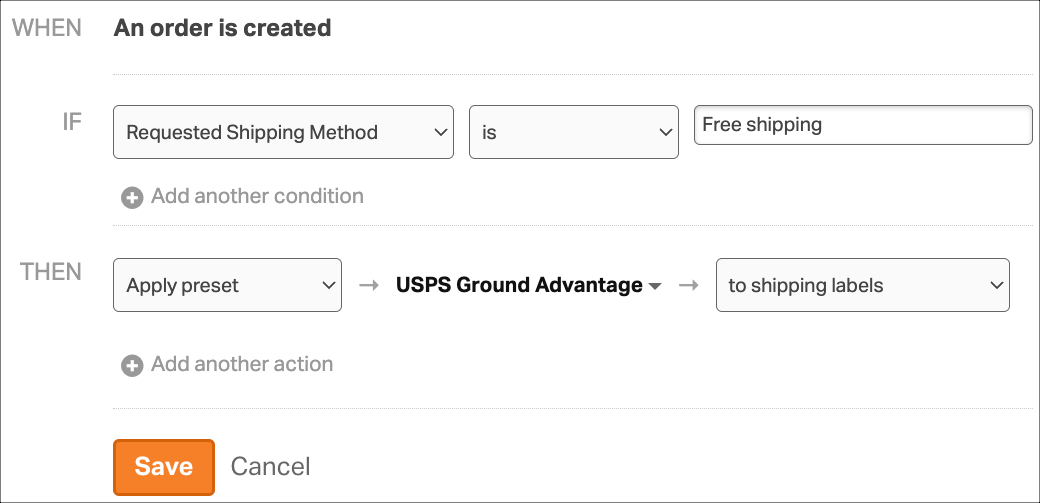
Apply Preset by Requested Ship Method
Using this example rule, any orders that import with a Requested Shipping Method of “Free shipping” will automatically have the USPS Ground Advantage preset applied.
- For the IF statement, select Requested Shipping Method, choose the best condition from the dropdown, then enter the specific Shipping Method.
- Note: This field is case-sensitive.
- Enter the Shipping Method exactly as it would import from your sales channel.
- For the THEN statement, select Preset and then choose the desired preset from the dropdown.
- Click Save.
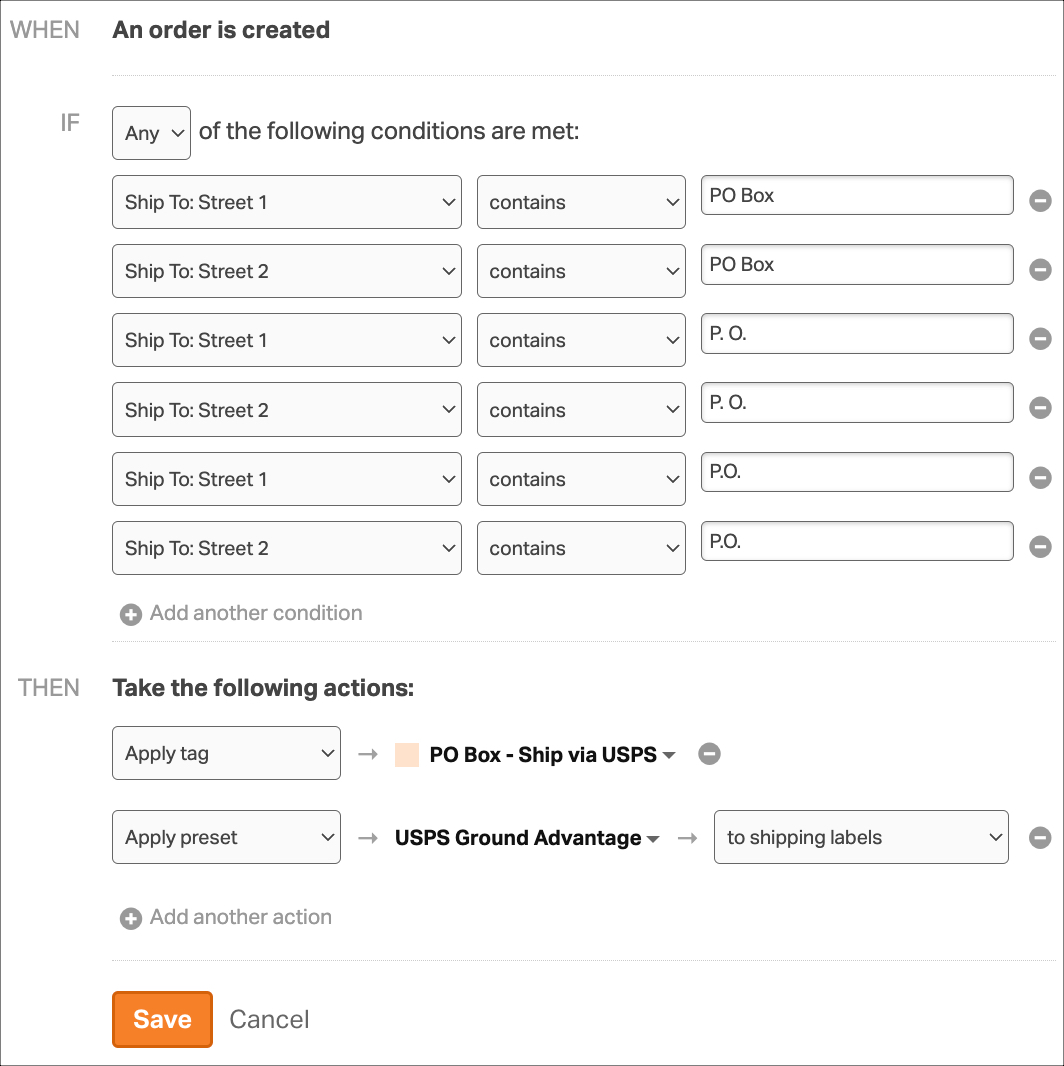
Tag orders with PO Box address
This example rule applies the “PO BOX – Ship via USPS” tag + Ground Advantage preset to all orders that import with any variation of “PO Box” in either the Ship-To Street 1 or Street 2 field.
- For the IF statement, select the Ship-To: Street 1, choose contains from the condition dropdown, then enter PO Box.
- Note: This field is case-sensitive.
- Since PO Box can be entered in several ways; we recommend entering different variations of PO Box for both Street 1 and Street 2 to ensure these orders will get tagged.
- For the THEN statement, select Apply tag and then select or create an order tag from the dropdown.
- Click Save.
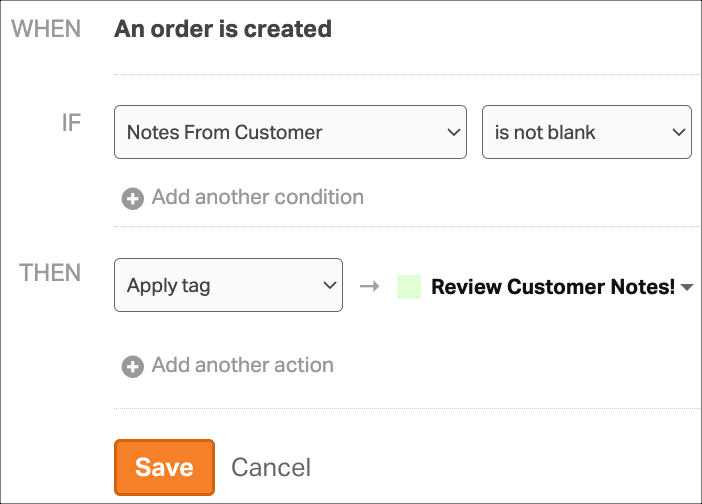
Tag orders to check Customer Notes
Use this rule so your warehouse staff can double-check the notes the customer has entered. These might include crucial shipping instructions or a separate gift message to be printed.
- For the IF statement, select Notes From Customer and is not blank.
- For the THEN statement, select Apply tag and then select or create an order tag from the dropdown.
- Click Save.
Tag orders by Internal Notes
Use this rule if your orders import with Internal Notes that contain helpful information you want to identify.
For example, if you use a TikTok integration via Shopify, those orders may import into Ordoro with an Internal Note that includes the word “TikTok.” In this case, you can create an automation rule to automatically tag any orders that have an Internal Note containing “TikTok.”
- For the IF statement, select Internal Notes and contains TikTok.
- For the THEN statement, select Apply tag and then select or create an order tag from the dropdown.
- Click Save.

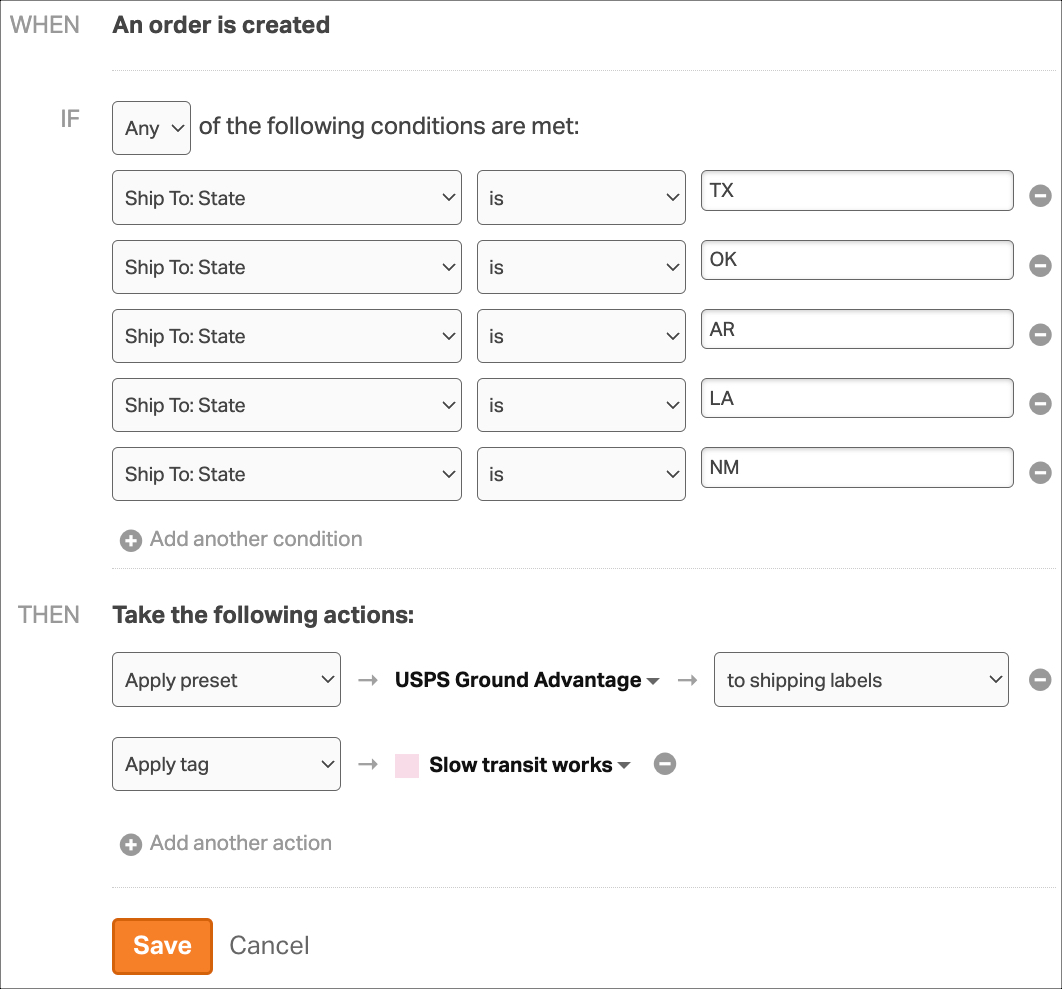
Apply Preset based on slower shipping to nearby states
Choosing a slower shipping method to nearby states may still result in packages arriving at the same time as expedited or priority shipping due to their close proximity, making the difference negligible.
- For the IF statement:
- Choose Any.
- Enter all the nearby states in your zone.
- For the THEN statement, apply the preset for the slower shipping method. You can also tag these orders for added visibility.
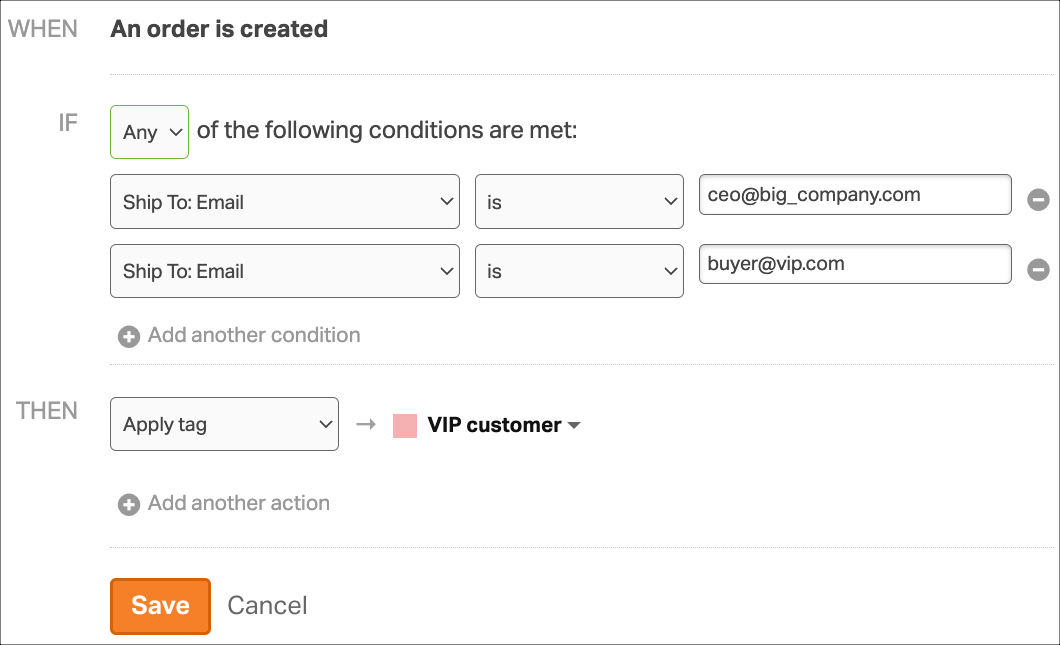
Tag VIP customers
- For the IF statement:
- Choose Any.
- Enter the email addresses for your VIP customers.
- For the THEN statement, select Apply tag and then select or create an order tag from the dropdown.
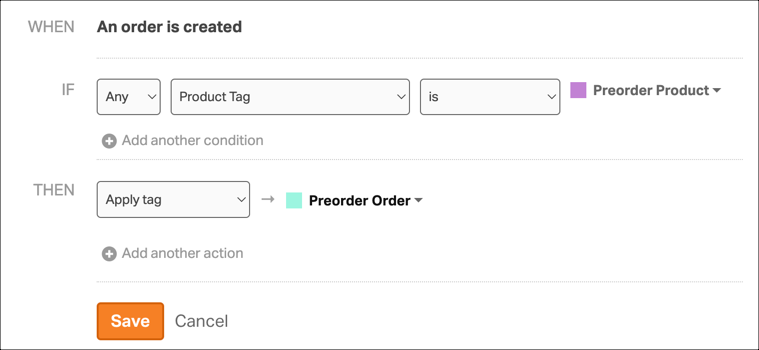
Tag Orders with Preordered or Presale products
In combination with Product Tags, you can automatically apply Order tags to your incoming orders that contain products that are on preorder. This will allow you to address these orders differently from the other order you receive that have inventory available to ship.
1. You’ll need to add Product tags to your preorder/presale products. Click here for a support article with instructions for how to apply tags to products.
2. Once your preorder/presale products are tagged, you’ll use Automation Rules to apply order tags to orders with the preorder/presale products on them.
3. For the IF statement, select Product Tag from the dropdown, and then select the tag you assigned to your preorder/presale products.
4. For the THEN statement, Then select Apply Tag option, and select a preorder/presale tag to apply to your orders. See the example below: