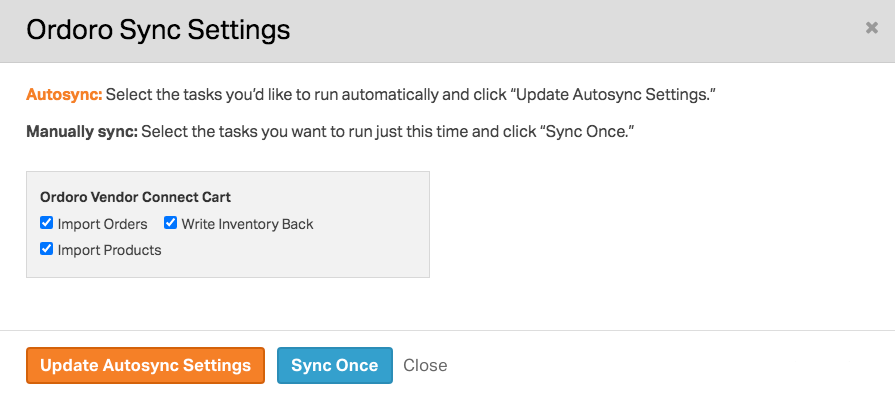
Ordoro uses a task system to create orders and to manage specific functions between the Merchant and the Supplier accounts. Some tasks fire off instantly while others run at a scheduled interval. This article outlines the task types and the timing.
For more information on vendor portals and the terminology, please refer to this help article.
Topics
Global tasks
These can be enabled via the blue ‘Sync’ button in the top right:
- Import Orders: this task creates the order in the Supplier’s vendor portal account.
- Import Products: this task imports products from the Merchant account into the Supplier’s vendor portal account.
- Write Inventory Back: if the vendor portal is configured to manage inventory, this task will write the inventory quantities from the Supplier’s vendor portal account to the Merchant account.
You can see the five most recent tasks by clicking on the ‘Activity Menu’:
Note: these tasks are only accessible in the Supplier’s vendor portal account. See this help article on how to access and manage the cart sync settings.
Is there a way to change the interval for the tasks listed above?
While this setting is not accessible from your account, our support team can review and make the necessary changes at your request. (Email us at support@ordoro.com if you’d like to make updates.) Scheduled tasks can be set to run at the following intervals:
- 10-minutes
- hourly (this is the default)
- 6-hours
- daily
Backend tasks
These tasks run behind the scenes:
- Update tracking: this task runs as soon as tracking is created or added to an order. It sends the tracking details from the Supplier’s vendor portal back to the Merchant account.
- Split order: should the order be split in the Supplier’s vendor portal account, this task fires off instantly to split the order in the Merchant account. Refer to this help article on how order splitting works.
- Cancel orders: if an unshipped order is canceled in the Merchant account, this task will cancel the order in the Supplier’s account. (Note: this task is not scheduled by default – see this help article for more information.)


