It’s incredibly important that you make sure your Ordoro products have the correct Amazon Fulfillment Channel (FBM or FBA) assigned to them. If not, you run the risk of creating a ghost listing on Amazon. Click here for details.
Topics
- Managing Amazon Fulfillment Channel status
- How automatic detection works
- How to update a single product’s Fulfillment Channel status
- How to update multiple products’ Fulfillment Channel statuses via CSV
Managing Amazon Fulfillment Channel status
Ordoro now offers two ways to keep your products’ Amazon Fulfillment Channel (FBA or FBM) assignment in sync.
If automatic detection is enabled:
Ordoro can automatically detect when your Amazon fulfillment channel changes from FBA to FBM or FBM to FBA and update the product information in your account. The fulfillment type is auto-detected during the inventory writeback sync, ensuring your product data stays current. If you’d like this setting enabled, please contact our Support team.
If automatic detection is not enabled:
If you are updating an Amazon product from FBA to FBM or FBM to FBA, those changes must be made in Ordoro, before you update them in Amazon. All changes to the Fulfillment Channel must be made in Ordoro first.
How automatic detection works
When automatic detection is enabled, Ordoro updates a product’s Fulfillment Channel during the inventory writeback sync. For a product to be included in this sync, it must be in Needs Sync status.
- The Needs Sync filter identifies products that require an inventory update. Learn more about what Needs Sync means and when products are automatically added to this status here:
- You can also manually mark products as Needs Sync to trigger an inventory update for selected items. This is helpful if you want to ensure a particular SKU is picked up in the next writeback. See how to do that here:
Once a product is in Needs Sync, the next inventory writeback sync will evaluate its Amazon fulfillment channel. If Amazon shows a different fulfillment channel than what is saved in Ordoro, Ordoro will update the product accordingly.
How to update a single product’s Fulfillment Channel status
Use this method if automatic detection is not enabled.
1. Disable the inventory sync to Amazon.
- Click here for details on how to do this in Ordoro.
- Wait until the Sync button stops spinning to make sure there isn’t an already running inventory sync task.
2. Click on the Products tab in the green bar.
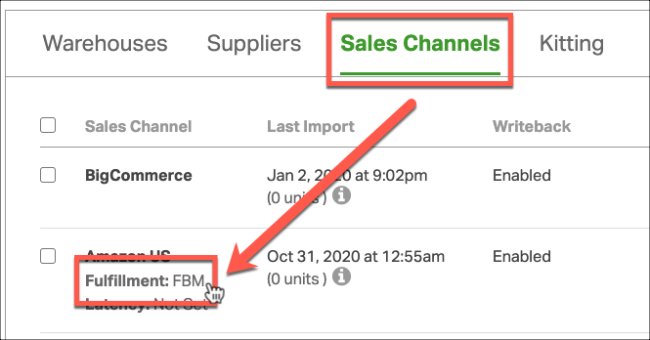
3. Search for the SKU in the search bar and click on the Sales Channel name to be taken directly to the Product Details page for this product
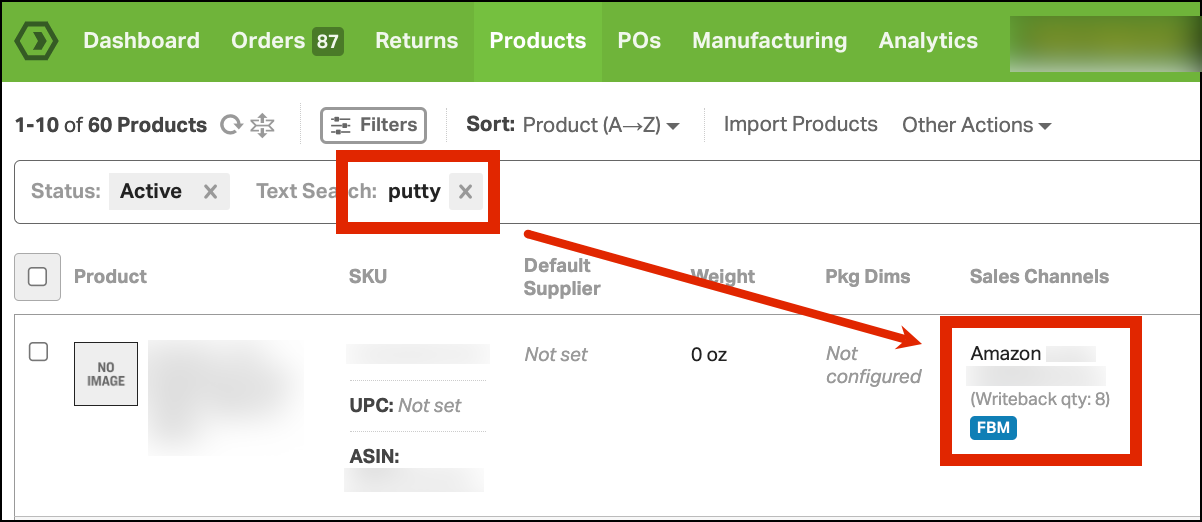
4. Under the Sales Channels info, click the Fulfillment Channel Status (FBA or FBM).
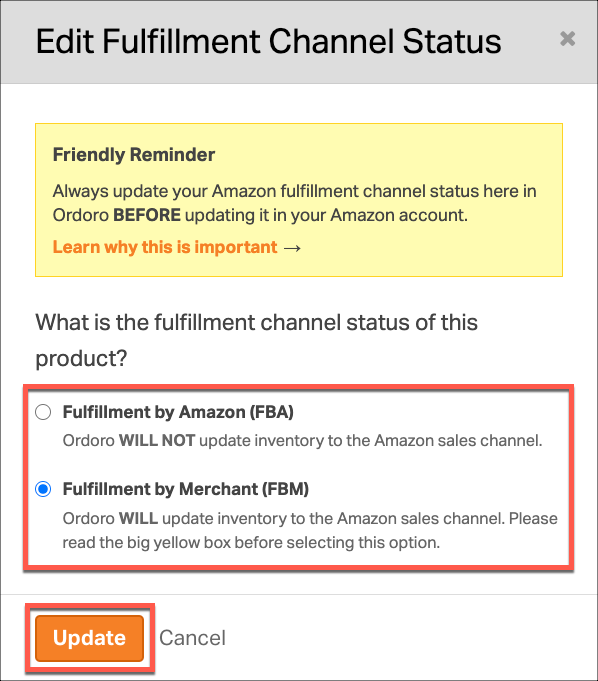
5. The Edit Fulfillment Channel Status modal will pop up. Update the product to be FBA or FBM to match how the product is to be setup in Amazon. Then click Update.
6. Once you’ve updated your products in Ordoro, log into your Amazon Seller Central and update the Fulfillment Channel information to match Ordoro.
- This is especially important if you change the product from FBA to FBM in Ordoro.
7. Re-enable the inventory sync to Amazon in Ordoro.
- Click here for details on how to do this in Ordoro.
How to update multiple products’ Fulfillment Channel statuses via CSV
Use this method if automatic detection is not enabled.
1. Disable the inventory sync to Amazon and wait until the sync button stops spinning to make sure there isn’t an already running inventory sync task.
- Click here for details on how to do this in Ordoro.
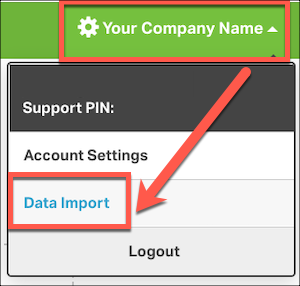
2. Click on your Company Name in the top right-hand corner.
3. Select the Data Import from the drop-down menu.
4. Choose Update Product/Sales Channel Bridge option from the drop-down options.
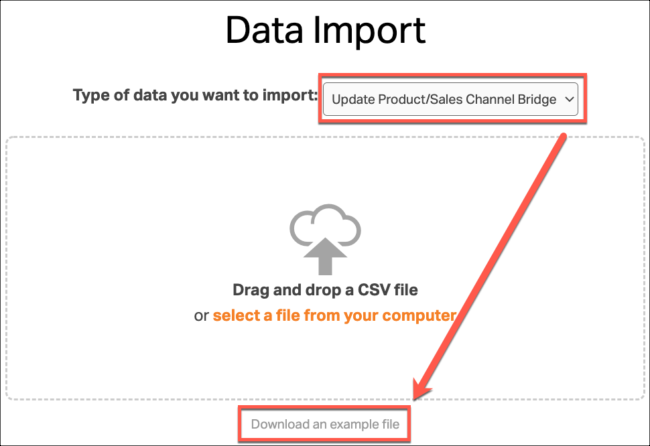
5. Download the example file.
6. Delete Columns D, E, and F. (Fulfillment Latency, Max Export, and Quantity Writeback Inventory).
- If left blank, they will overwrite the existing data as blank.
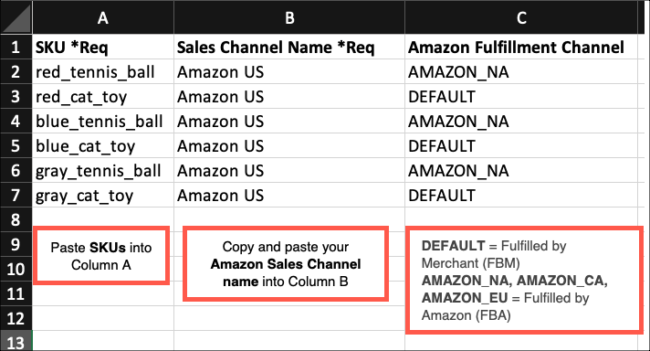
7. Paste the SKUs you are updating into Column A (SKU *Req).
- Ensure that your SKUs or other values are not truncated via Excel formatting. See this support article to resolve this issue.
8. Copy and paste your Amazon Sales Channel name from the Sales Channel settings, into Column B (Sales Channel Name *Req).
9. Enter the following in Column C (Amazon Fulfillment Channel).
- To update to Fulfilled by Merchant (FBM) enter DEFAULT.
- To update to Fulfilled by Amazon (FBA) enter:
- AMAZON_NA for North America
- AMAZON_EU for Europe
- AMAZON_CA for Canada
- Reminder: If you are not updating Amazon Fulfillment Latency (Column D), Max Export (Column E), or Quantity Writeback Inventory (Column F), delete the columns.
- Do not save the file with these columns blank.
10. Save the file as .csv file.
11. Drag and drop the CSV file into the Data Import window.
12. Follow the prompts to complete the Data Import. Click here for instructions one how to use the Data Import function.
13. Once the Data Import has completed, log into your Amazon Seller Central and update the fulfillment channel information.
14. Re-enable the inventory sync to Amazon.
- Click here for details on how to do this in Ordoro.
Please email support@ordoro.com if you have any questions.