Customers may need to return items for an order you shipped to them. Ordoro supports Return Merchandise Authorizations (RMAs) directly from the original order. RMAs provide a transaction record, and you can track the status of the goods being returned to you.
Notes
- RMAs are exclusive for Premium plans.
- Essentials and Advanced accounts have access to our Returns workflow, seen here.
Setup articles
Topics
- Initiate a return (RMA)
- Create a return label
- Email the return label to your customer
- Update status
- Receive and restock the returned products
How to initiate a return (RMA)
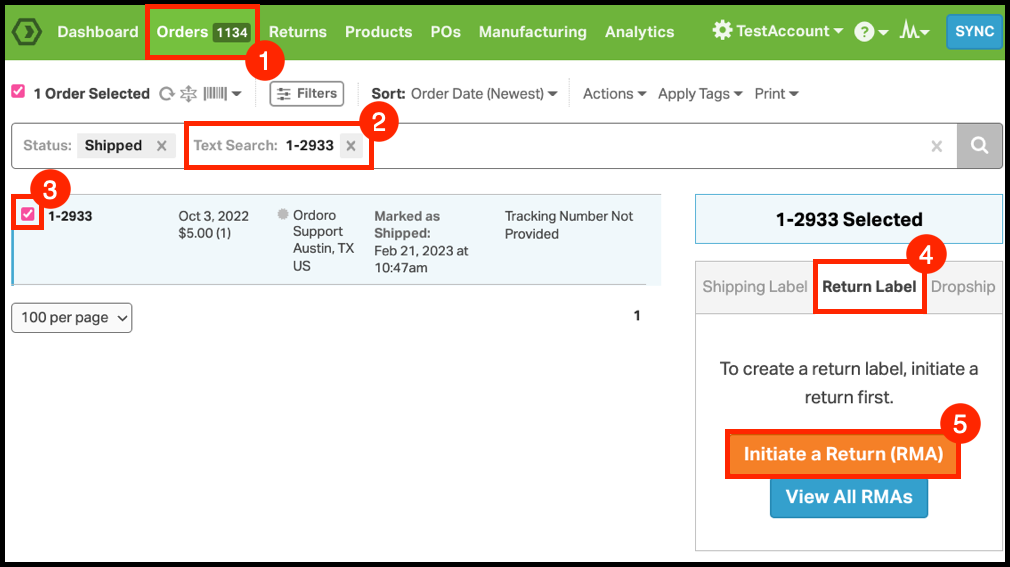
1. Click on the Orders tab.
2. Search for the order that needs an RMA.
3. Click the checkbox for the order.
4. Choose Return Label in the label panel.
5. Select the Initiate a Return (RMA) button.
This opens the RMA modal. Learn about the sections below.
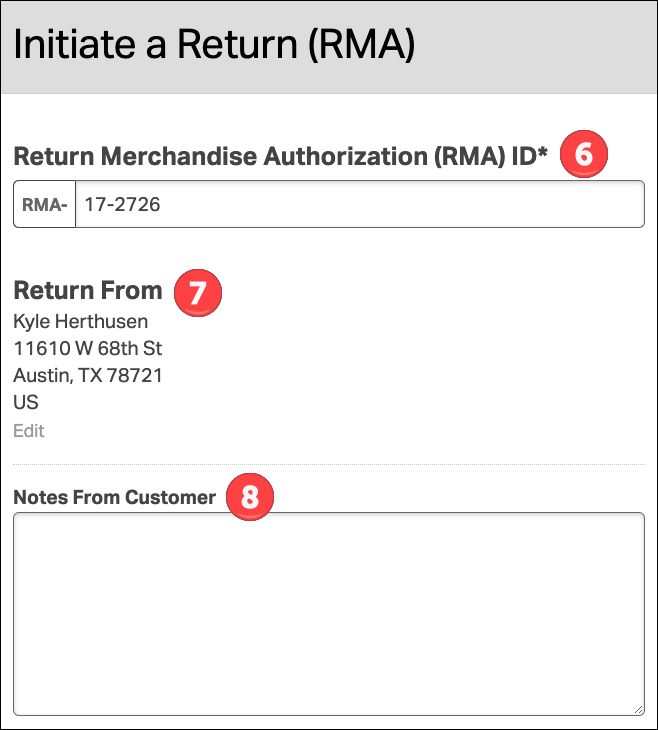
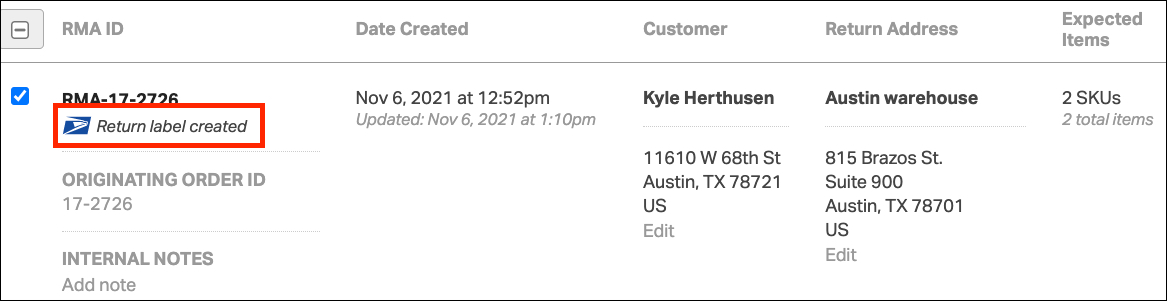
6. Return Merchandise Authorization (RMA) ID:
- By default, this number matches your order number. It can be edited before it’s saved.
7. Return From
- Your customer’s address from the order will pre-populate here.
- This order’s address will be used for the return label.
- If you’d like to use a different address, click the Edit link.
8. Notes from Customer
- Record any information from the customer here.
- This could be why the customer returned the product(s).
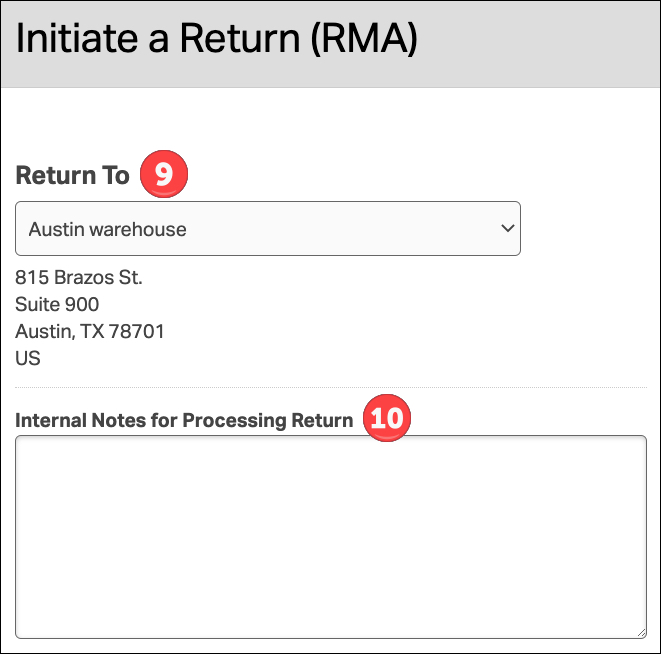
9. Return To
- This is the address to which the returned item(s) will go and will be used on the return label.
- By default, this will be the warehouse the order shipped from.
- However, you can choose a different warehouse/supplier to send it back to.
- Additionally, you can manually enter an address as well.
10. Internal Notes for Processing Return
- These notes will not be sent to the customer and are used in Ordoro only.
- You could enter how to manage the products when returned, notes to check for damages, etc.
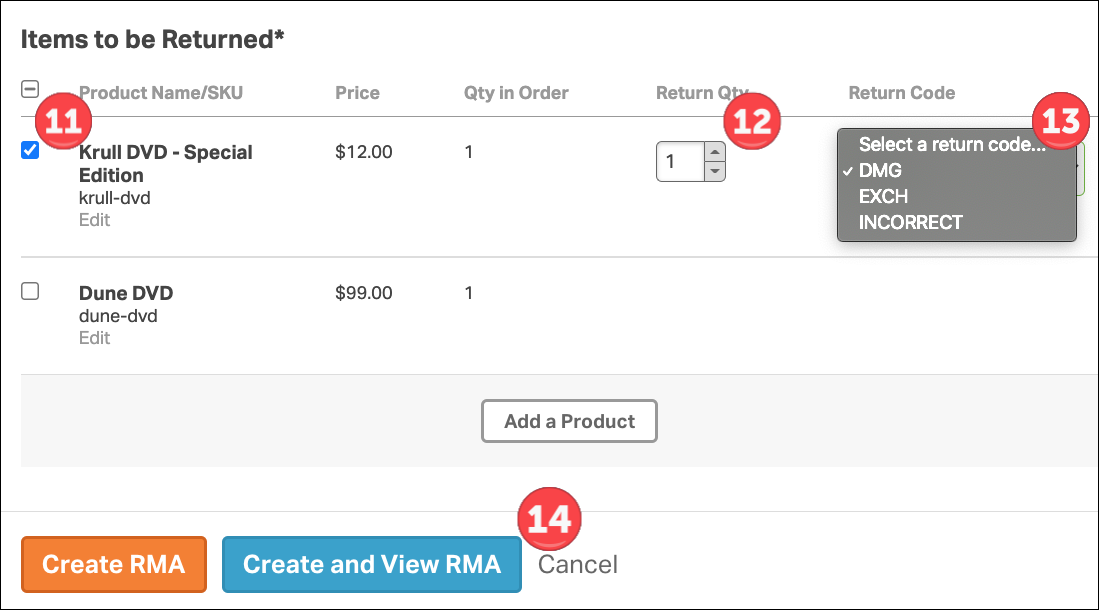
11. Select Items to be Returned.
- Choose which items the customer will return.
- Adding an item is optional, but it helps track which products will be returned to you.
- You can also manually add products that were not on the original order.
12. Return Qty
- This is how many initially shipped quantities will be returned to you.
13. Return Code
- If you’ve set up Return Codes, then they will appear here.
- Return Codes allow you to categorize the reasons products are returned to you.
14. Create and View RMA
- Once you’ve completed steps 6-13, you can create and view the RMA. This will take you to the RMA Details page.
- You’ll be navigated to the Shipped Orders page if you choose Create RMA.
How to create a return label for RMAs
Once you create an RMA (see above), you’ll be taken to the RMA Details page. Otherwise, go to the Returns tab -> select the RMA, which needs a return label.
Note: The shipping configuration from the original outgoing shipment will not be copied over by default. Learn more here.
1. The Returns Label panel appears to the right.
2. Create a return label as you would a shipping label.
3. Return From is the origin address for the return label and will ship to the Return To address.

4. Once an RMA shipping label is created, it’s visible on the RMAs List page.
How to email the RMA label to your customer
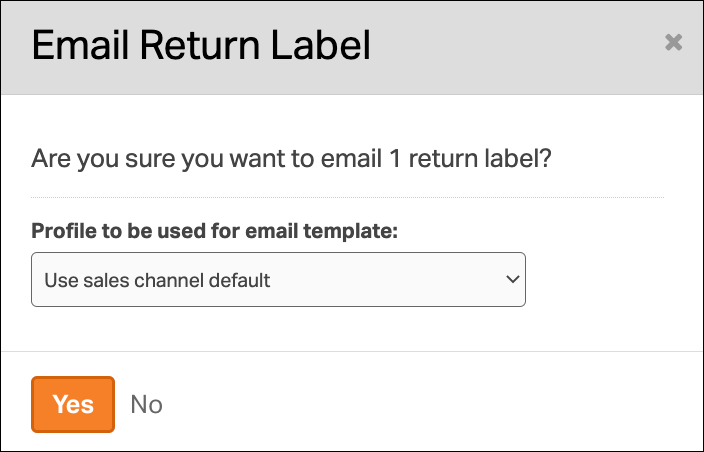
1. Once the return label is created, you can either email it to the customer directly from Ordoro or download it to send elsewhere.
- See the Send Email button to email from Ordoro.
- Ordoro will send the label to the Return From email on the RMA.
- An email may be sent multiple times to the customer.
- Print options are available underneath this option.

2. Once you select Send Email, a modal will open asking which Profile you’d like to use.
- The chosen Profile will use the Return Email Content for the email.
- See this support article on how to set up your Return Email Content.
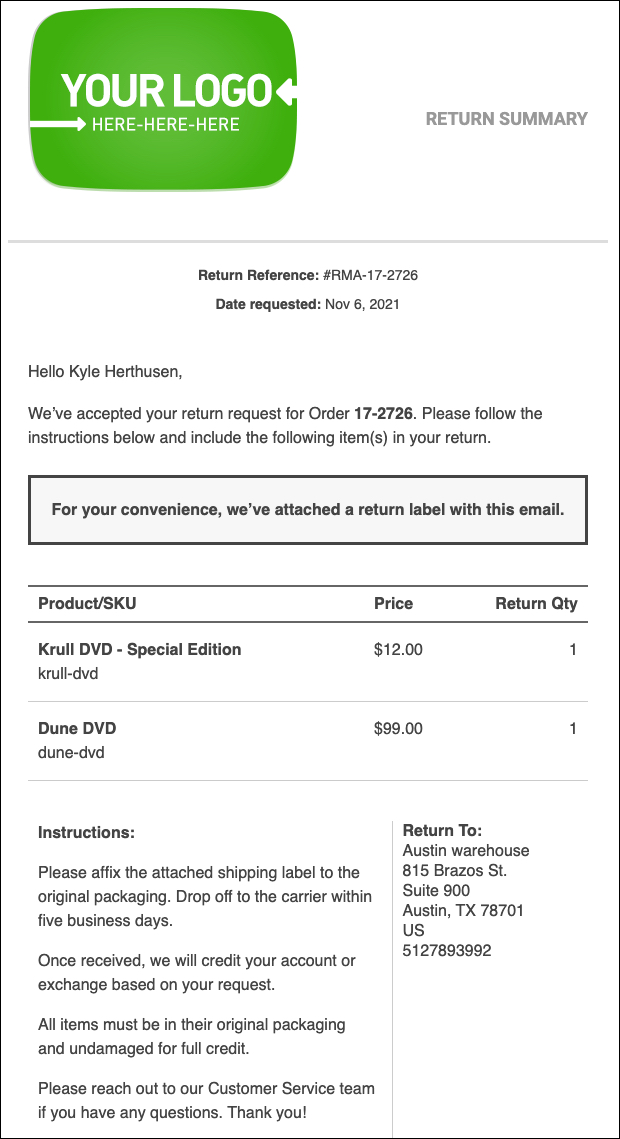
3. Here’s a sample RMA email and how it will appear to your customer.
How to update the RMA status
Once you have sent the RMA return label to your customer, you can manually update the status.
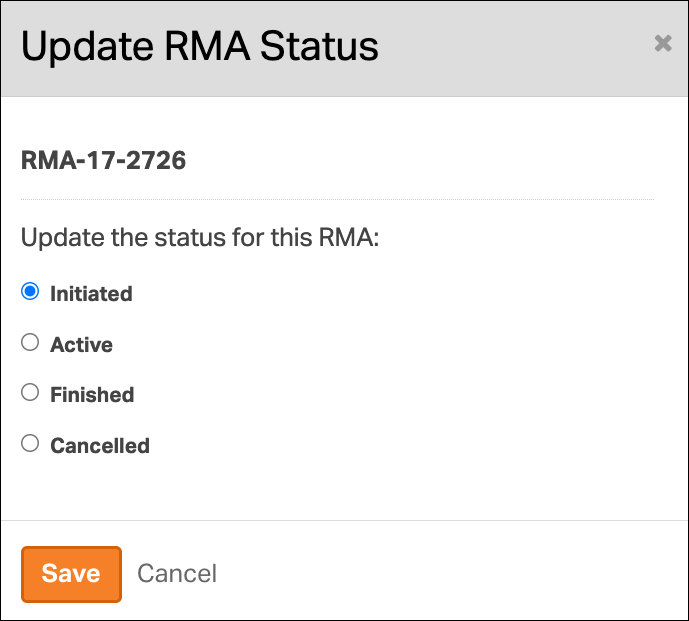
1. Select the Update Status on the RMA Detail page.

2. There are multiple status options for RMAs.
- Initiated
- Active
- Finished
- Canceled
3. When you’ve emailed the customer, you can change the status from Initiated -> Active.
This helps track which RMAs still need return labels to be sent to the customer.
How to receive and restock products
Once you’ve received the returned items from your customer, you’ll need to evaluate whether you want to resell them or count them as a loss.
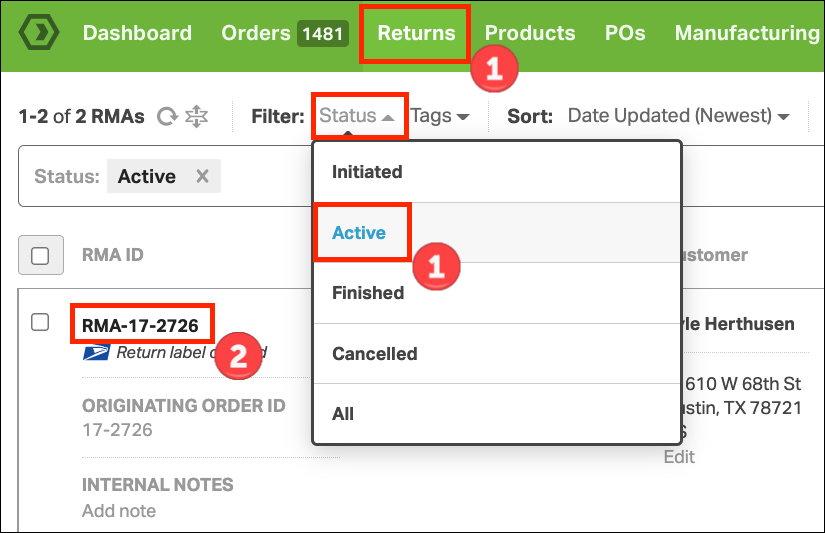
1. Go to the Returns tab -> select the Active Status.
2. Click on the RMA you received. This will take you to the RMA Details page.
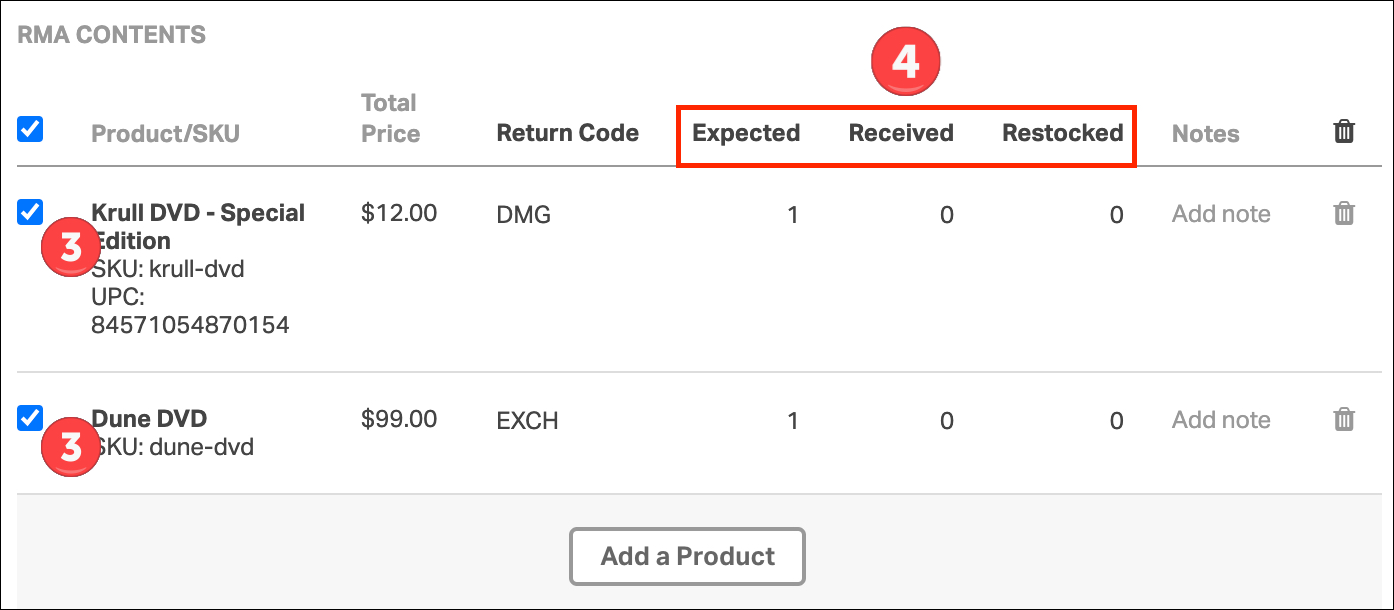
3. Next, scroll to the RMA Contents section and select which item(s) you’ve received.
4. Select the Expected, Received, or Restocked header to enter these quantities.
A modal will appear so you can enter the Received and Restocked quantities. See below for more details.

5. Qty to Receive
- The amount you received back from the customer.
- This number does not affect your Ordoro inventory.
6. Qty to Restock
- This is the number of received products that are resellable, and you’ll put them back on your shelves.
- Once you update this quantity, the inventory in the Restock Location warehouse will increase.
7. Restock Location
- Where the inventory will be increased if there’s quantity to restock.
In the example above, the Krull DVD was received but not restocked. The Dune DVD was in good condition and was accepted and restocked in the Austin warehouse.
Tip: If you’d like to receive or return the full quantity of a line item in one click, hover to the right of the quantity field and click the Force Verify checkmark.

8. Click Save once you’ve finalized your changes.
9. Lastly, you can update the RMA status to Finished.