
Purchase orders, or POs, help you track what you’ve ordered from your suppliers and receive those items into inventory once they arrive.
In Ordoro, you can create POs, send them to suppliers, organize PO line items, add item-specific notes, receive inventory, and print barcode labels from the receiving workflow.
Topics
- Before you create purchase orders
- Create a purchase order
- Add and manage items on a PO
- Send, preview, or print a PO
- Update the Estimated Delivery Date
- How to receive items and increase inventory
Before you create purchase orders
Before creating POs, we recommend reviewing a few settings and product details.
1. Add your outgoing email address
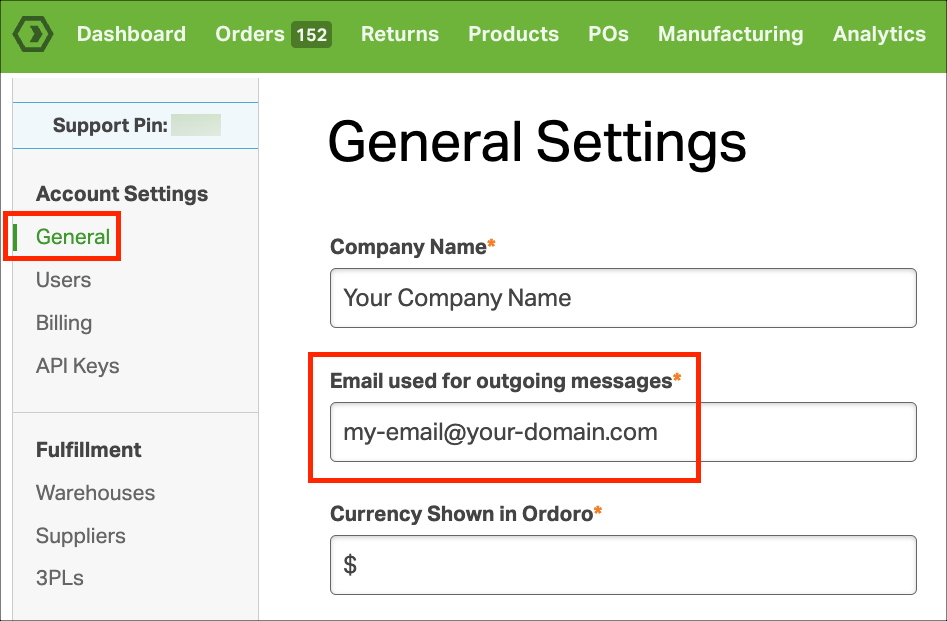
- Go to Settings -> General and enter the email address you’d like to use for outgoing messages.
- This email address will appear as the From address for POs and tracking emails sent from Ordoro.
2. Create your suppliers
- If you haven’t added suppliers yet, create them before creating POs.
- Click here for instructions.
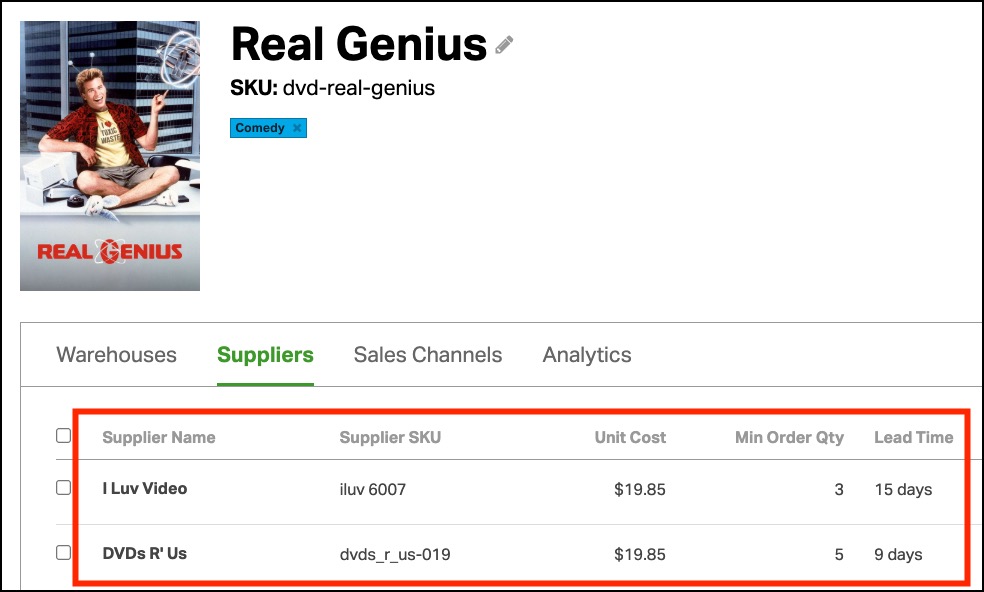
3. Assign suppliers to your products
- Supplier assignments help Ordoro know which products can be ordered from each supplier. You can also set supplier-specific details like unit cost, minimum order quantity, and Supplier SKU.
- Click here for instructions.
4. Choose your PO ID format (optional)
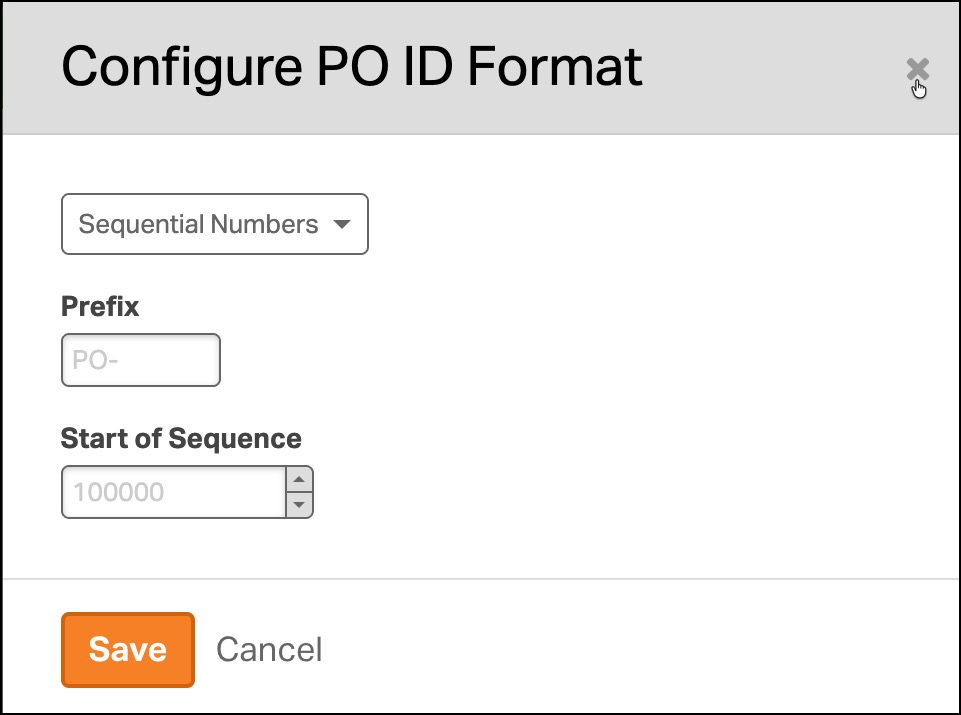
- By default, Ordoro creates PO IDs using the date and time each PO was created.
- You can also use sequential PO IDs if your business prefers numbered purchase orders.
- Click here for detailed set up instructions.
5. Choose whether to recalculate Weighted Average Unit Cost (optional)
- Ordoro can automatically recalculate a product’s Weighted Average Unit Cost when inventory is received from a PO.
- To enable this setting, select the checkbox in your General settings.
- Click here for more details about the calculations.

Create a purchase order
You can create POs from the Products tab.
- Go to the Products tab.
- Select the checkbox next to the product(s) you’d like to reorder.
- Tip: Use the Low Inventory filter to find products that may need reordering. Click here for details.
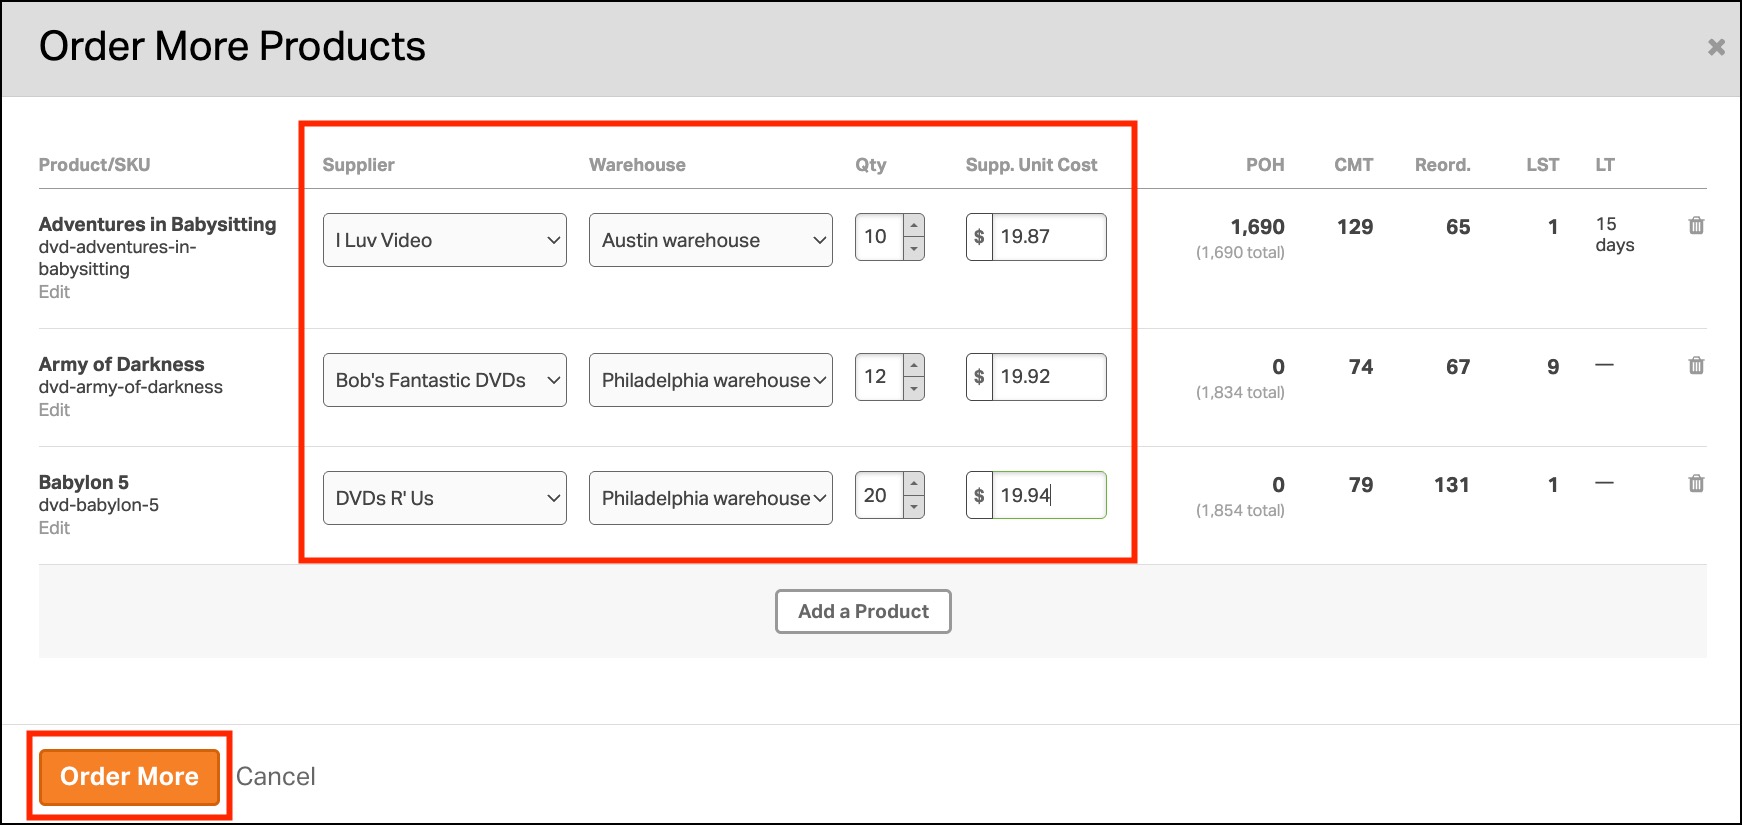
- Click Order More.

- In the pop-up, review or update the following details: Supplier, Warehouse where the items will be received, Quantity to order, Supplier unit cost
- If you’ve already saved supplier details on the product, Ordoro will pre-fill available information.
- For example, if a product has a supplier minimum order quantity of 10, that quantity will be entered automatically.
- Note: Physical On Hand inventory is specific to each warehouse. Committed and Reordered quantities are combined across all warehouses.
- Click Order More to create the PO.
- If the selected products use different default suppliers, Ordoro will create separate POs for each supplier.
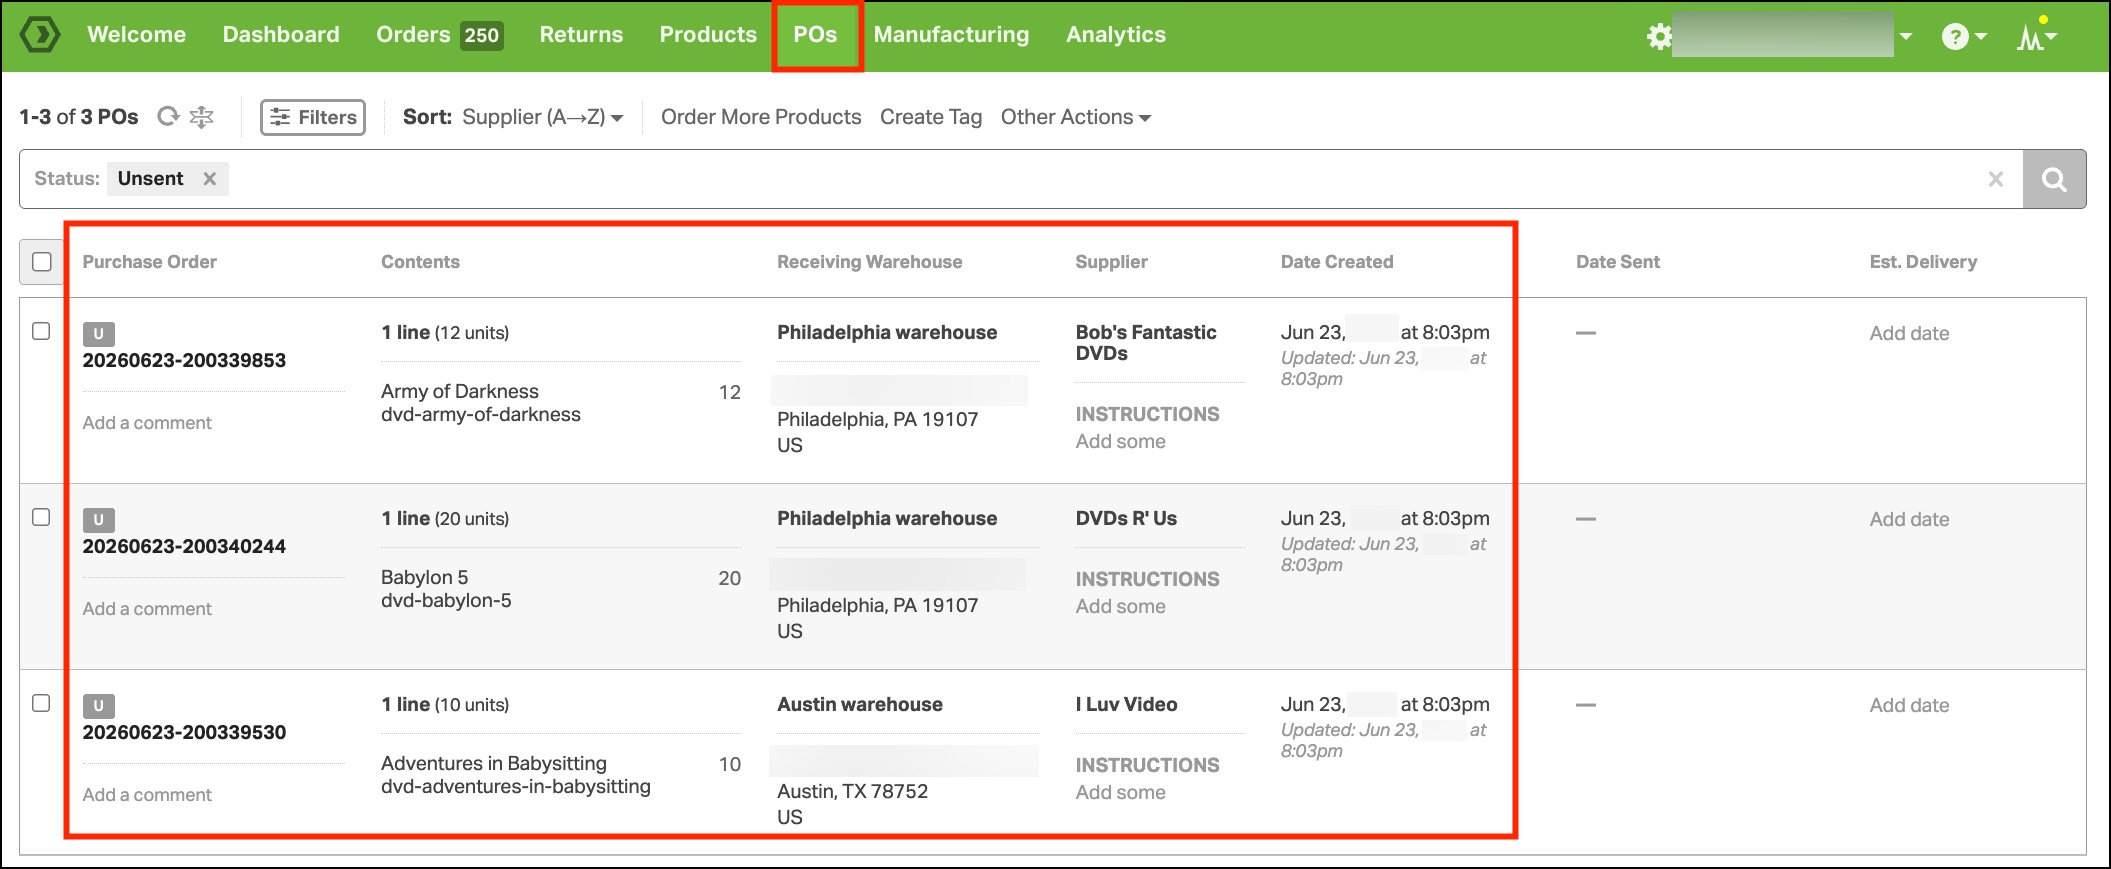
- New POs are created in the Unsent status.
- The PO ID will use the format selected under Settings > Purchase Orders:
- Datetime-based: The PO ID is based on the date and time the PO was created.
- Sequential: The PO ID uses your configured prefix and the next number in the sequence.
- You can edit the PO ID before the PO is marked as Sent.
- Once the PO has been sent, the PO ID can no longer be edited.
- The PO ID will use the format selected under Settings > Purchase Orders:
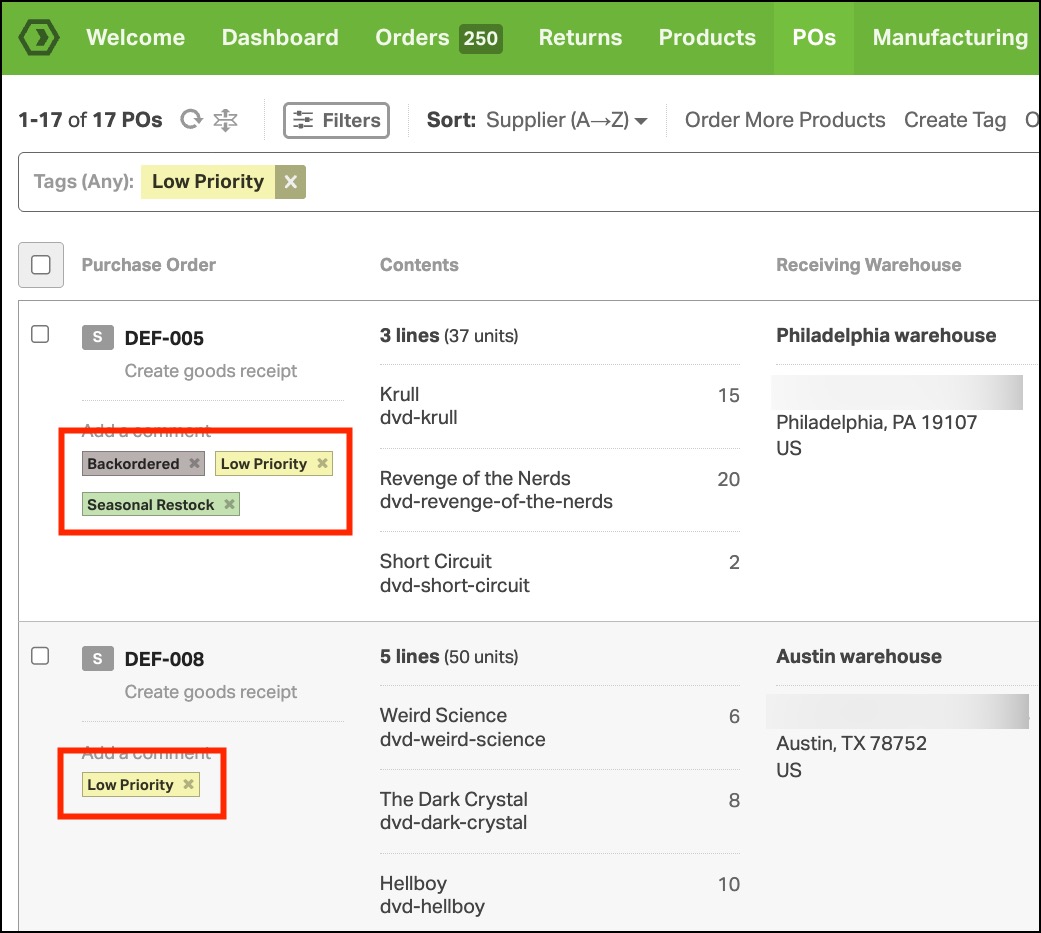
- You can add tags to POs to help categorize and filter them. More details here.
Add and manage items on a PO
You can add products to an existing PO in two ways:
We recommend adding products to Unsent POs only. You can add products to a PO that has already been emailed to your supplier, but you’ll need to resend the PO to ensure the supplier sees the changes.
Add products directly from the PO
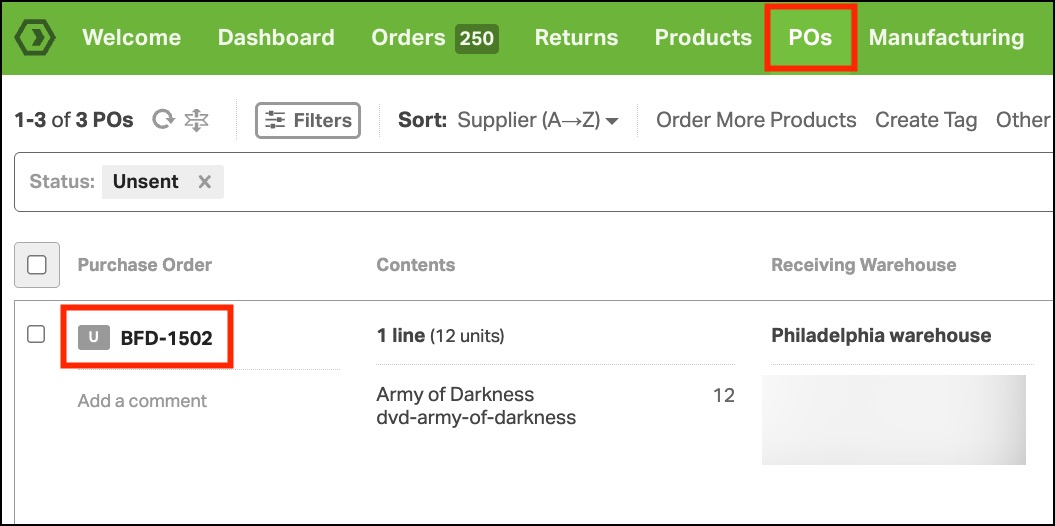
- Go to the POs tab.
- Click the PO ID to open the PO Details page.
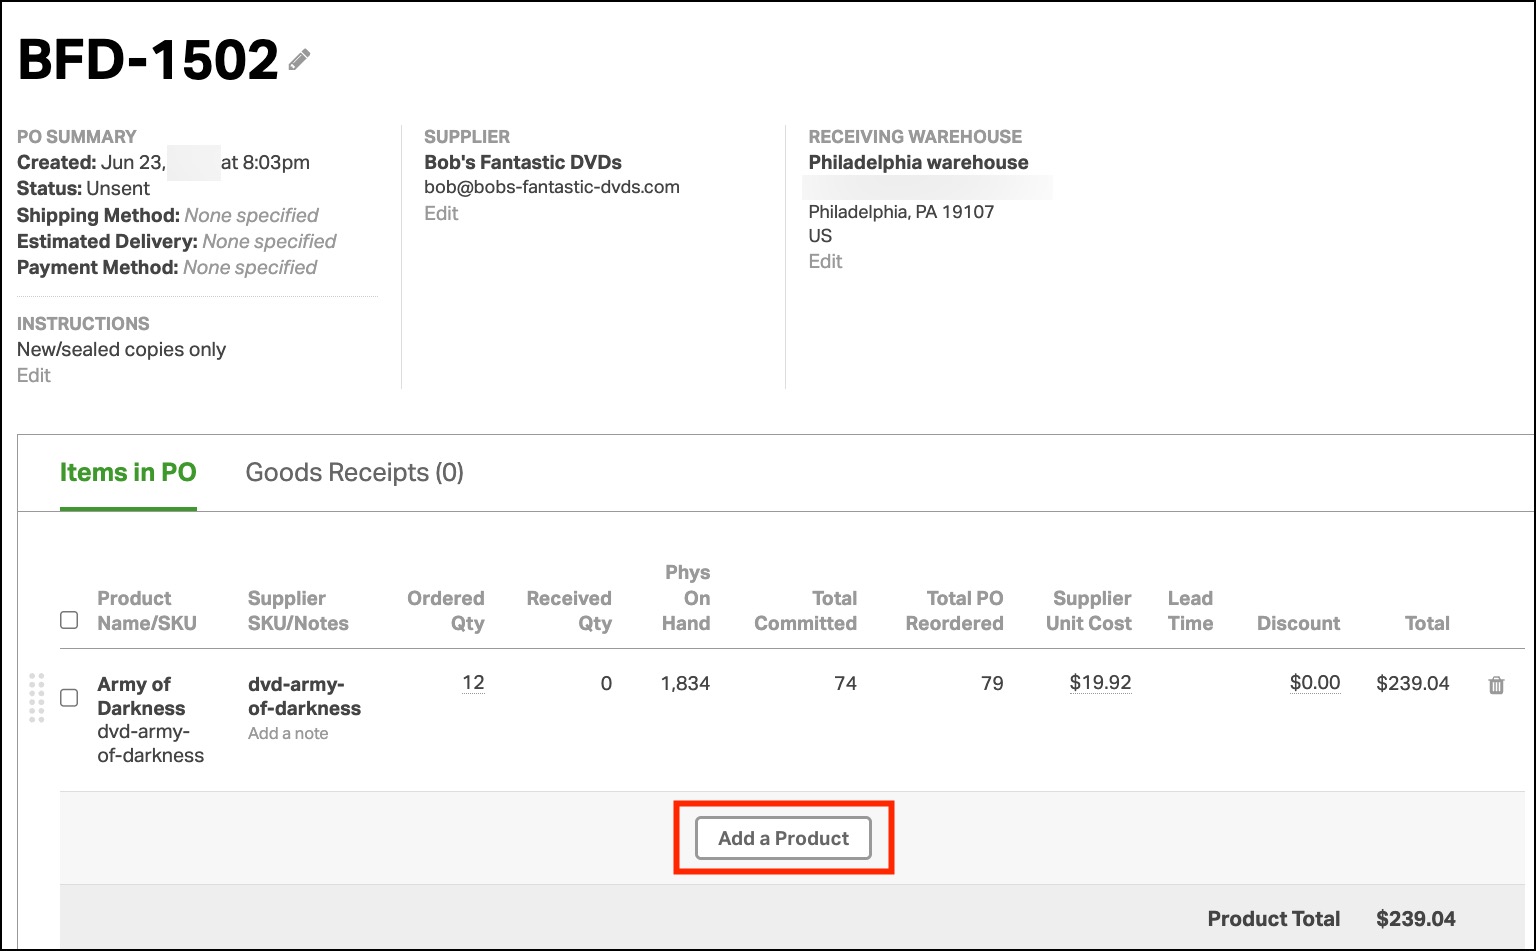
- Click Add a Product.
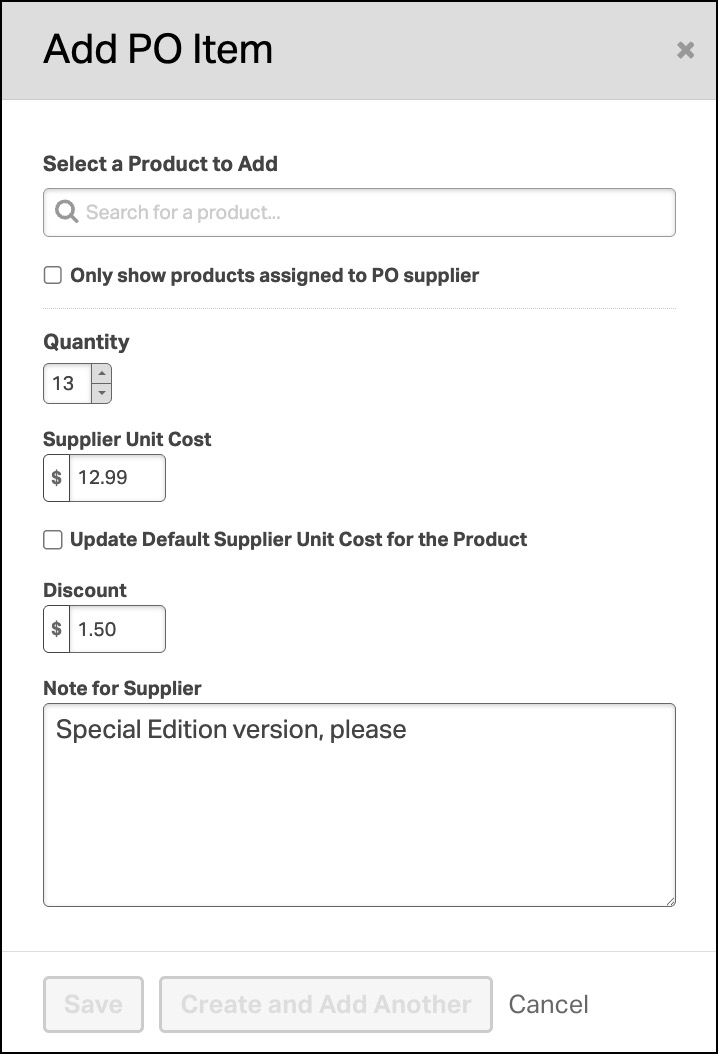
- In the Add PO Item modal, search for the product by SKU or product name.
- Enter the Quantity, Supplier Unit Cost, Discount, and/or Note for Supplier.
- If supplier details are already saved on the product, Ordoro will pre-fill available information.
- Click Save or Create and Add Another.
Show only products assigned to the PO supplier
When adding products directly to a PO, you can filter the search results to show only products assigned to that PO’s supplier.
This is helpful if you have a large product catalog and only want to see the products you actually order from that vendor.
- Go to the POs tab.
- Open the PO.
- Click Add a Product.
- In the Add PO Item modal, select Only show products assigned to PO supplier.
- Search for the product by SKU or product name.

When this checkbox is selected, Ordoro will only show products assigned to the supplier on the PO.
Notes:
- The checkbox is unchecked by default.
- Products can still appear if the PO supplier is assigned to the product, even if it is not the product’s default supplier.
- Archived products will not appear in the search results.
Add products from the Products page
Note: This option only works when the PO is in the Unsent status.
- Go to the Products tab.
- Select the products you’d like to add to the PO.
- Click Order More.
- Review the supplier, warehouse, quantity, and supplier unit cost.
- Click Order More.
Ordoro will continue adding items to an existing Unsent PO for that supplier until the PO is marked as Sent.
Example:
- You create an Unsent PO for Supplier A.
- Later, you go to the Products page and order another item from Supplier A.
- Ordoro adds that item to the existing Unsent PO instead of creating a new one.
- Once the PO is marked as Sent, future items from Supplier A will be added to a new PO.
Reorder items on a PO
You can rearrange PO lines by dragging and dropping them into your preferred order.
This is useful for grouping related products, matching your supplier’s preferred order, or organizing larger POs to make them easier for your team to review.
To reorder PO lines:
- Go to the POs tab.
- Open the PO.
- Using the dotted lines, drag and drop the PO lines into the order you prefer.
- Tip: You can select multiple items to move them all at once.
Click the GIF below to see PO line reordering in action.
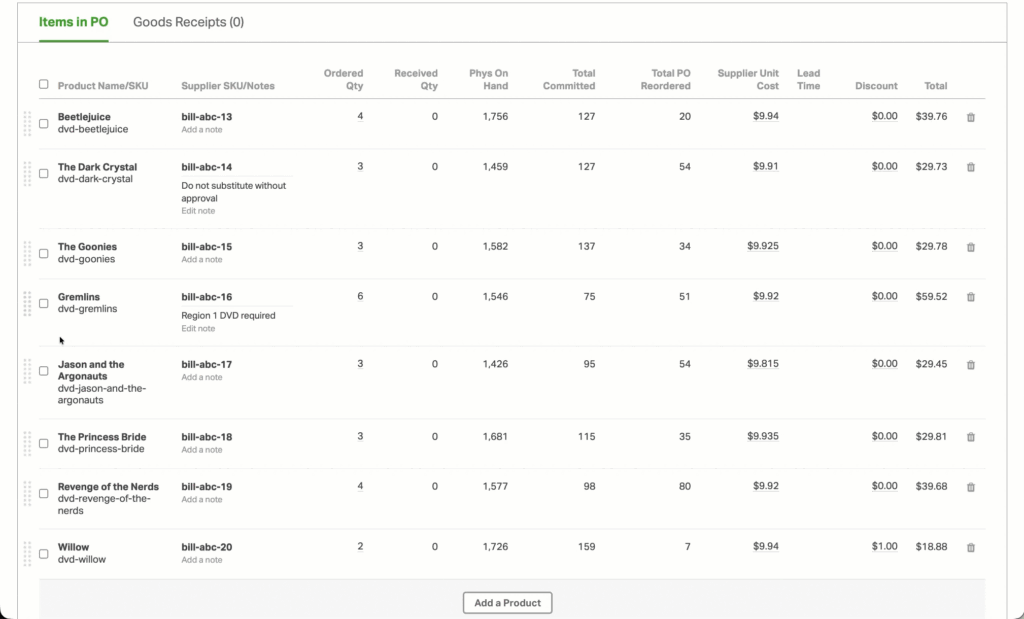
The custom order will be retained on:
- PO Details page
- PO List page
- Preview/Print PO
A few notes:
- If you add a new item after reordering the PO, it will be added to the bottom of the list.
- Reordering PO lines does not change the product’s quantity, supplier unit cost, discount, or notes.
- PO lines can be reordered regardless of PO status.
Add notes to PO lines
You can add notes directly to individual PO lines. This is helpful for product-specific details like special instructions, damaged items, delivery updates, or supplier reminders.
To add a note:
- Go to the POs tab.
- Open the PO.
- Find the product line you’d like to update.
- In the Supplier SKU/Notes column, click Add a note.
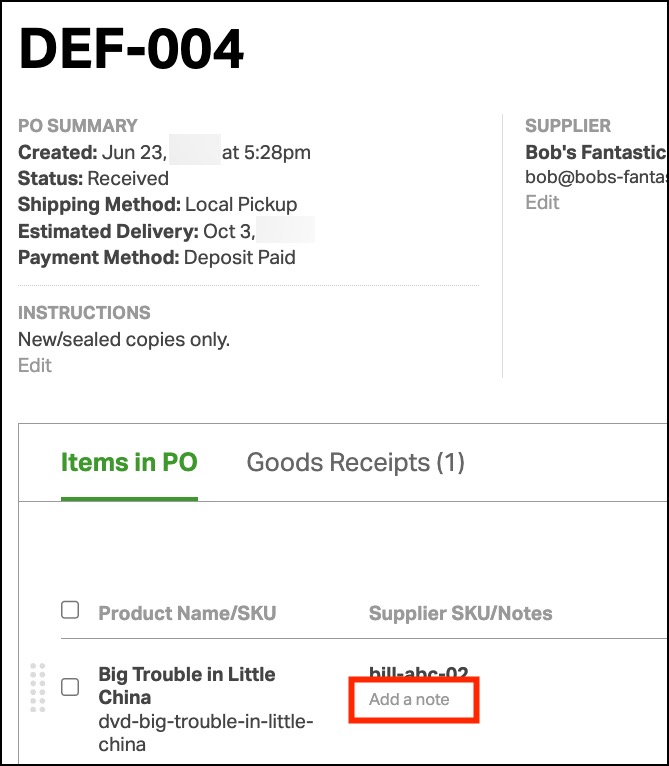
- Enter the note in the Note for Supplier field.
- Click Save.
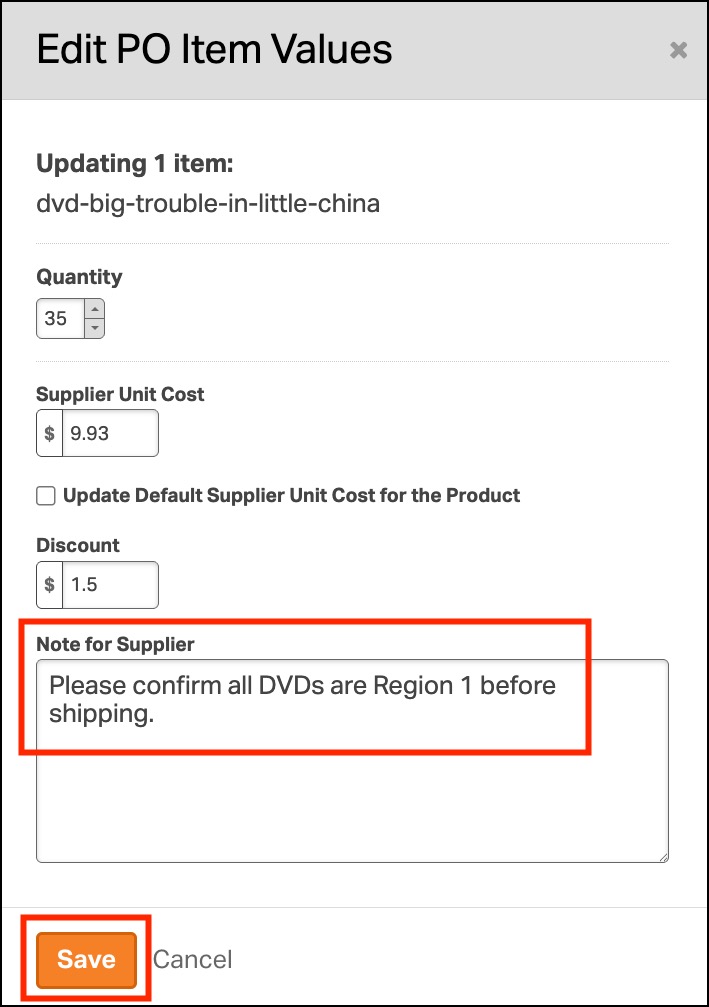
- Once saved, the note will appear in the Supplier SKU/Notes column for that PO line.

Things to note:
- Notes remain attached to the individual PO line, even if you reorder the PO lines or update other line details such as quantity, supplier unit cost, or discount.
- PO line notes cannot be edited after the PO is canceled.
Send, preview, or print a PO
Once the PO is ready, you can email it to your supplier from Ordoro. You can send one PO at a time or send multiple POs in bulk.
Email one PO to your supplier
- Go to the POs tab.
- Click the PO ID to open the PO Details page.
- Review the purchase order.
- Click Send PO.

This emails the PO to your supplier and changes the PO status from Unsent to Sent.
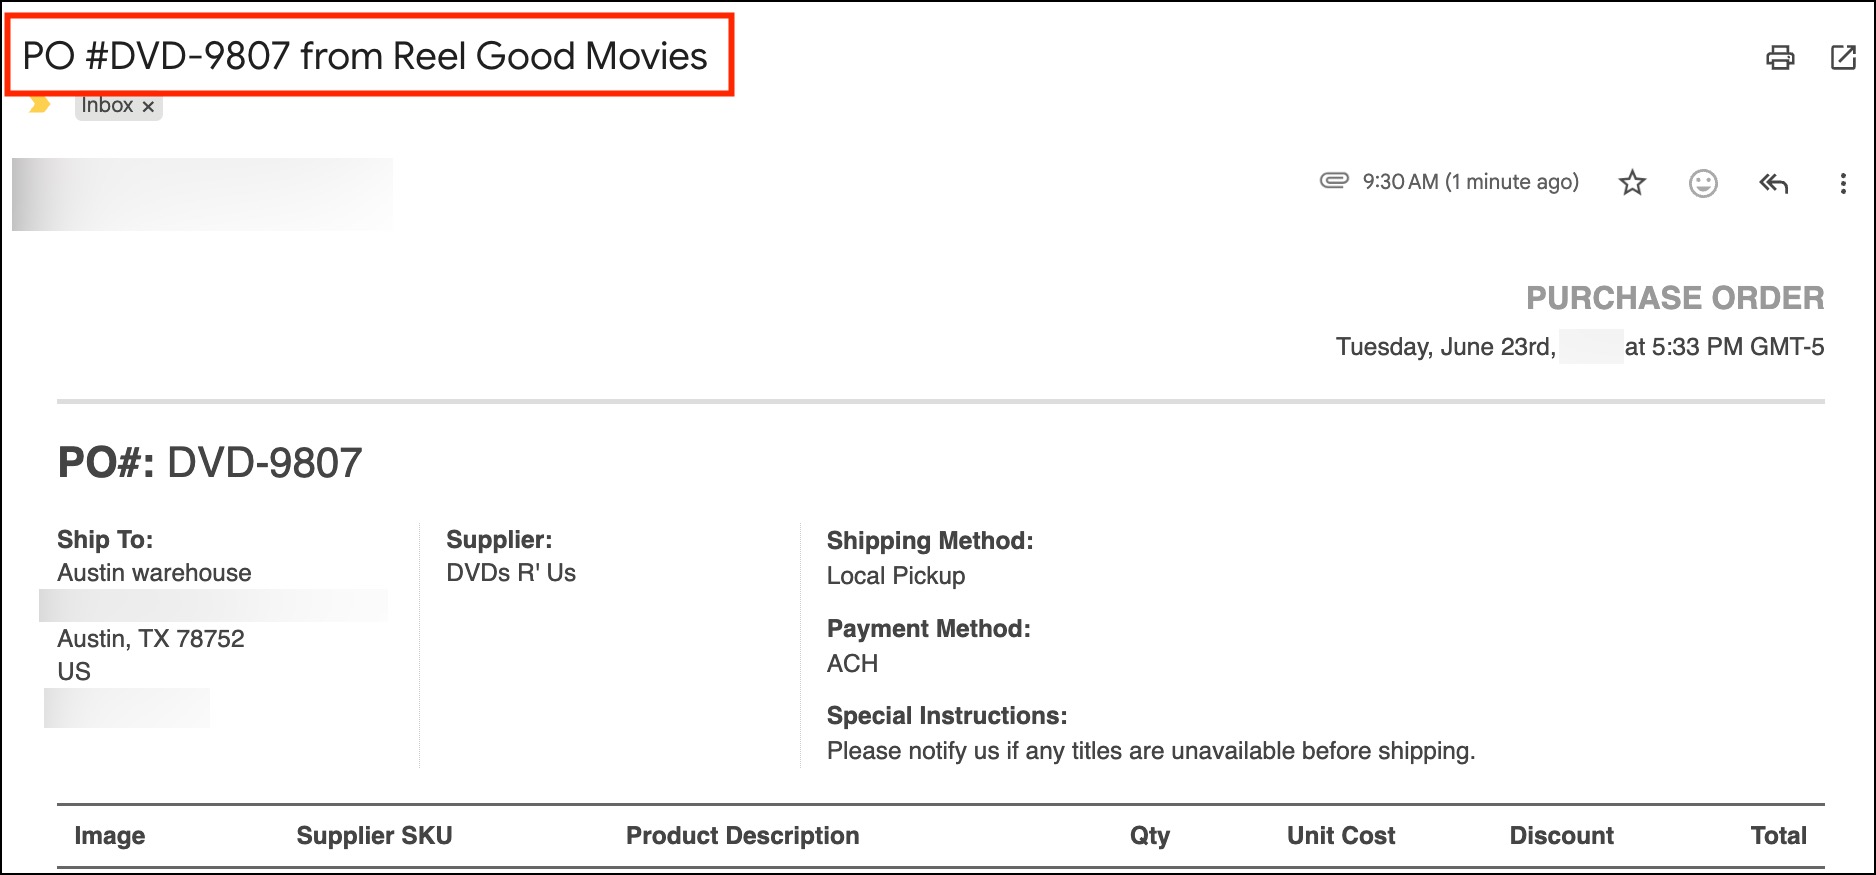
The email subject line will be:
PO #[your PO ID] from [Your Company Name]
A downloadable PDF of the PO will be included as an attachment.
Email multiple POs at one time
- Go to the POs tab.
- Select the checkbox next to each PO you’d like to email.
- Click Send POs.
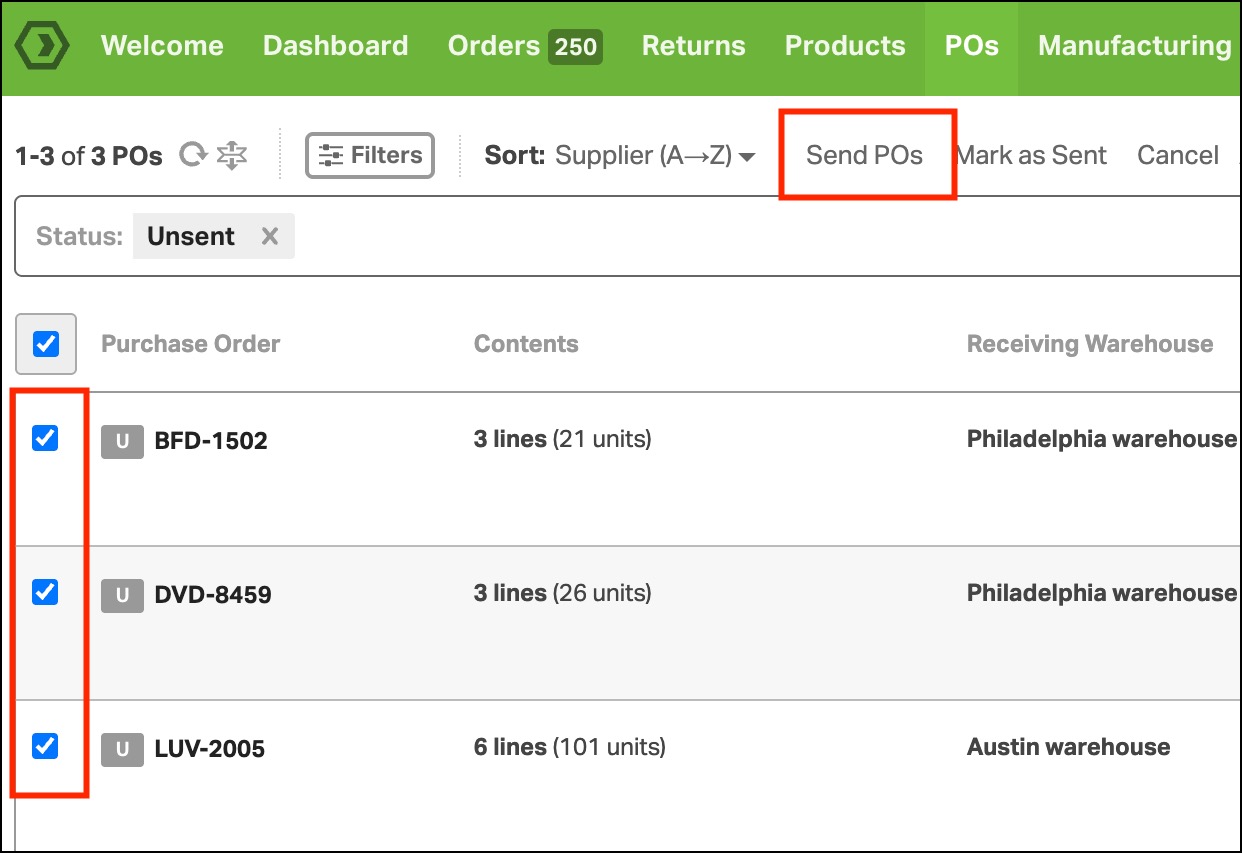
Each selected PO will be emailed to its corresponding supplier. This also changes the selected PO statuses from Unsent to Sent.
The email subject line for each PO will be:
PO #[your PO ID] from [Your Company Name]
Each email will include a downloadable PDF of the PO as an attachment.
Preview or print a PO
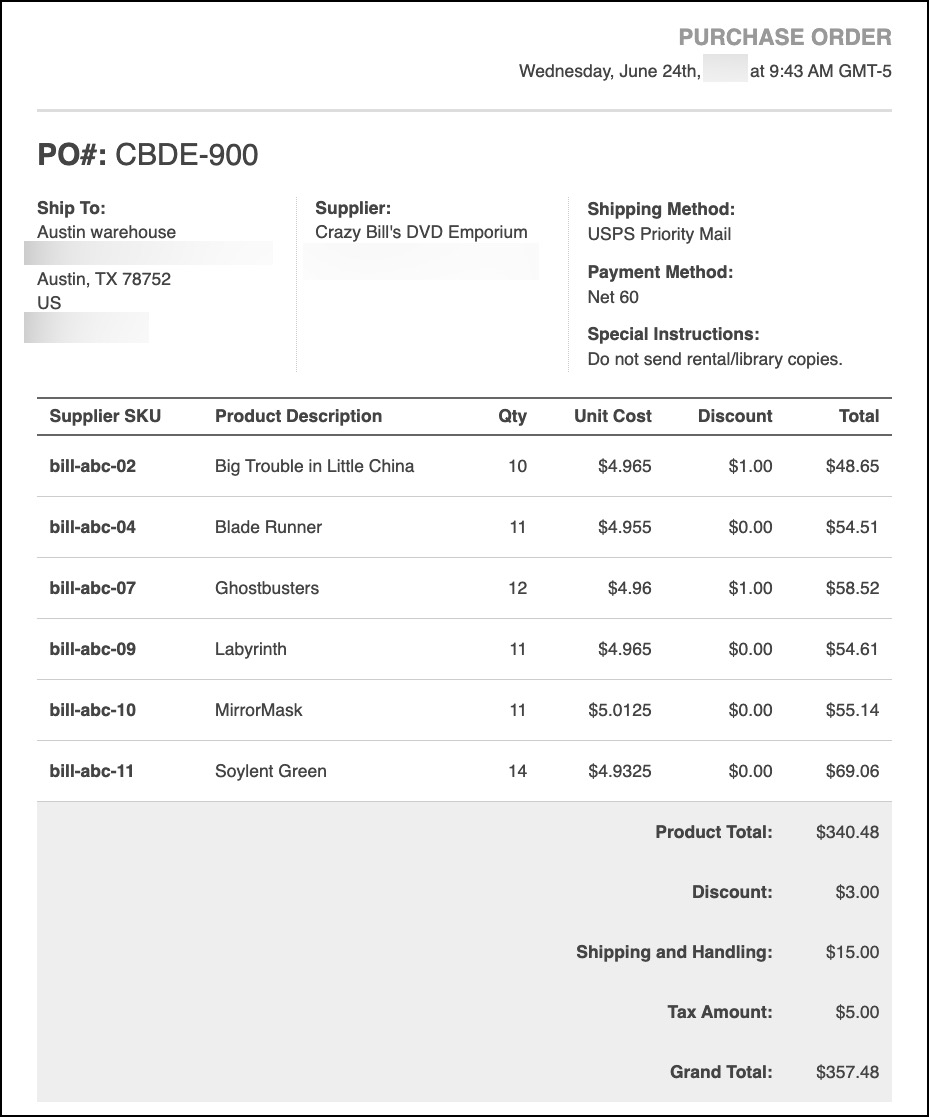
You can preview a PO before sending it to your supplier. You can also print the PO from the preview page.
- Go to the POs tab.
- Click the PO ID to open the PO Details page.
- Click Preview/Print PO.
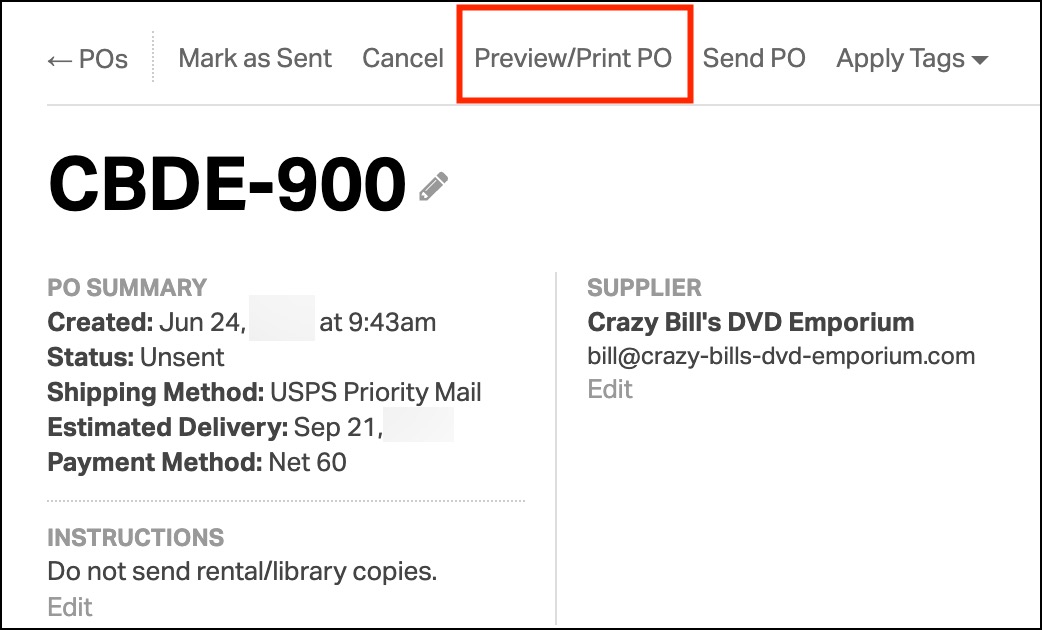
- A new browser tab will open with the PO preview.
- To print the PO, click the PDF attachment and select the printer icon.
When the PO is emailed, the supplier will receive a downloadable PDF attachment.
Update the Estimated Delivery Date
Once your supplier confirms the shipment’s arrival date, you can save it in Ordoro as the Estimated Delivery Date. This can help your team plan for receiving and restocking.
- Go to the POs tab.
- Click the PO ID to open the PO Details page.
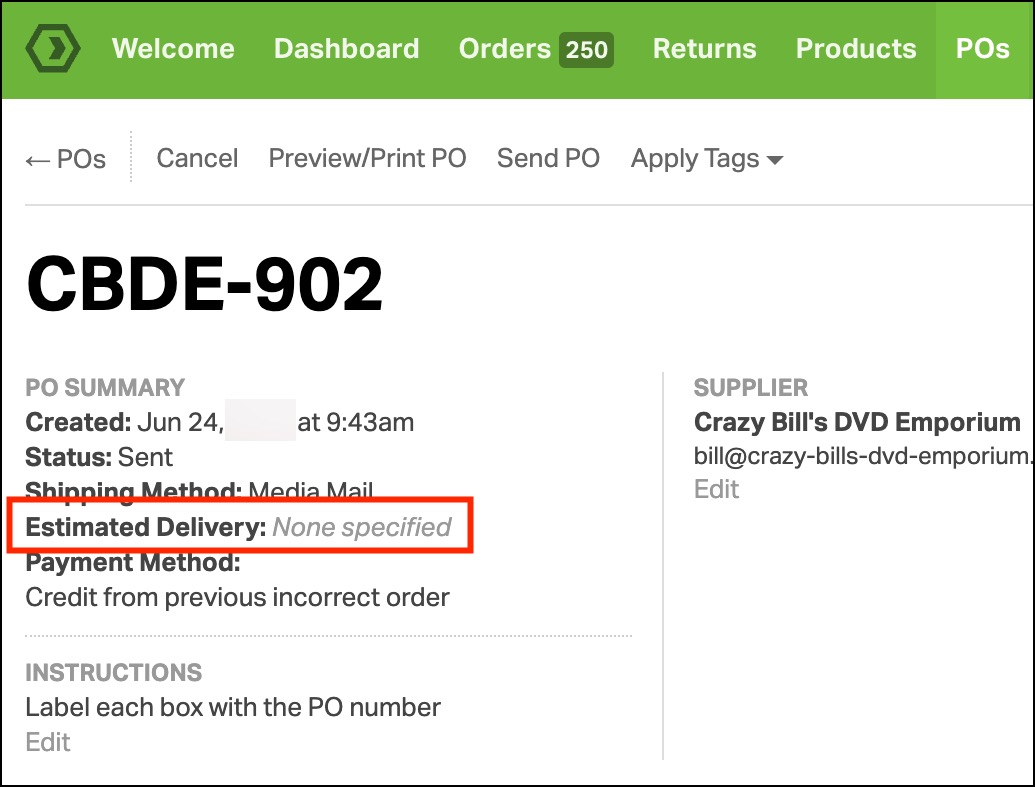
- In the Est. Delivery column, click None specified.
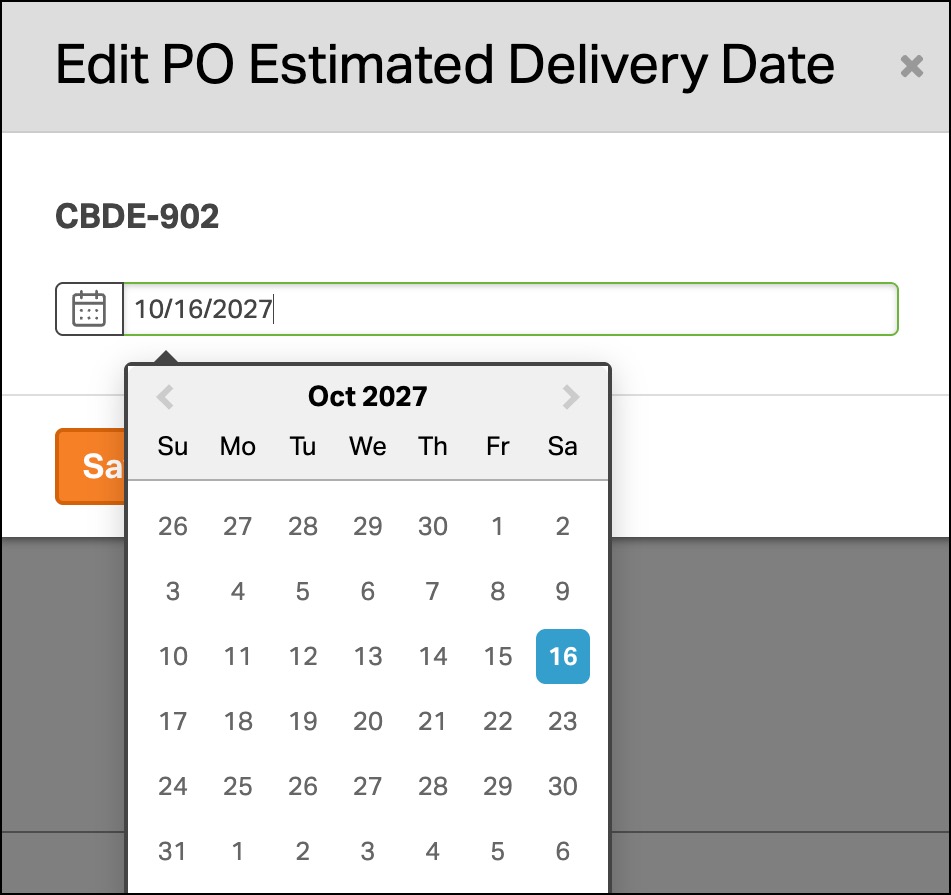
- Enter the expected delivery date.
- Click Save.
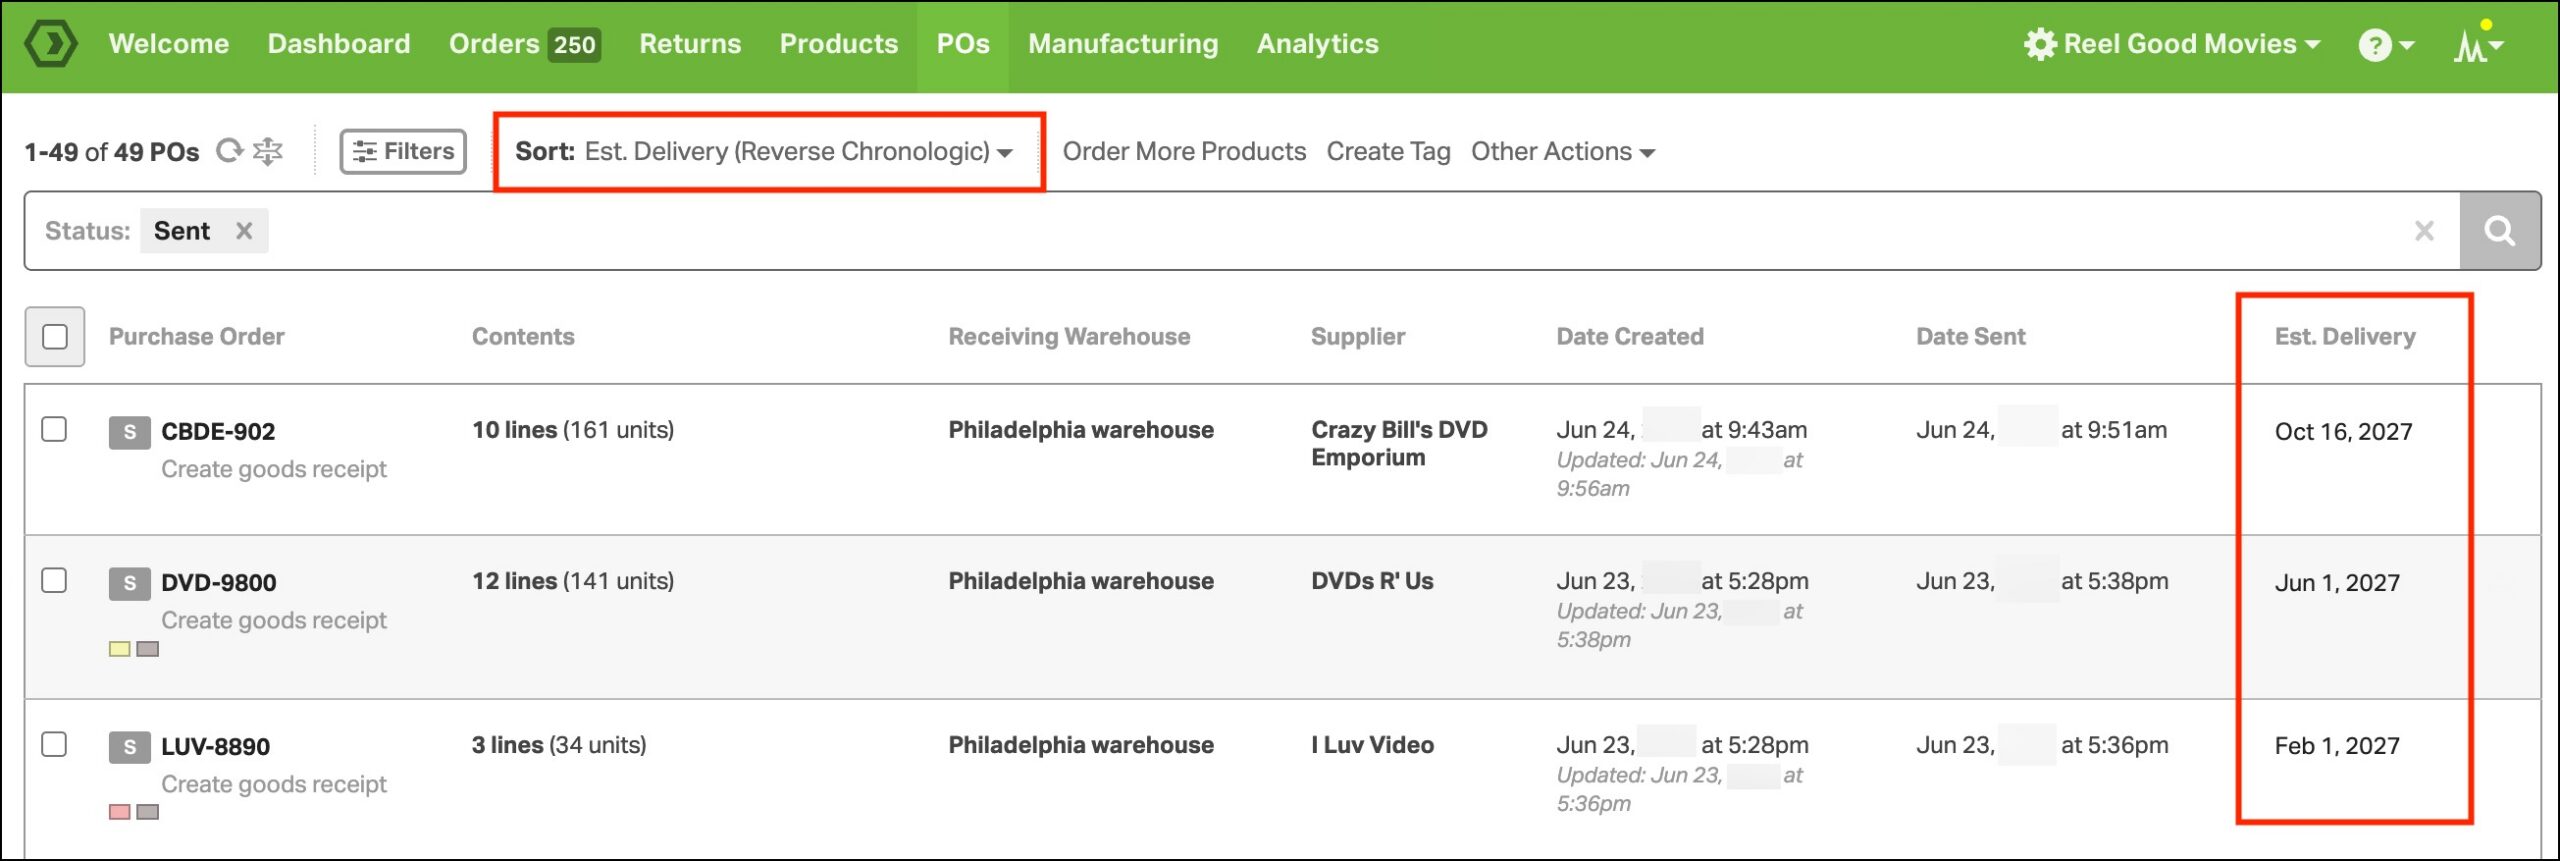
You can sort POs by the Estimated Delivery Date to see when they’re expected to arrive.
Receive inventory
When your supplier ships the items to you, you can create a Goods Receipt from the PO. The Goods Receipt records what was received and increases inventory quantities for the received products.
- Go to the PO Details page.
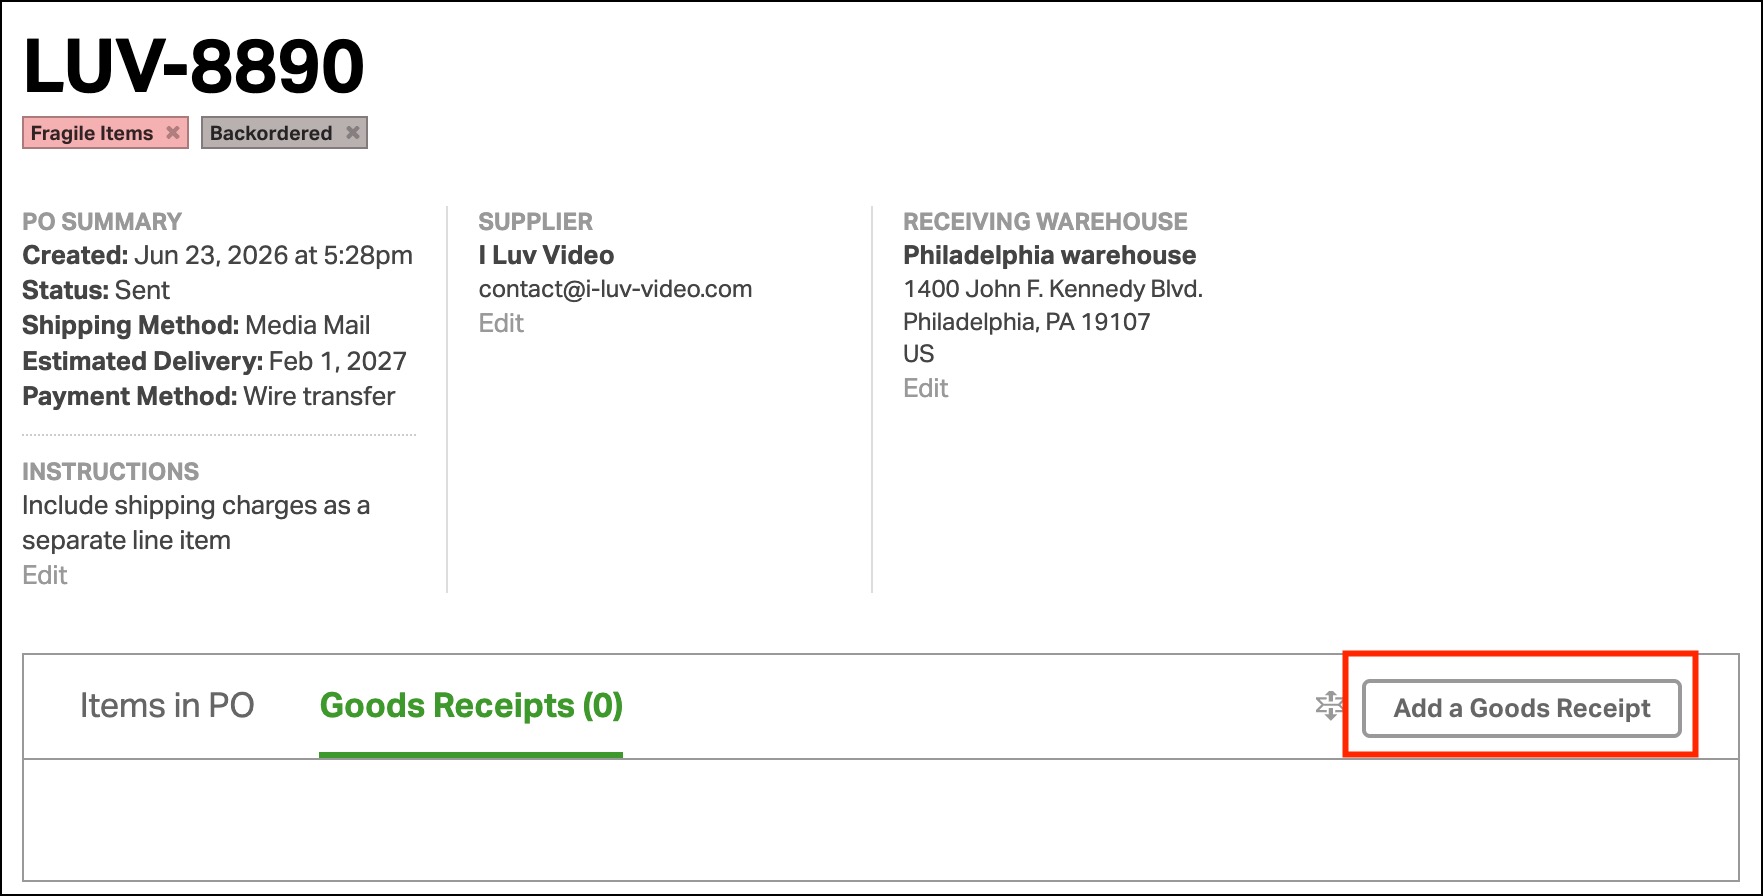
- Select the Goods Receipts tab.

- Click Add a Goods Receipt.
- Enter the quantity received for each product. You can either:
- Manually enter the quantity received
- Scan product barcodes and let Ordoro auto-fill the quantity. This article goes into more detail.
- Click Save.
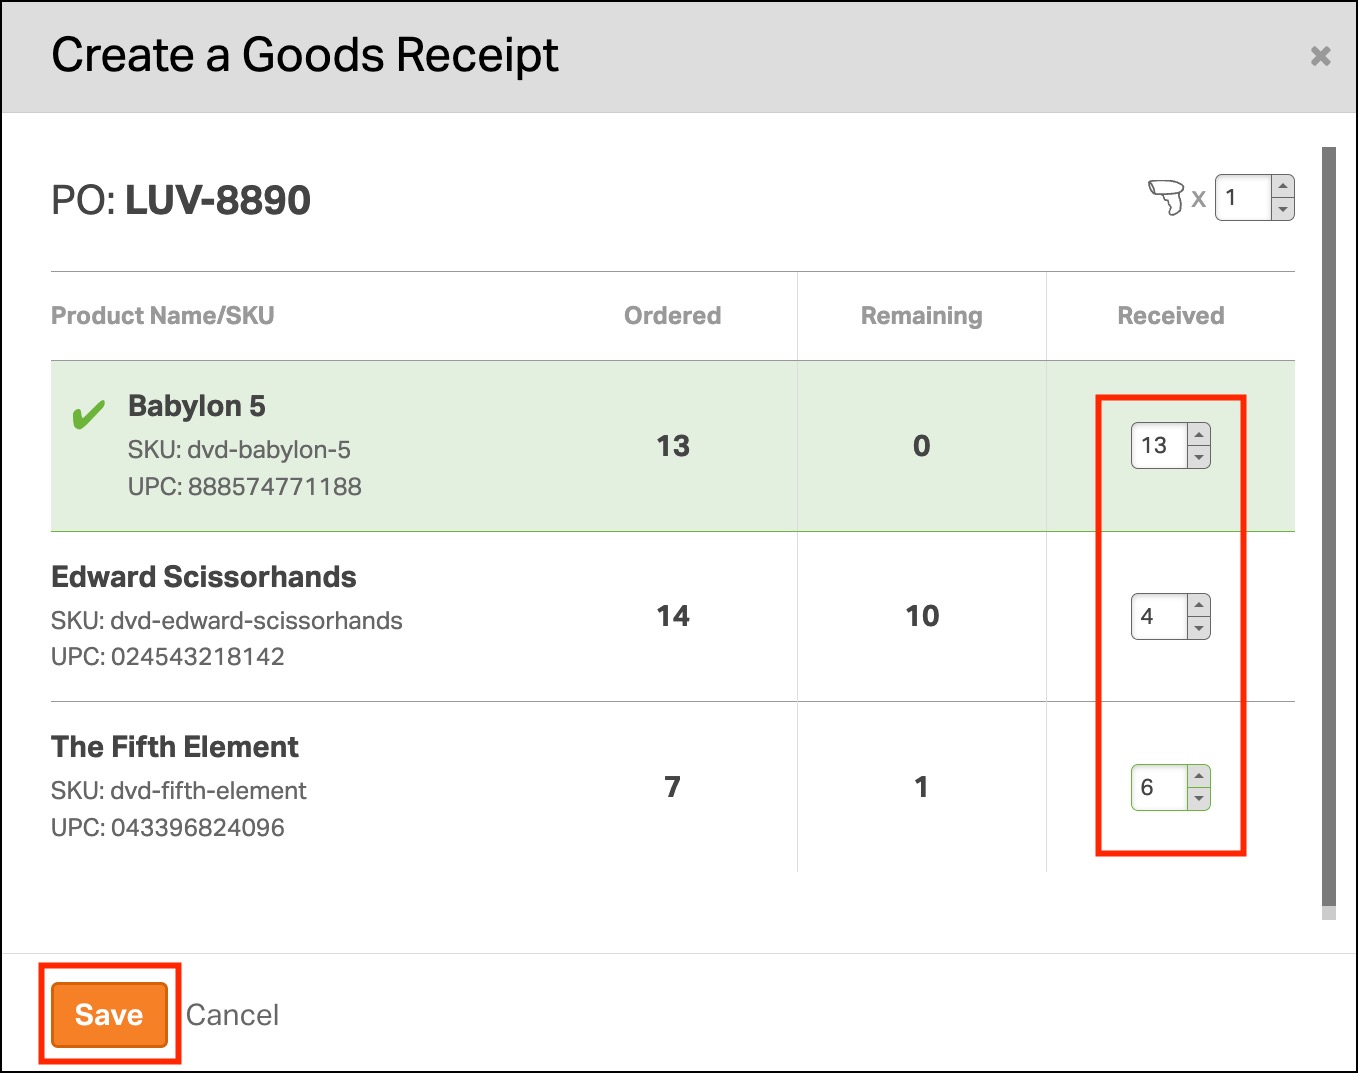
Once saved, Ordoro will increase the Physical On Hand quantities for the received products.
A Goods Receipt record will also be created. This record shows what was received, who received it and when. You can also add an Internal Note to the Goods Receipt.

Partial vs. fully received POs
If you receive only some of the ordered items, the PO status will change to Partial.
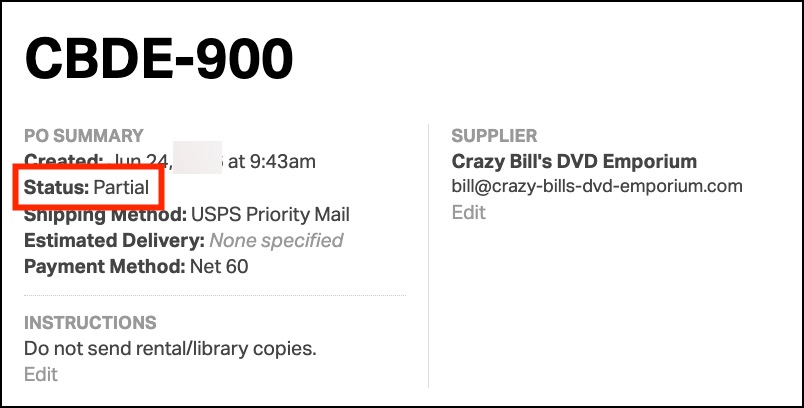
When the remaining items arrive, create another Goods Receipt and enter the quantities received.
Once all items on the PO have been received, the PO status will change to Received.

Supplier SKUs on saved Goods Receipts
After a Goods Receipt is created and saved, Ordoro will display Supplier SKUs alongside your internal product SKUs.

This can make it easier to compare the received inventory against your supplier’s packing slip, invoice, or other paperwork.
If the product does not have a Supplier SKU, Ordoro will display the product’s standard SKU instead.
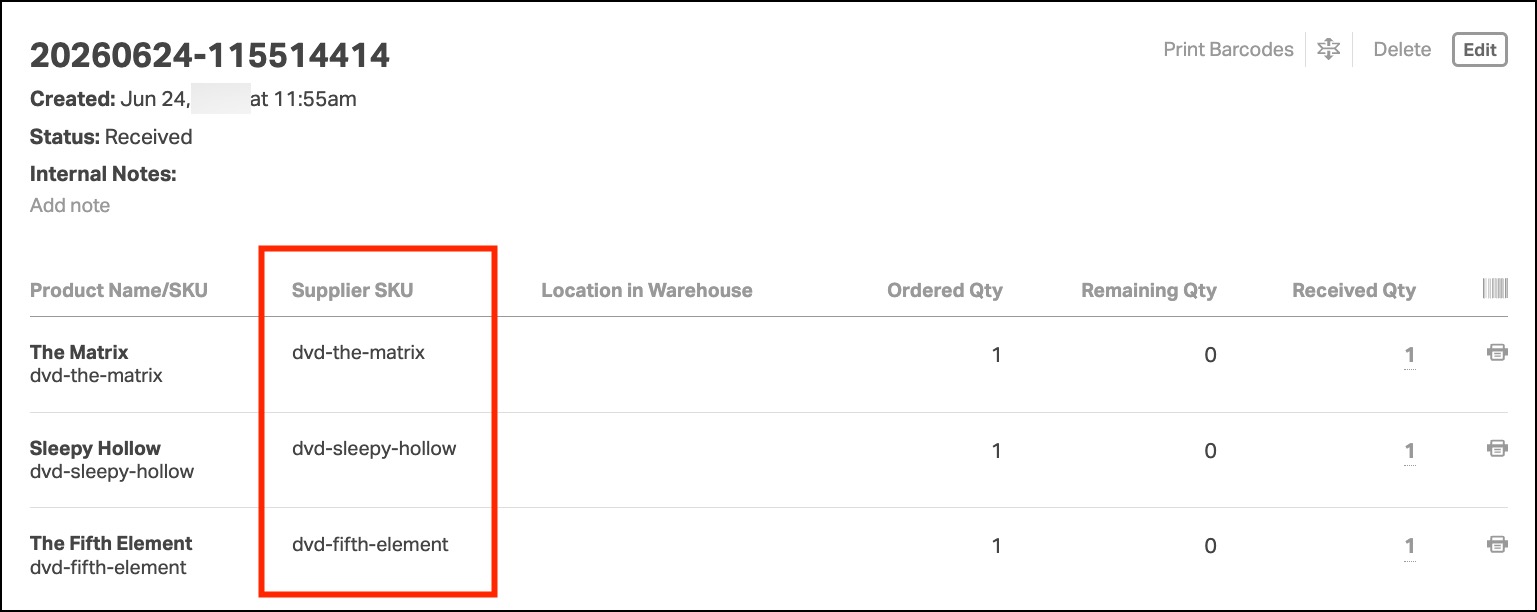
Notes:
- Supplier SKUs appear after the Goods Receipt has been saved.
- If a product is assigned to multiple suppliers, Ordoro will show the Supplier SKU for the supplier associated with the PO.
- This works for both partially received and fully received POs.
Print barcode labels from a Goods Receipt
After a Goods Receipt is created, you can print barcode labels directly from the Goods Receipts section of the PO.
You can print barcode labels for:
- The full Goods Receipt
- A single received product line
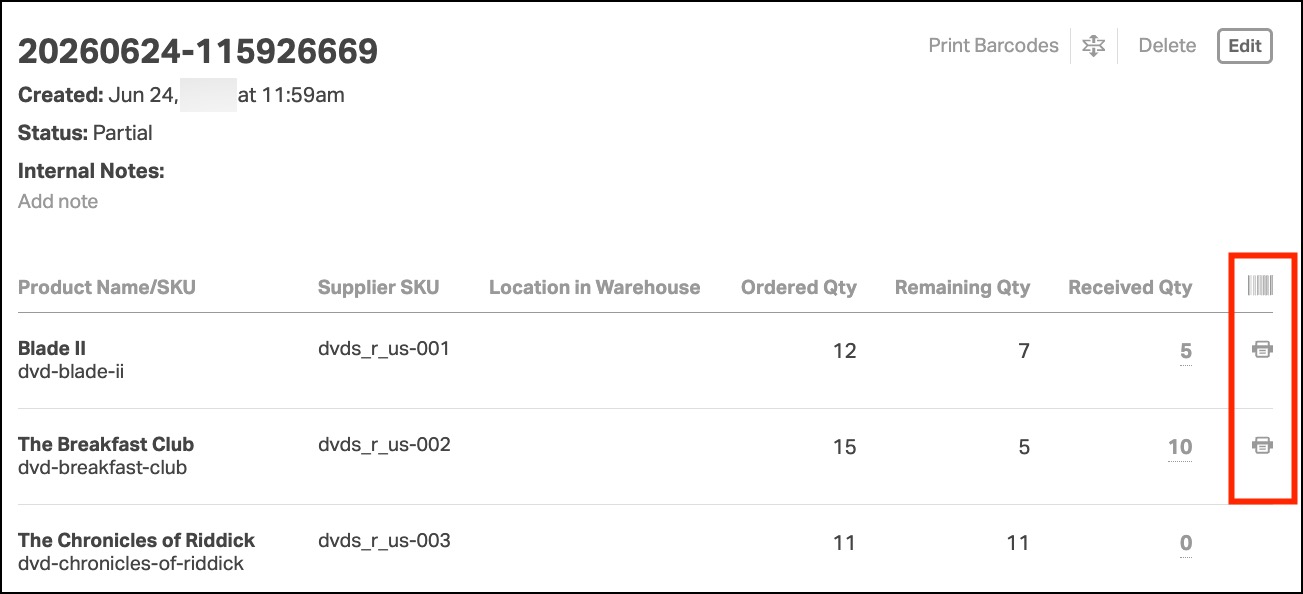
Barcode label quantities are based on the quantity received. For example:
- Imagine that 5 units of a product are received.
- In Ordoro, the No. of Copies is set to 2
- Then, Ordoro will generate 10 barcode labels for that product.

Products with a zero received quantity are not included when printing barcodes for the full Goods Receipt.
For detailed steps, see: How do I print barcode labels from a Goods Receipt?