
Stop rebuilding the same order filters every day. Saved Filters let you save your most-used Order List views so you can quickly get back to the orders you need.
Whether you are managing fulfillment queues, monitoring special order types, or helping teams stay aligned, Saved Filters can help you work faster and spend less time setting up filters.
Topics
- Why use Saved Filters?
- How to create a Saved Filter
- How to apply a Saved Filter
- How to edit or delete a Saved Filter
- Saved Filter permissions
- Real-world examples
Why use Saved Filters?
If you find yourself applying the same Order filters over and over, Saved Filters can save you time.
Instead of manually rebuilding filters every day or relying on browser bookmarks, you can save a filter directly inside Ordoro and access it anytime.
Some common examples include:
- Awaiting Fulfillment orders for a specific warehouse.
- Dropshipment Requested orders.
- Orders with certain tags or shipping priorities.
- Orders assigned to a specific user or workflow.
Saved Filters are saved at the company level, which means your team can access the same saved views across users and devices.
How to create a Saved Filter
Option 1: Save a filter from the Order List
- Navigate to the Orders page.
- Click the ••• button -> Save a Filter Set.

- Enter a name for the Filter Set.
- Apply the filters you want to save.
- Click Save Filter Set.

Your filter will now appear in the Saved Filters list for future use.

Option 2: Save a filter while using the Filters modal
- Navigate to the Orders page.
- Click Filters.
- Add your desired filters.
- Choose the option to Save and Apply.

- Enter a name for the filter.
- Click Save and Apply Filter Set.

How to apply a Saved Filter
- Navigate to the Orders page.
- Click ••• next to Filters.
- Select the Saved Filter you want to apply.
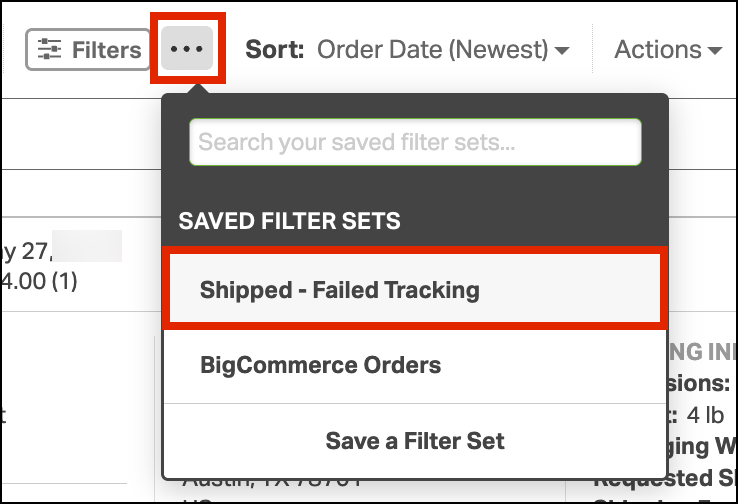
Ordoro will automatically apply those saved settings and update the Order List.
This makes it easy to jump between workflows without rebuilding filters each time.
How to edit or delete a Saved Filter
Need to make changes to an existing filter?
- Click ••• next to Filters.
- Find the filter you want to update.
- Choose the Edit icon to update the filter settings or rename it.

- Choose Delete to remove the filter.

Changes will be available to anyone using that Saved Filter.
Saved Filter permissions
Saved Filters include flexible permissions for growing teams.
Users with the appropriate user permissions can create and edit saved filters.

Other users can still apply and use approved Saved Filters in their daily workflow, but they may not be able to make changes.
This helps managers create consistent workflows while giving team members quick access to the order views they use most.
Real-world examples
Let’s say your business has a small fulfillment team managing several different order priorities throughout the day.
Instead of manually rebuilding filters every time the team switches tasks, you create Saved Filters for each workflow:
Morning Fulfillment Queue
- Order Status = Awaiting Fulfillment
- Warehouse = Austin
Your warehouse lead starts the day by opening this Saved Filter to see standard orders ready to ship.
VIP / Rush Orders
- Tagged = VIP
- Order Status = Awaiting Fulfillment
Customer service uses this filter throughout the day to quickly identify high-priority orders and make sure nothing urgent is missed.
Dropship Orders
- Order Status = Dropshipment Requested
- Supplier = Preferred Vendor
Your purchasing or operations team uses this view to stay on top of dropship workflows without sorting through standard fulfillment orders.
Problem Orders
- Address Validation = Failed
- Status = Awaiting Fulfillment
Support staff can quickly review orders needing attention before they delay shipping.
Because these Saved Filters are shared at the company level, everyone on the team works from the same approved views. That means fewer clicks, less confusion, and faster handoffs between teams.