If you keep your inventory in multiple locations, it’s essential to track how and when it’s transferred. Managing various warehouses allows you to have an agile supply chain. This ensures orders can ship in the fastest and most affordable way.
However, knowing which items to transfer, their transit status, and what was received can be challenging. Ordoro’s inventory transfer feature records transaction details and posts them to the Inventory Log for your reference.
Topics
- How to transfer inventory
- Inventory transfer options
- Transfer errors and warnings
- How transfers appear in the Inventory Log
How to transfer inventory
1. Prepare your shipment and send it to the receiving warehouse.
- You can determine which products to transfer by looking at the Low Stock Threshold or Low Inventory report.
2. Once the destination warehouse has received the items, they will record the quantities by following the steps below:
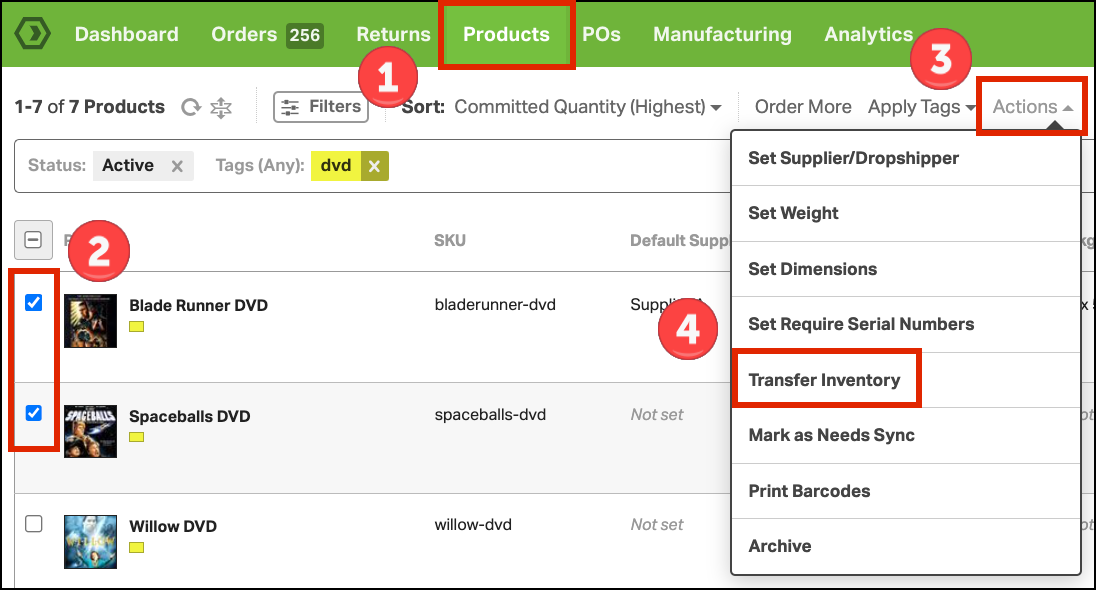
- On the Products tab, search and select the products to transfer.
- Note: If a kit is transferred, the component’s quantity updates per its kit ratio.
- Example:
- The kit product is a Beach Tennis Paddle Set. The component product is a Tennis Paddle, and the component quantity for the kit is two paddles. If 15 of the kit product are transferred, the component product’s quantity will increase by 30 (15 x 2 = 30 Tennis Paddles).
- Click Actions -> Transfer Inventory.
Inventory transfer options
After clicking Transfer Inventory, the following modal will appear:
1. Sending
- The origin warehouse where the inventory was stored.
- Quantities will be deducted from this location.
2. Receiving
- The receiving warehouse where inventory is being transferred.
- Quantities will be added to this location.
3. Transfer Notes
- Text field for general/board notes related to the transfer.
- Transfer notes populate in the Inventory Log as well.
4. Transfer Quantity
- The quantity to deduct from the Sending warehouse and add to the Receiving warehouse.
- The Committed and Physical On Hand quantities in both warehouses will dynamically change when the Transfer Quantity is entered.
- If you transfer more than you have available on hand, a warning will appear.
- See the Transfer errors and warning section for more details.
5. Line Notes
- Text field for notes specific to each product in the transfer.
- The notes populate in the Inventory Log as well.
6. Add a product to be transferred
- The way to enter additional products to transfer.
7. Transfer button
- Complete the transfer by clicking here.
- This reduces the inventory from the Sending warehouse and increases the Receiving warehouse.
Transfer errors and warning
1. Archived products
- Inventory transfers are available for active products.
- If an item is archived, you will see an error message preventing transfer.
2. Negative warehouse quantity
- If the Transfer Quantity is greater than your Available On Hand quantity, a warning will appear.
- The warning does not prevent the transfer. The inventory can still move to the Receiving warehouse.
How transfers appear in the Inventory Log
The Inventory Log tracks product actions in Ordoro. When an inventory transfer is completed, it’s recorded in the log. See this support article on how to export an Inventory Log.
Click the screenshot below to expand the image.
1. created_at
- The date and time of the transfer.
2. event_type
- This will be listed as inventory_transfer.
3. quantity
- The amount deducted from the Sending warehouse and increased in the Receiving warehouse.
4. user_name
- The user that completed the transfer in Ordoro.
5. sending_warehouse_name
- The selected Sending warehouse.
6. receiving_warehouse_name
- The selected Receiving warehouse.
7. transfer_notes
- The notes entered for the transfer. Corresponds to option 3 above.
8. line_notes
- The notes entered for the product line. Corresponds to option 5 above.