To ship your orders with UPS, Ordoro provides two options:

  1. Create a UPS account through Ordoro with discounted rates.
  2. Connect an existing UPS account.

This article describes how to get UPS connected to your Ordoro account.


Topics

  1. Create a UPS Discounted Rates account through Ordoro
  2. Connect your UPS Discounted Rates account to a UPS Profile
  3. Connect an existing UPS account to Ordoro
  4. Sample UPS invoice
  5. How UPS rates appear

Create a UPS Discounted Rates account through Ordoro

By creating a UPS account in Ordoro, you can ship your orders with Ordoro’s discounted rates.

When creating the account in Ordoro, two emails will be sent from UPS to connect the newly created account to UPS.com. This allows you to manage pickups and pay your bills online. (Note: invoices are emailed weekly.)

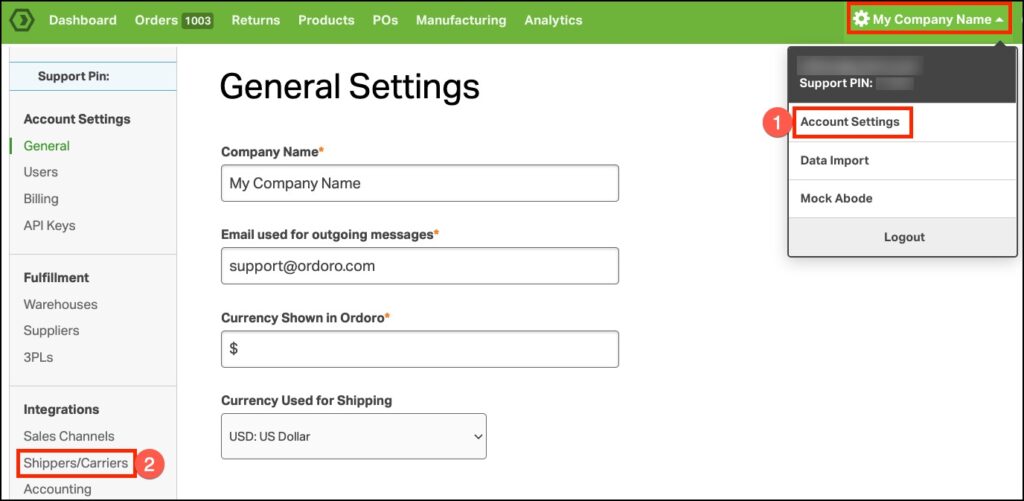
  1. Click on your Company Name in the top right corner. Select Account Settings.
  2. On the left, under Integrations, click Shippers/Carriers.

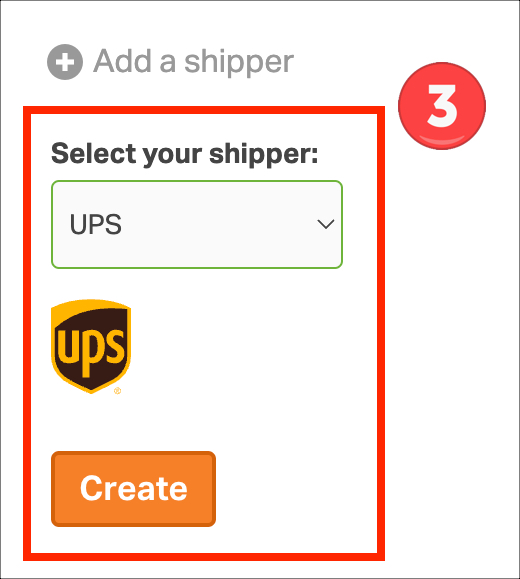
  1. Click Add a shipper and select UPS from the dropdown.
  2. Select New Account.
  3. Confirm the Billing Address for UPS Account is correct.
    • Click Edit to update the billing details if needed.
    • Important: Use an email address you can access, as vital information will be sent to connect the account to UPS.com for billing, etc.
    • This email is also used in the UPS.com step 8 below.
  4. Select the checkbox for I agree to the UPS Technology Agreement.
  5. Select the checkbox for I understand the UPS Prohibited Items List.
  6. Click Create.
  1. The account is created, and you can start shipping your orders with UPS!
    • Two emails will be sent immediately: one with your account number and another with a PIN.
    • Refer to the steps below to connect the newly created account to a UPS.com profile.

After your account is created, you’ll be able to reference the UPS account number if needed, by clicking Edit next to your newly created UPS®: Discounted Rates account :


Connect your UPS Discounted Rates account to a UPS Profile

After creating your UPS Discounted Rates account, follow the steps below to connect it to a UPS Profile.

  1. You will receive two emails from UPS:
    1. Your New UPS Account is Ready to Use
      • This includes your account number and additional details about your account.
    2. Your UPS Account Verification PIN
      • This includes a PIN to connect your newly created account to UPS.com to manage account settings, enable UPS pickup, and pay invoices.
      • The PIN will expire in 30 minutes.
  2. In the Your UPS Account Verification PIN email, click on Add Account to Profile.

  1. There are two options:
    • If you have an existing UPS.com account, enter your Email/Username + Password, and click Log In.
    • If you are new to UPS.com, click Create a UPS Username and set up the account.

  1. Once logged into your UPS.com account, click on the circle in the top right and select Accounts and Payment.
  1. Select Add Existing Account -> Add.

  1. Enter the following data, then click on Next:
    • Payment Account Type -> Documents and Packages.
    • Account Number
    • Nickname (this can be whatever you choose)
    • Country
    • Postal Code for Pickup Address

  1. Select PIN Verification -> Next.

  1. Enter the following data, then click Next:
    • PIN Availability -> I already have a PIN.
      • If the PIN has expired or you can’t find it, select I need to request a PIN instead.
      • UPS will email you a new PIN that will expire in 30 minutes.
    • Email Associated to the Account: Enter the email provided in step 5 when creating the account in Ordoro.
    • PIN: Enter the PIN you received in an email at step 1.

  1. The account will now be associated with your UPS.com profile.

FAQs

  • UPS bills weekly for the labels created in Ordoro with this account.
  • UPS Discounted Rate accounts are meant for Ordoro use only and will not be compatible with other UPS services, like UPS Worldship.

Connect an existing UPS account to Ordoro

You’ll need a recent UPS invoice and your account number to connect an existing UPS account. See more details below.

  1. Click on your Company Name in the top right corner. Select Account Settings.
  2. On the left, under Integrations, click Shippers/Carriers.
  3. Click Add a shipper -> select UPS from the dropdown.
  4. Select Existing Account.
  5. Enter your UPS Account number.
  6. Confirm that the Billing Address for UPS Account information matches the UPS billing address on your invoice.
    • If the Company Name and address do not match your UPS billing address, click the Edit button to update.
    • Do not include the +4 digit extended zip code in this address.

  1. Select the checkbox for I have received an invoice from UPS.
    • Use an invoice from at least the last 90 days and its information.
    • Ideally, use an invoice at least 2-3 weeks old.
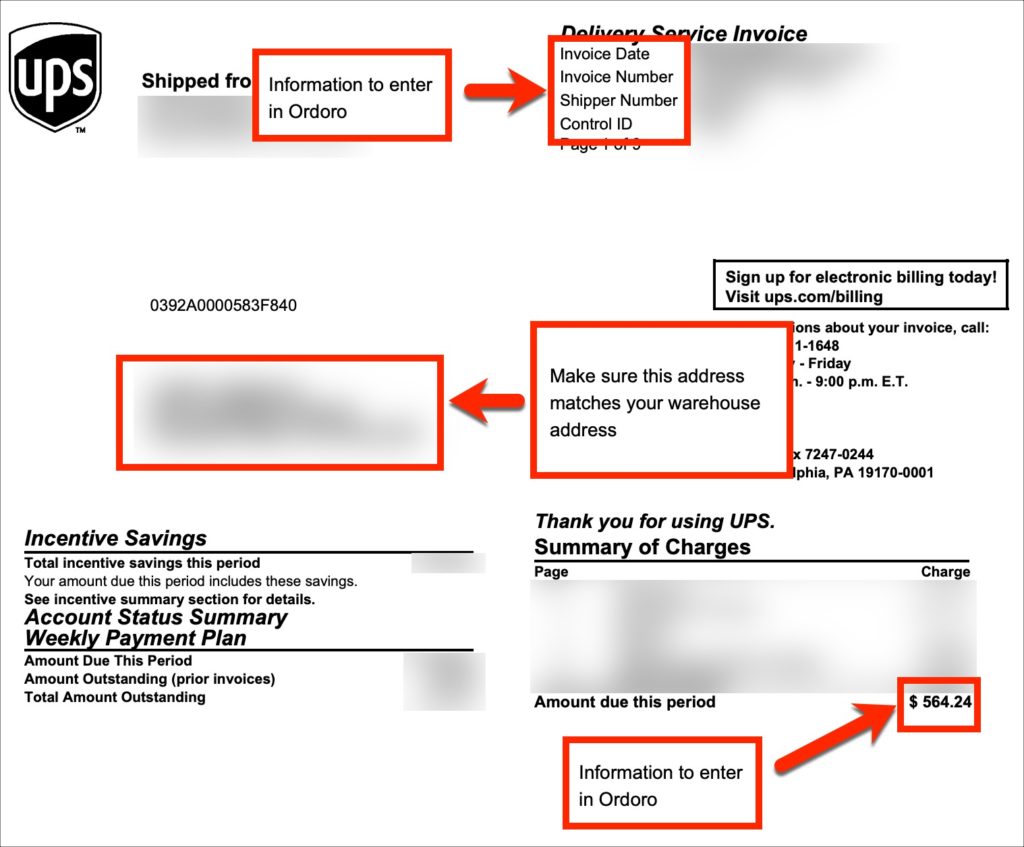
    • See the Sample UPS invoice for extra help.
  1. Key in the Invoice Number.
  2. Select the Invoice Date.
  3. Enter the Control ID.
  4. Enter the Total charges from this period.
  5. Select I agree to the UPS Technology Agreement.
  6. Click on Authorize.

  • Warning: if you attempt to create a UPS account and received errors three times within an hour, your UPS account will be locked out for 24 hours.
  • Feel free to contact support@ordoro.com if you see any errors.


Sample UPS invoice

Sample UPS invoice for reference. Click on the image to expand.

How UPS rates appear

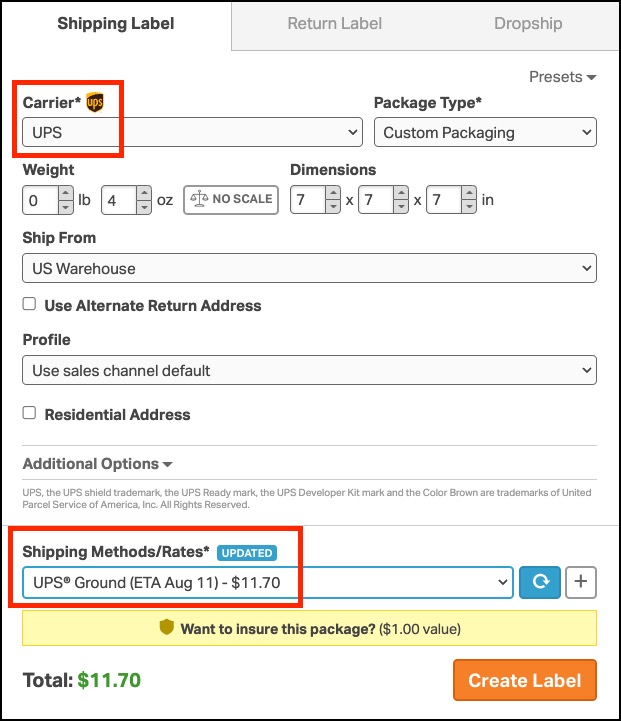
Once UPS has been added, you’ll see Ordoro’s discounted rates or your negotiated UPS rates when creating a shipping label.
Leave a Reply

Your email address will not be published. Required fields are marked *